T015_SetUp_Printer
【ArmPos Hospitality Tutorial】 課程編號: 92f3f51d-78fb-4f87-b770-3839a40e98d2 ----------- 此講義目錄 : https://aclasarmpos.blogspot.com/p/armpos-internal-tutorial.html 此講義YouTube PlayList : ArmPos Hospitality Tutorial(All) https://youtube.com/playlist?list=PLGa5Tzn6r8qHGqXwzy0_i4JAi21sl37u_ ArmPos Hospitality Tutorial(Internal) https://youtube.com/playlist?list=PLGa5Tzn6r8qHhvRh9-tuS3xpQgwMcz9Kp ArmPos Hospitality Tutorial(Customer) https://youtube.com/playlist?list=PLGa5Tzn6r8qFIcfl2r0Jd2lpnYw_5_ve5 SampleFile : https://drive.google.com/drive/folders/1FQKoWkFSMrNrEMN4Gdv6ECMygtHsgg54?usp=sharing ----------- 講義部落格 : https://aclasarmpos.blogspot.com/ Youtube PlayList : https://www.youtube.com/channel/UCyvy6XeA1tS73JpJtjlaRTQ/playlists ================================ ---------------------------- Internal Training : All Customer Training : None ---------------------------- 內部工作人員設定Printer ---------------------------- T015_SetUp_Printer T015_01_Hardware_ConnectToPrinter (1.) T015_02_Armpos_PrinterSetup (2.)
================================ 1. Connect to Printer(Hardware) 2. Printer Setup(Armpos) ================================
================================
1. Connect to Printer(Hardware)
-------------------------------------------------------------------------------------------------------------------------------------------------
Connect to Printer(Hardware)
-------------------------------------------------------------------------------------------------------------------------------------------------
1.
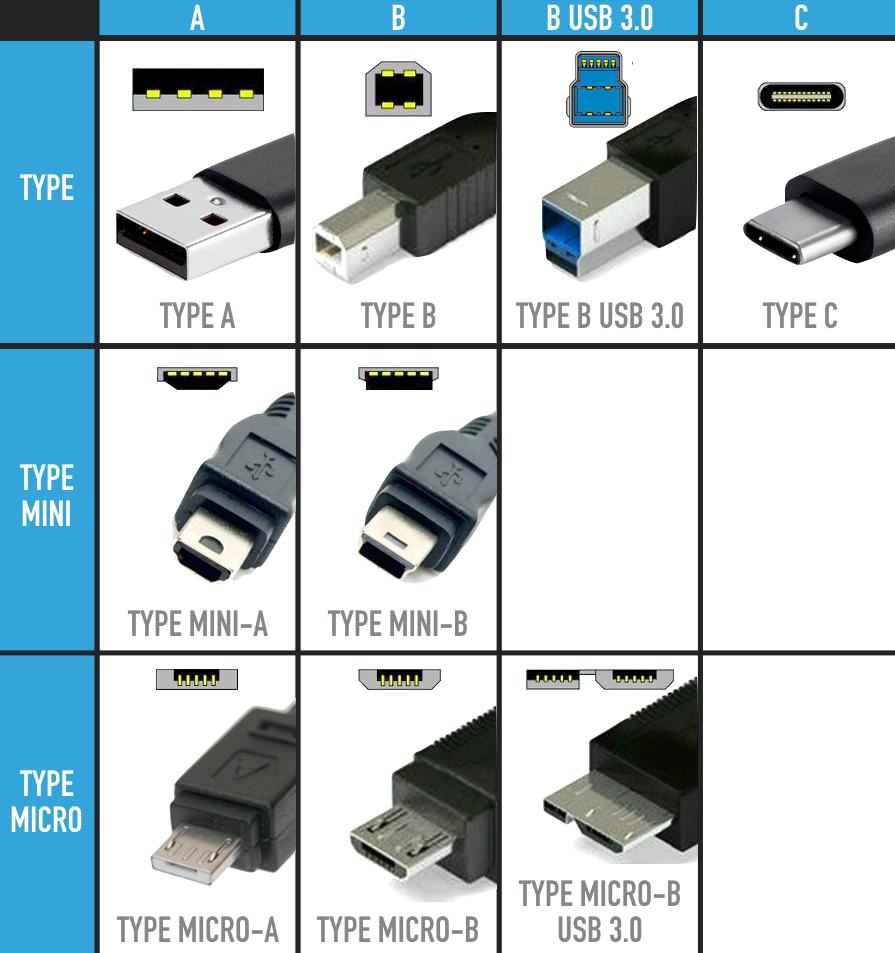
Cable
----------------------------------------------
Reference: https://www.reddit.com/r/coolguides/comments/5zvu1w/i_redrew_the_usb_types_guide/
UsbType.png
----------------------------------------------
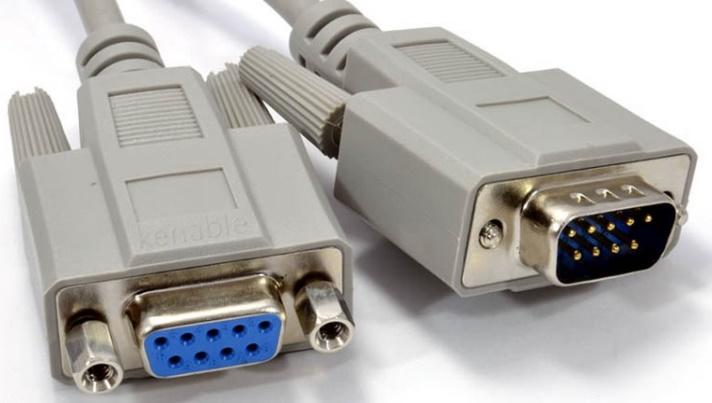
Reference: https://behind-the-scenes.net/using-serial-ports-for-communication/
SerialPort.jpg

----------------------------------------------
Reference: https://www.linortek.com/store/rj45-internet-cable/
Rj45InternetCable.jpg

------------------------------------------------------------------------------------------------------------------------------------
2.
Connect the Printer
There are 3 ways to connect the "Printer"
-------------------------------------------------------------------------------------------------------------------------
2.1.
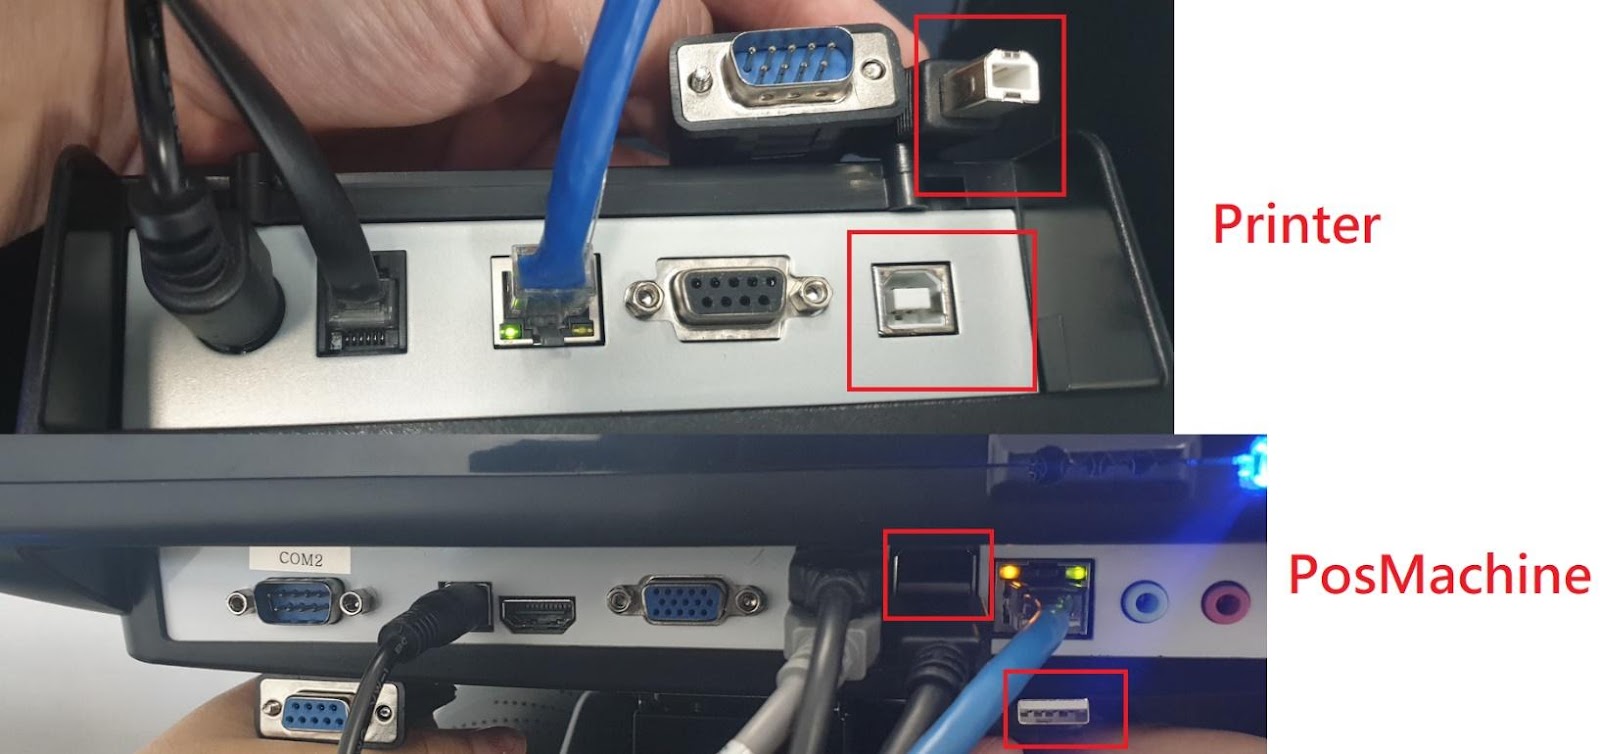
1stWay - Connect by "UsbTypeBMale-UsbTypeAMale" cable.
"UsbTypeBMale" should connect to "Printer".
"UsbTypeAMale" should connect to "PosMachine".
-----------
In this case, you need to install the "driver" to the "PosMachine".
If you use
2ndWay - Connect by "SerialPortMale-SerialPortFemale" cable.
3rdWay - Connect by "Rj45InternetCable".
Then you don't need to install "driver".
Therefore, we don't recommend to use
1stWay - Connect by "UsbTypeBMale-UsbTypeAMale" cable.
-----------
Each "Printer" has different "Driver",
so I will not demonstrate how to install the "Drive" in this tutorial.
-----------
We don't recommend to use "USBPrinter",
unless the "PosMachine" has included the "BuiltInPrinter".
The response speed of "USBPrinter" is a bit too slow and hard to maintain.
----------------------------------------------

----------------------------------------------
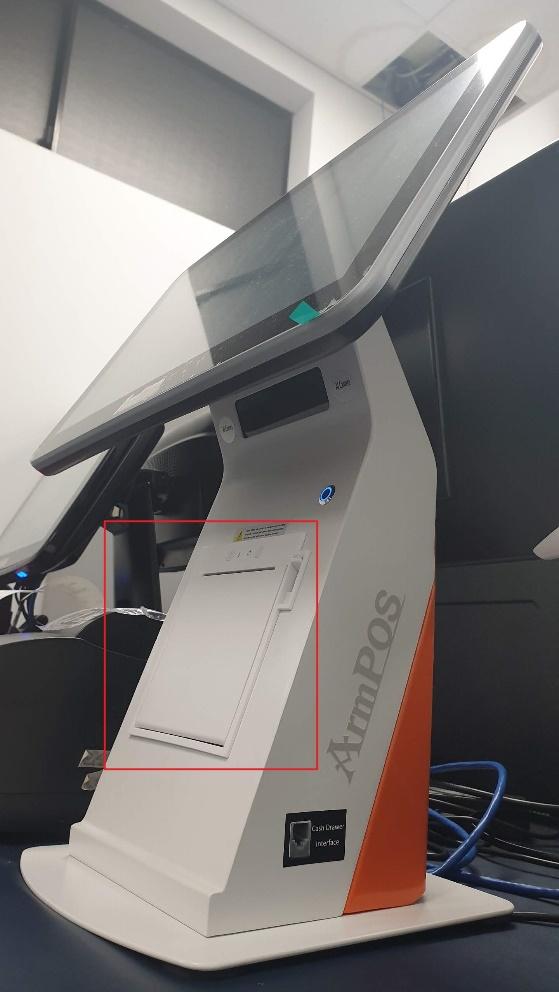
Some of our "PosMachine" has included the "BuiltInPrinter".
In this case, you need to install the "Driver" to use the "BuiltInPrinter".
Each "Printer" has different "Drivers",
so I will not demonstrate how to install the "Drive" in this tutorial.
-------------------------------------------------------------------------------------------------------------------------
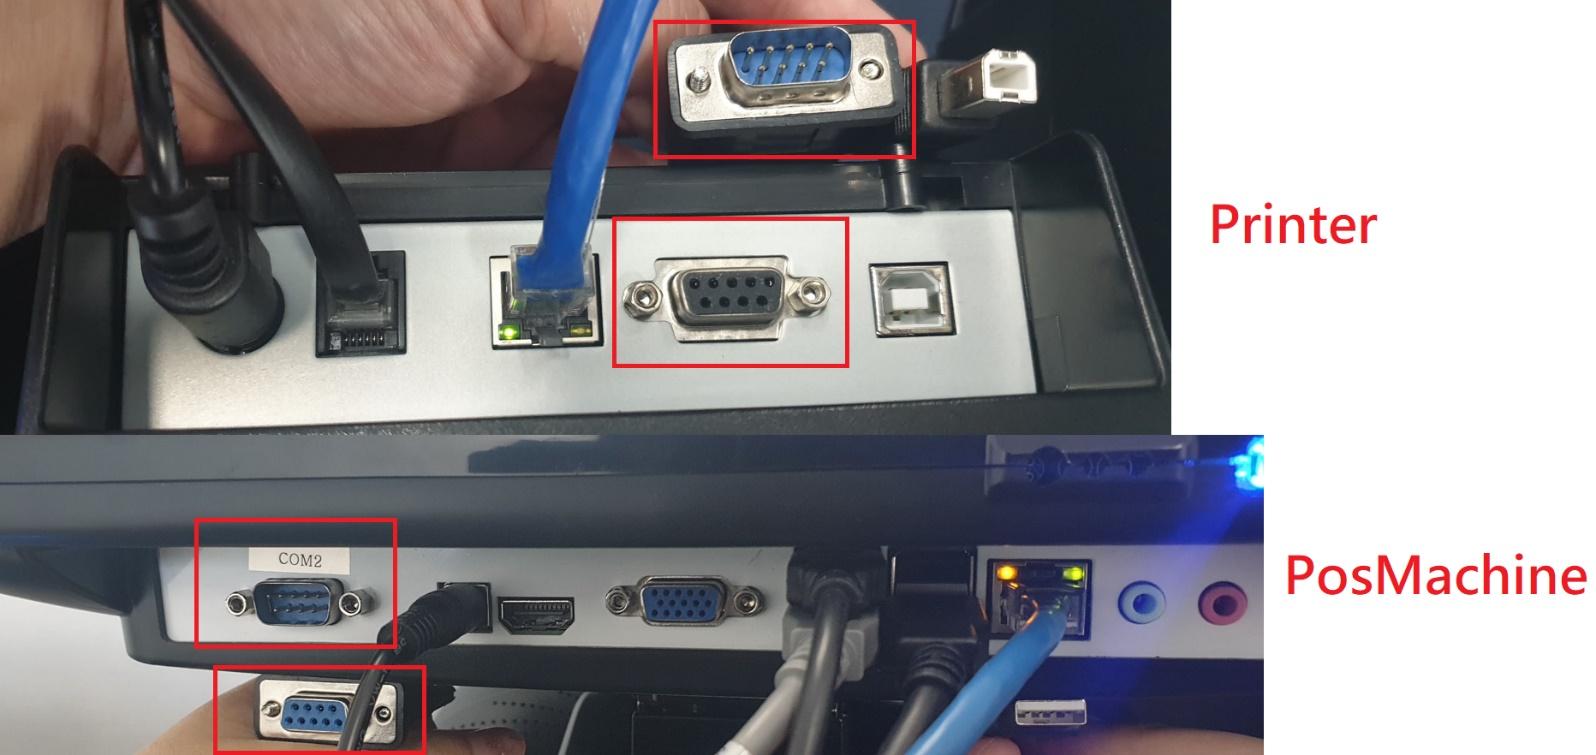
2.2.
2ndWay - Connect by "SerialPortMale-SerialPortFemale" cable.
"SerialPortMale" should connect to "Printer".
"SerialPortFemale" should connect to "PosMachine".
In my case, "SerialPortFemale" was connected to "PosMachine-COM2".
-----------
If the customer only buy only one "PosMachine" without buying "KDS, Printers, SelfOrderServiceOnline...etc",
we usually sell the "PosMachine" which has included the "BuiltInPrinter",
or we normally sell the "SerialPortPrinter"
----------------------------------------------
-------------------------------------------------------------------------------------------------------------------------
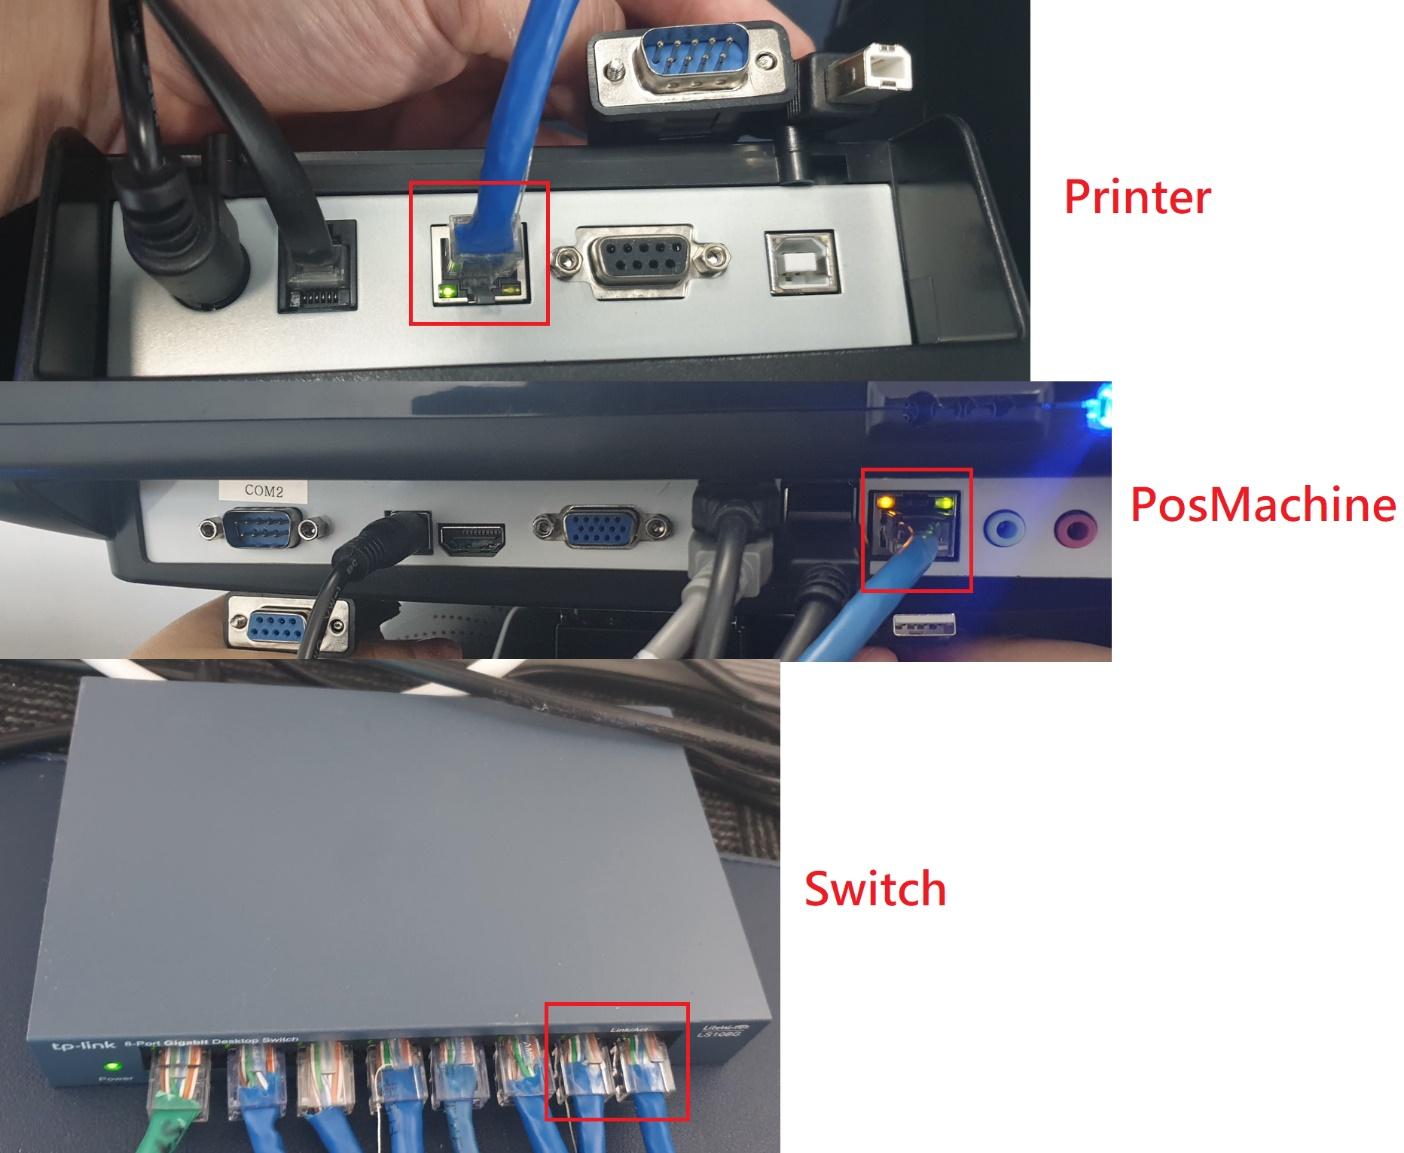
2.3.
3rdWay - Connect by "Rj45InternetCable".
"PosMachine" should connect to the "Switch" via "Rj45InternetCable".
"Printer" should connect to the "Switch" via "Rj45InternetCable".
-----------
Please note that you don't need "InternetConnection",
all you need is to connect all "Devices" to the "Switch"
in order to have a "LocalAreaNetwork"(LAN)
-----------
If the customer buy "PosMachine, KDS, Printers, SelfOrderServiceOnline...etc",
we normally connect all devices to the "Switch" in order to have a "LocalAreaNetwork"(LAN)
----------------------------------------------
------------------------------------------------------------------------------------------------------------------------------------
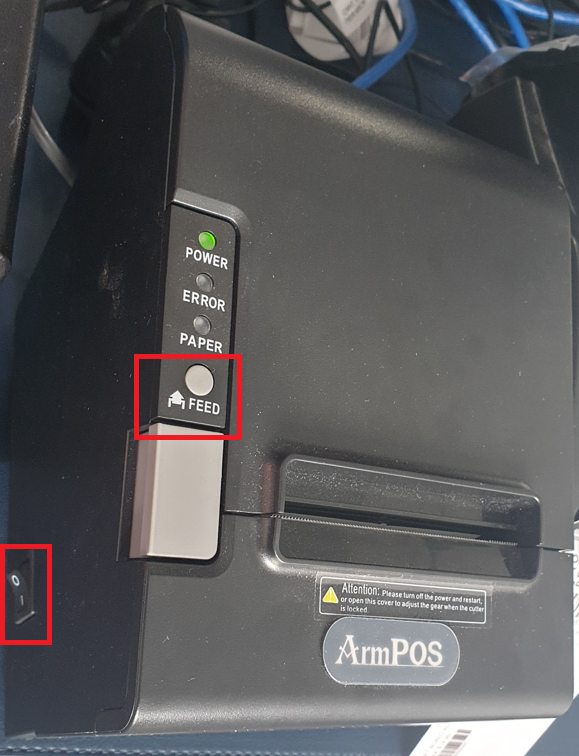
3.
SelfTestingPage
----------------------------------------------
Please turn off the "Printer",
and then hold the "Feed" button and turn on the "Printer".
Continue to hold the "Feed" button for "8 Seconds"
It will print out the "SelfTestingPage".
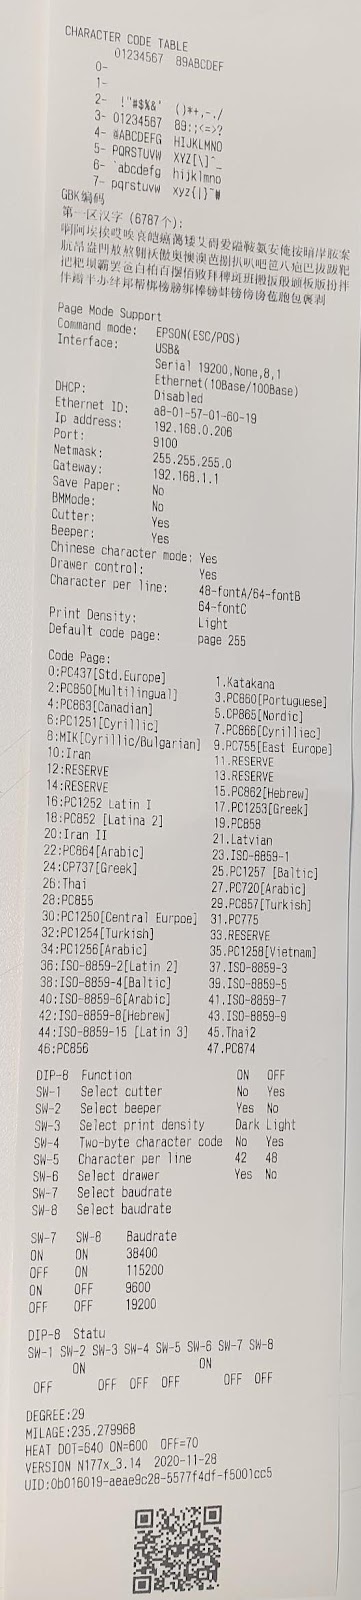
Please check the "BaudRate" and "IpAddress" of the "Printer"
-----------
After you knew your printer "IpAddress"
You should use the specific software to set up a new "ConstantIpAddress"(固定IP)
You should also use the specific software to set up the language of the "Printer".
Each "Printer" has different specific softwares.
so I will not demonstrate how to use this specific softeare in this tutorial.
-----------
In my case,
the "SelfTestingPage" indicate the "BaudRate" is "19200"
"IpAddress" of the "Reception" is "192.168.0.209".
"Kitchen" of the "Reception" is "192.168.0.207".
"KitchenWindow" of the "Reception" is "192.168.0.205".
----------------------------------------------
----------------------------------------------

-------------------------------------------------------------------------------------------------------------------------------------------------
2. Printer Setup(Armpos)
-------------------------------------------------------------------------------------------------------------------------------------------------
Printer Setup(Armpos)
-------------------------------------------------------------------------------------------------------------------------------------------------
1.
Printer Setup(Armpos)
-------------------------------------------------------------------------------------------------------------------------
1.1.
C:\Program Files (x86)\CYEcrPC\PrinterConfig.xml
----------------------------------------------
<?xml version="1.0" standalone="yes"?>
<DocumentElement>
<CYPRN>
<PRN_NO>0</PRN_NO>
<PRN_NAME>not print</PRN_NAME>
<PRN_TYPE />
<PRN_IP>none</PRN_IP>
<PRN_BAUDRATE>0</PRN_BAUDRATE>
<PRN_CUT>false</PRN_CUT>
<PRN_SPLIT>false</PRN_SPLIT>
<PRN_ID>0</PRN_ID>
<USER_NAME />
<PRN_BEEP>false</PRN_BEEP>
<PRN_MESSAGE>false</PRN_MESSAGE>
</CYPRN>
<CYPRN>
<PRN_NO>1</PRN_NO>
<PRN_NAME>Rception</PRN_NAME>
<PRN_TYPE>GP-80250</PRN_TYPE>
<PRN_IP>192.168.0.209</PRN_IP>
<PRN_BAUDRATE>0</PRN_BAUDRATE>
<PRN_CUT>true</PRN_CUT>
<PRN_SPLIT>false</PRN_SPLIT>
<PRN_ID>0</PRN_ID>
<USER_NAME>ADMIN</USER_NAME>
<PRN_BEEP>false</PRN_BEEP>
<PRN_MESSAGE>true</PRN_MESSAGE>
</CYPRN>
<CYPRN>
<PRN_NO>2</PRN_NO>
<PRN_NAME>Kitchen</PRN_NAME>
<PRN_TYPE>GP-80250</PRN_TYPE>
<PRN_IP>192.168.0.207</PRN_IP>
<PRN_BAUDRATE>0</PRN_BAUDRATE>
<PRN_CUT>true</PRN_CUT>
<PRN_SPLIT>false</PRN_SPLIT>
<PRN_ID>0</PRN_ID>
<USER_NAME>ADMIN</USER_NAME>
<PRN_BEEP>false</PRN_BEEP>
<PRN_MESSAGE>true</PRN_MESSAGE>
</CYPRN>
<CYPRN>
<PRN_NO>3</PRN_NO>
<PRN_NAME>KitchenWindow</PRN_NAME>
<PRN_TYPE>GP-80250</PRN_TYPE>
<PRN_IP>192.168.0.205</PRN_IP>
<PRN_BAUDRATE>0</PRN_BAUDRATE>
<PRN_CUT>true</PRN_CUT>
<PRN_SPLIT>false</PRN_SPLIT>
<PRN_ID>0</PRN_ID>
<USER_NAME>ADMIN</USER_NAME>
<PRN_BEEP>false</PRN_BEEP>
<PRN_MESSAGE>true</PRN_MESSAGE>
</CYPRN>
</DocumentElement>
-------------------------------------------------------------------------------------------------------------------------
1.2.
PrinterOptions
----------------------------------------------


------------------------------------------------------------------------------------------------------------------------------------
2.
Connect the Printer
There are 3 ways to connect the "Printer"
-------------------------------------------------------------------------------------------------------------------------
2.1.
1stWay - Connect by "UsbTypeBMale-UsbTypeAMale" cable.
"UsbTypeBMale" should connect to "Printer".
"UsbTypeAMale" should connect to "PosMachine".
----------------------------------------------
----------------------------------------------
Some of our "PosMachine" has included the "BuiltInPrinter".
----------------------------------------------
2ndPrinter
Driver Print
E.g.
Printer Code : Auto Generated.
Printer name : POS80v2.0
Printer Type : Driver Print
Printer interface : USB
BaudRate : 0
"DriverPrinter" can not set up "AutoCut" and "Beep".
Print Message : True
Auto Cut : False
----------------------------


-------------------------------------------------------------------------------------------------------------------------
2.2.
2ndWay - Connect by "SerialPortMale-SerialPortFemale" cable.
"SerialPortMale" should connect to "Printer".
"SerialPortFemale" should connect to "PosMachine".
In my case, "SerialPortFemale" was connected to "PosMachine-COM2".
----------------------------------------------

----------------------------------------------
SelfTestingPage
-----------
Please turn off the "Printer",
and then hold the "Feed" button and turn on the "Printer".
Continue to hold the "Feed" button for "8 Seconds"
It will print out the "SelfTestingPage".
Please check the "BaudRate" and "IpAddress" of the "Printer"
----------------------------------------------
----------------------------------------------
2ndPrinter
Serial Port Print
E.g.
Printer Code : Auto Generated.
Printer name : Rception
Printer Type : "GP-80250"
PS: "GP-80250" is a popular printer for "ArmposHospitality".
Printer interface : Com2
PS: "Printer interface" might be "Com1or2" depending on your which serial port you have connected.
BaudRate : 19200
PS: "BaudRate" is depending on your "SelfTestingPage"
Auto Cut : True
Print Message : True
Auto Split : False
Beep : False
----------------------------

-------------------------------------------------------------------------------------------------------------------------
2.3.
3rdWay - Connect by "Rj45InternetCable".
All you need is to connect all "Devices" to the "Switch"
in order to have a "LocalAreaNetwork"(LAN)
----------------------------------------------
----------------------------------------------
SelfTestingPage
-----------
Please turn off the "Printer",
and then hold the "Feed" button and turn on the "Printer".
Continue to hold the "Feed" button for "8 Seconds"
It will print out the "SelfTestingPage".
Please check the "BaudRate" and "IpAddress" of the "Printer"
----------------------------------------------
----------------------------------------------
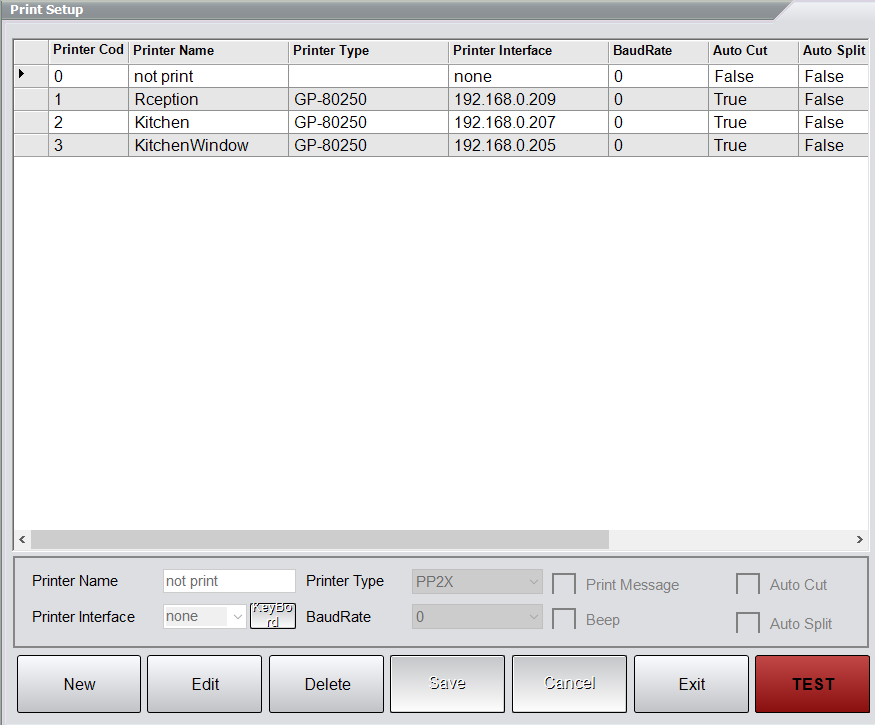
Please add the following "printers"
----------------------------
2ndPrinter
RJ45 Internet Cable Print
E.g.
Printer Code : Auto Generated.
Printer name : Rception
Printer Type : "GP-80250"
PS: "GP-80250" is a popular printer for "ArmposHospitality".
Printer interface : 192.168.0.209
BaudRate : 0
Auto Cut : True
Print Message : True
Auto Split : False
Beep : False
----------------------------
3rdPrinter
RJ45 Internet Cable Print
E.g.
Printer Code : Auto Generated.
Printer name : Kitchen
Printer Type : "GP-80250"
PS: "GP-80250" is a popular printer for "ArmposHospitality".
Printer interface : 192.168.0.207
BaudRate : 0
Auto Cut : True
Print Message : True
Auto Split : False
Beep : False
----------------------------
4thPrinter
RJ45 Internet Cable Print
E.g.
Printer Code : Auto Generated.
Printer name : KitchenWindow
Printer Type : "GP-80250"
PS: "GP-80250" is a popular printer for "ArmposHospitality".
Printer interface : 192.168.0.205
BaudRate : 0
Auto Cut : True
Print Message : True
Auto Split : False
Beep : False
----------------------------
-------------------------------------------------------------------------------------------------------------------------------------------------


Comments
Post a Comment