T010_ArmposRetail_Basic
T010_ArmposRetail_Basic
================================
【ArmPos Retail Tutoria】
課程編號: e417f8aa-2601-4e5f-9fb9-795e0fa260c5
-----------
此講義目錄 : https://aclasarmpos.blogspot.com/p/armpos-retail-tutorial.html
此講義YouTube PlayList :
Armpos Retail Tutorial(All)
https://youtube.com/playlist?list=PLGa5Tzn6r8qF679nXgAOc0ZIdOXzfNN6l
Armpos Retail Tutorial(Unlist)
https://youtube.com/playlist?list=PLGa5Tzn6r8qFxu14CQtU29oM3e-wu7pHO
Armpos Retail Tutorial(Customer)
https://youtube.com/playlist?list=PLGa5Tzn6r8qFn8HM-4FfUEuXg8ODscvQY
SampleFile : https://drive.google.com/drive/folders/1FQKoWkFSMrNrEMN4Gdv6ECMygtHsgg54?usp=sharing
-----------
講義部落格 : https://aclasarmpos.blogspot.com/
Youtube PlayList : https://www.youtube.com/channel/UCyvy6XeA1tS73JpJtjlaRTQ/playlists
================================
----------------------------
Internal Training : All
Customer Training : All
----------------------------
各種客人須知的基礎知識
----------------------------
T010_ArmposRetail_Basic
T010_01_Hardware_ArmposRetail_CashDrawer_Scales_Scanner_Printers (1.)
T010_02_BasicSale_Receipt_TaxInvoice_ActivateEftpos_ChangePrice_AvoidItem_PrintDailySalesReport (2.)
T010_03_Category_Item_MovePosition_HideAndShow_ReArrangeByCodeOrDescription_CreateEditRemove_MultiPrice_MemberPrice (3.)
T010_04_CustomerCashOut_DailySalesReport (4.)
T010_05_PaymentMethod_Linkly_Windcave (5.)
T010_06_OnlineMember_LocalMember_MemberCardType_Customer_MemberDiscount_MaxDiscountRate (6.)
================================
1. Hardware : ArmposRetail, CashDrawer, Scales, Scanner, Printers
2. BasicSale : Receipt, Tax Invoice ; Activate Eftpos ; Change Price ; Avoid Item ; Print DailySalesReport
3. Category, Item Setup : Move Position; Hide And Show; Re-Arrange By Code Or Description ; Create, Edit, Remove ; Multi-Price ; Member Price
4. Customer CashOut, Daily Sales Report
5. PaymentMethod - Linkly, Windcave
6. Online Member, Local Member ; Member Card Type ; Customer ; Member Discount, Max Discount Rate
================================
================================
1. Hardware : ArmposRetail, CashDrawer, Scales, Scanner, Printers
-------------------------------------------------------------------------------------------------------------------------------------------------
Hardware : ArmposRetail, CashDrawer, Scales, Scanner, Printers
-------------------------------------------------------------------------------------------------------------------------------------------------
1.
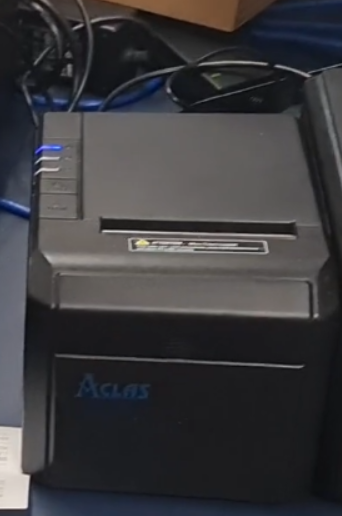
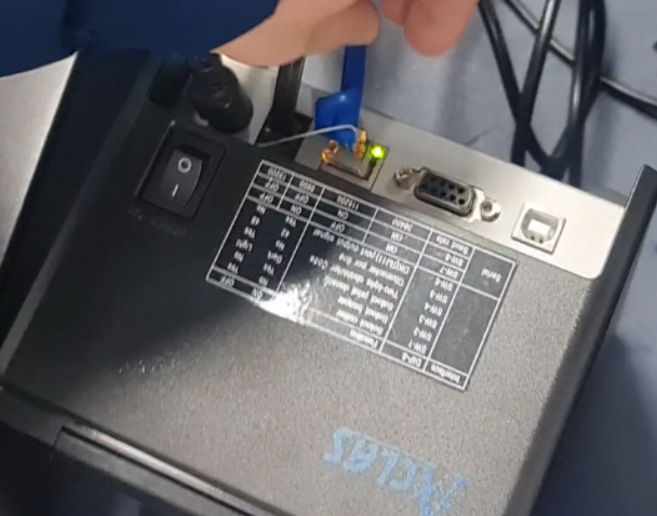
- Introduction "Hardware connection" between "Armpos Retail", "Cash Drawer", "Scales", "Scanner" and "Printers".
- "Armpos Retail" connects to the "Switch" via "RJ45 internet cable".
- "Cash Drawer" connects to the "Printer" via "Telephone Line".
- "Printer" connects to the "Switch" via "RJ45 Internet Cable".
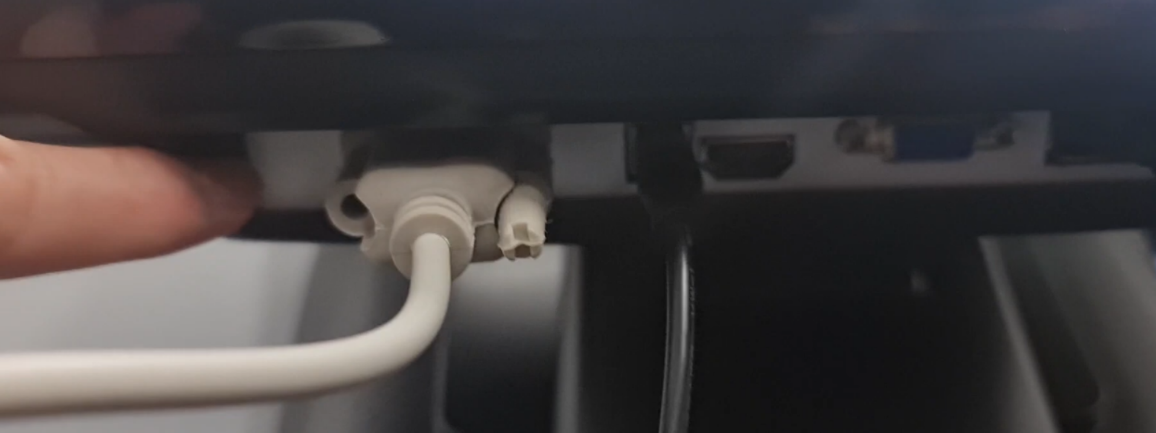
- "Scales" connects to the "Armpos Retail" via "Serial Port Cable".
- "Scanner" connects to the "Armpos Retail" via "USB Cable".
-----------
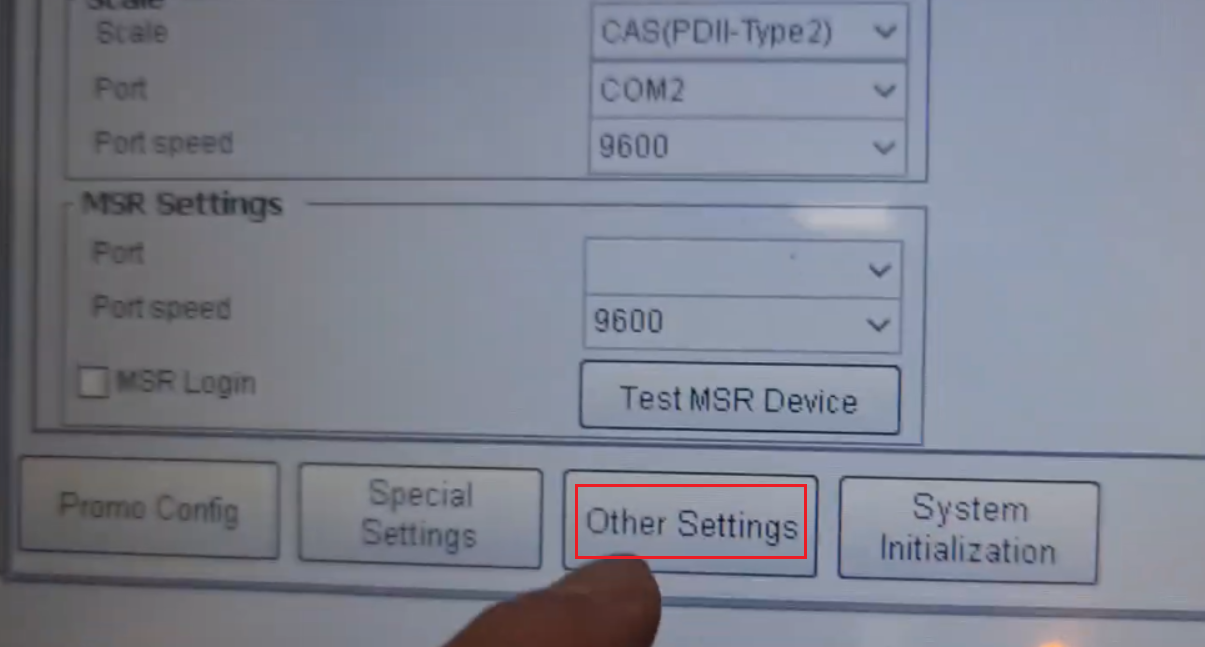
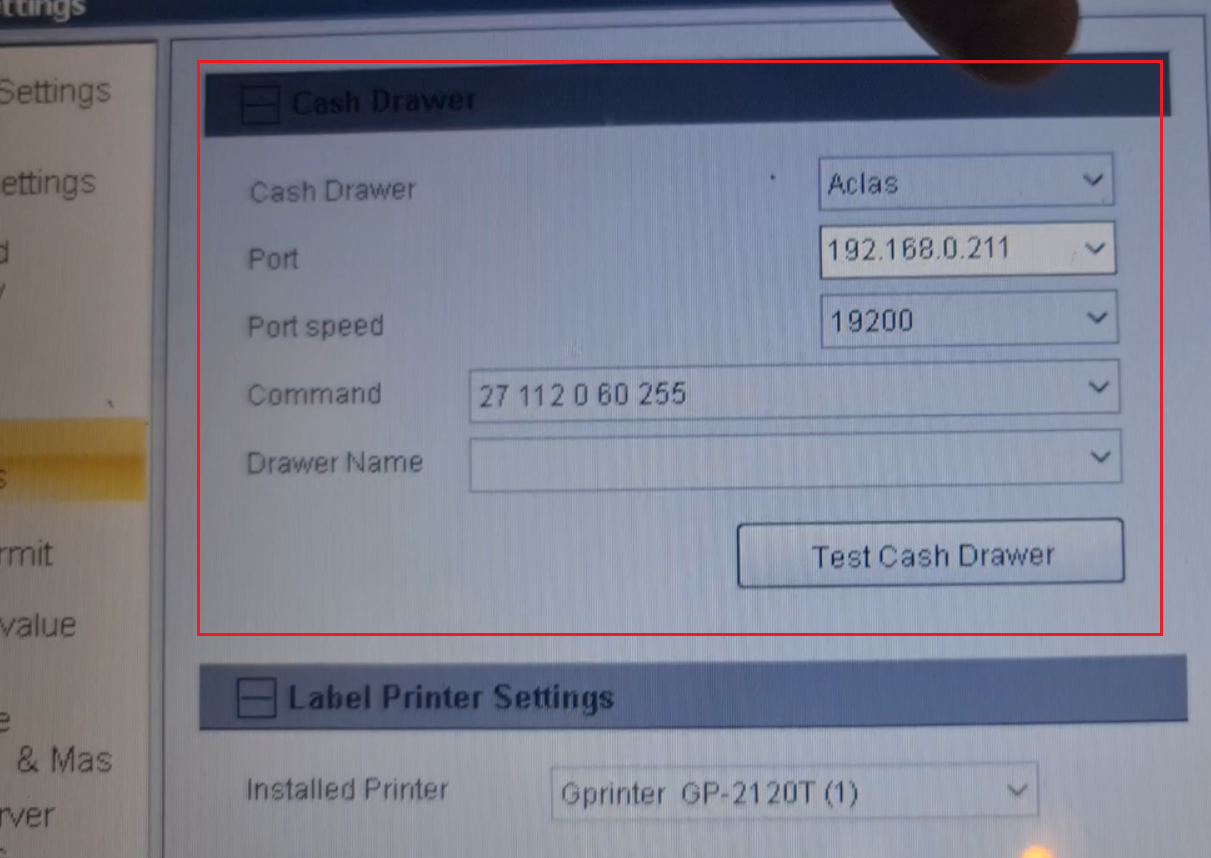
- "Printers" prints out "SelfTestingPage" in order to confirm the "BaudRate" and "IPAddress"
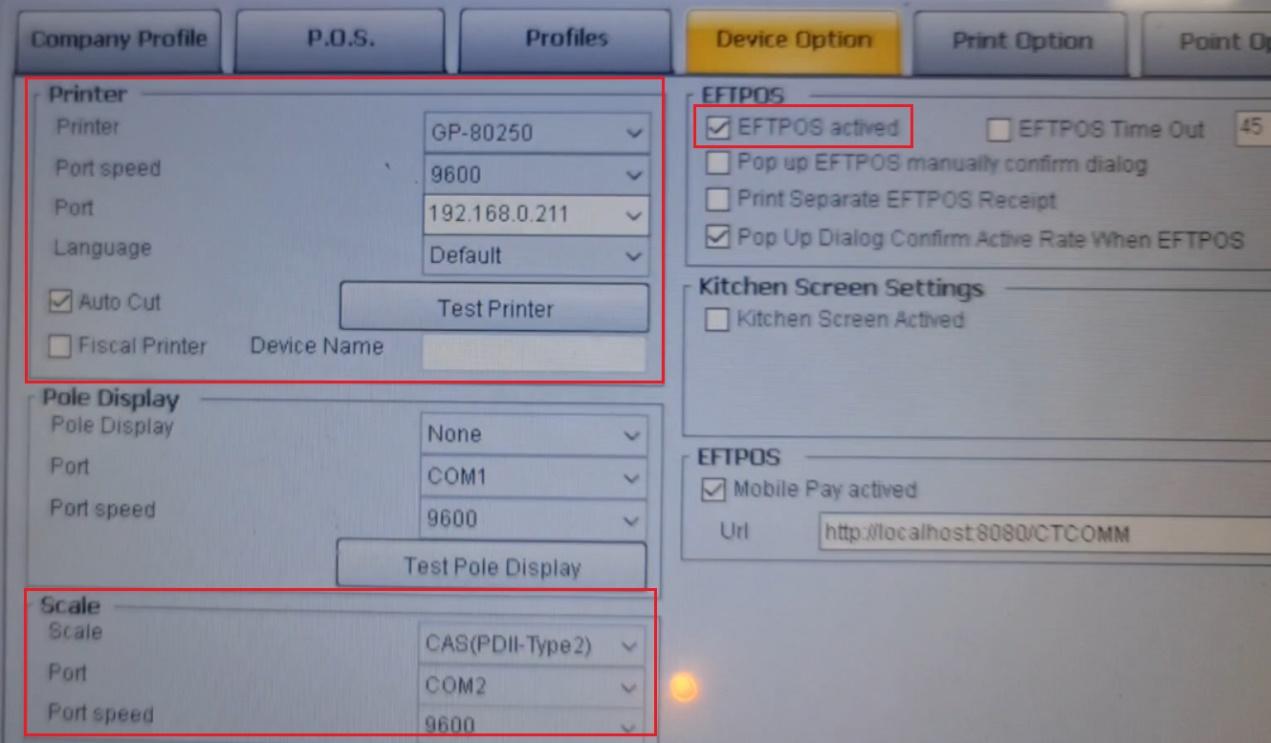
- In "Armpos Retail - Profile Setup", Go to "Device Options" Tab, Test the "Printer". Test "Scales", Test "Cash Drawer"
------------------------------------------------------------------------------------------------------------------------------------


-------------------------------------------------------------------------------------------------------------------------------------------------
2. BasicSale : Receipt, Tax Invoice ; Activate Eftpos ; Change Price ; Avoid Item ; Print DailySalesReport
-------------------------------------------------------------------------------------------------------------------------------------------------
BasicSale : Receipt, Tax Invoice ; Activate Eftpos ; Change Price ; Avoid Item ; Print DailySalesReport
-------------------------------------------------------------------------------------------------------------------------------------------------
1.
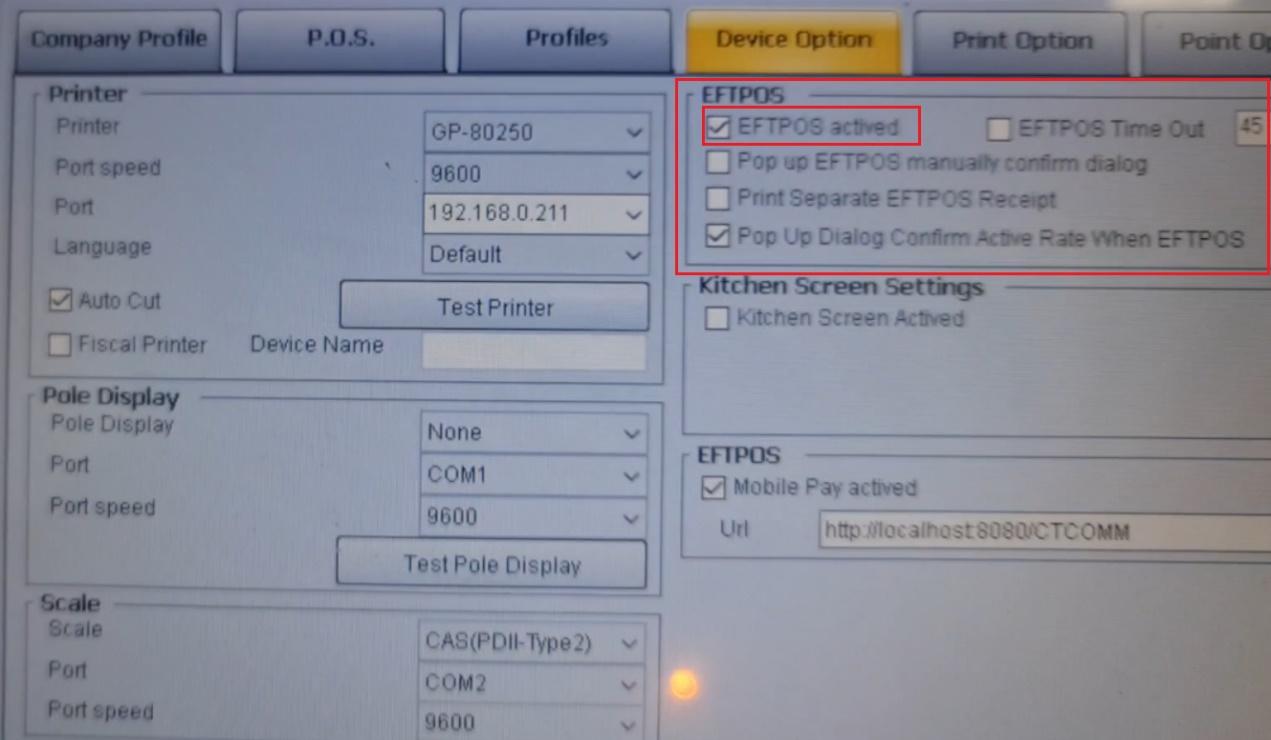
- Activate "Eftpos".
- "Armpos" can connect to "Linkly Eftpos"(https://www.linkly.com.au/)
- "Armpos" can connect to "Windcave Eftpos"(https://www.windcave.com/)
-----------
- Change Price
-----------
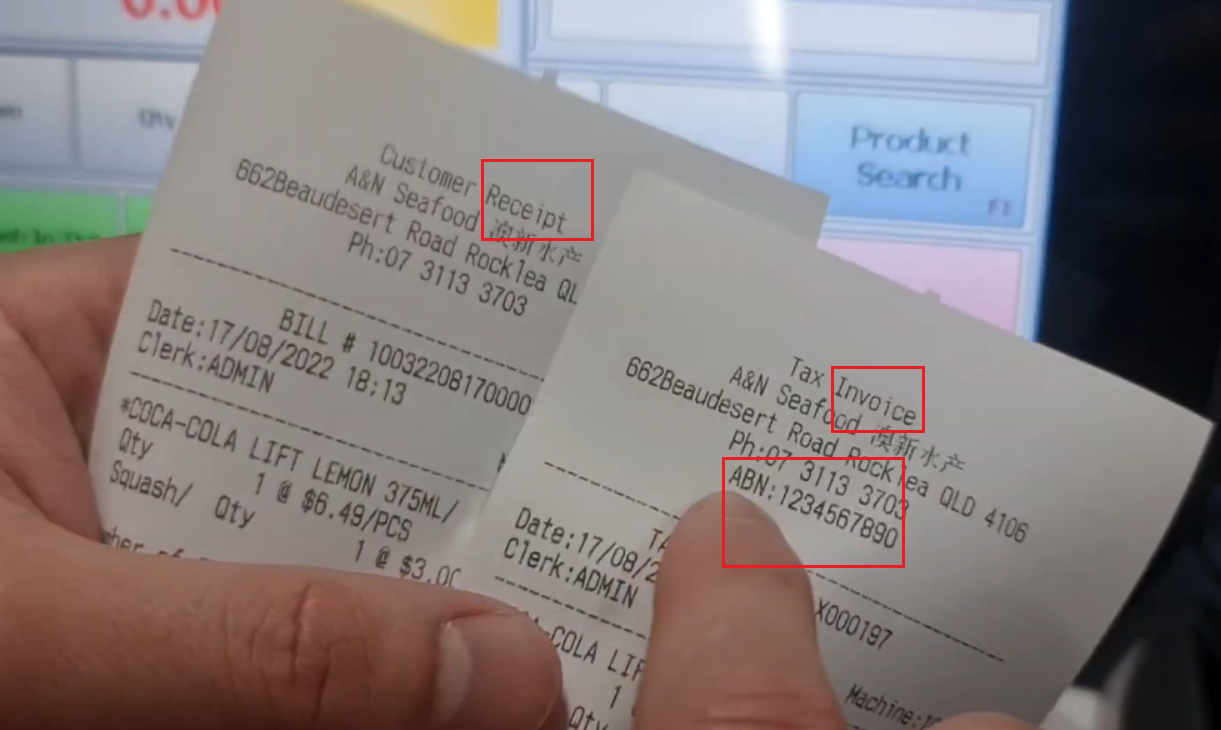
- Basic Sale.
- "Receipt", "TaxInvoice"
- Avoid "Item"
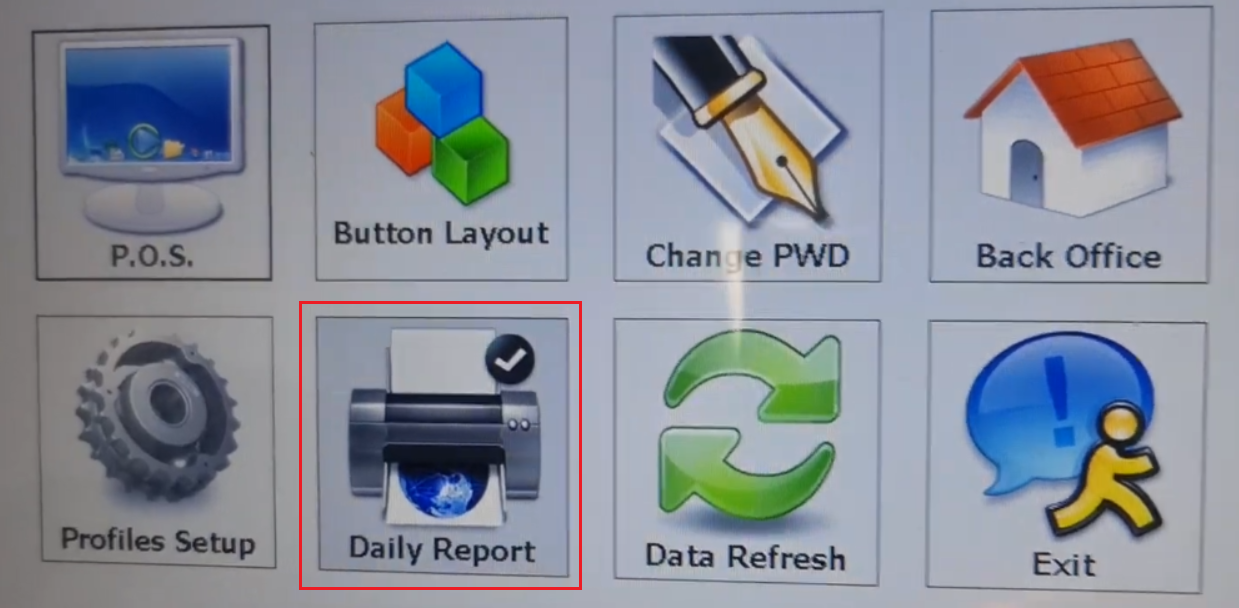
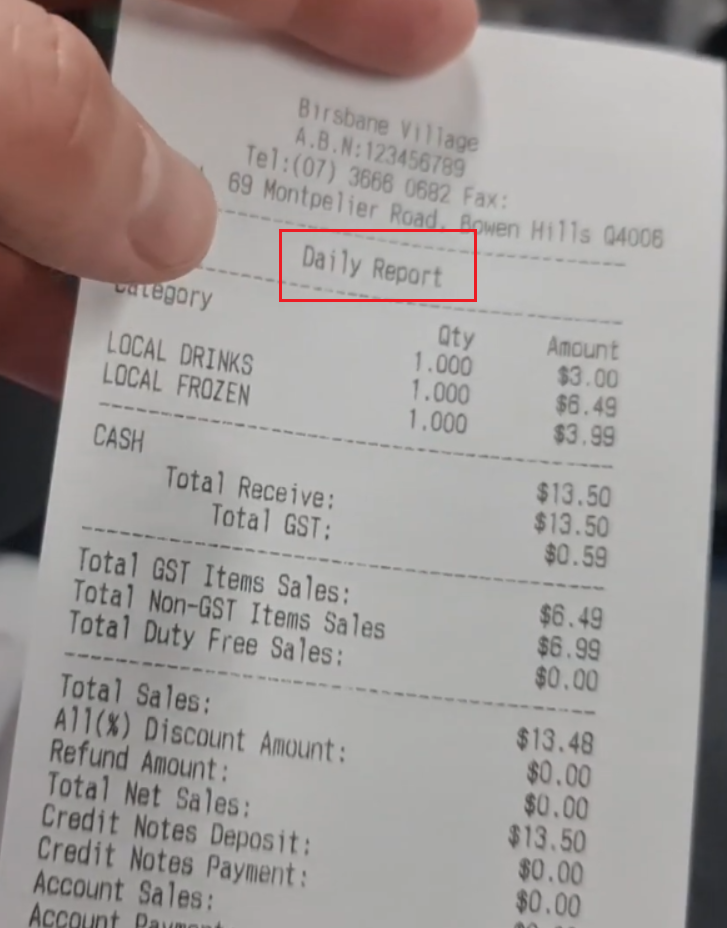
- Print "DailySalesReport"
------------------------------------------------------------------------------------------------------------------------------------


-------------------------------------------------------------------------------------------------------------------------------------------------
3. Category, Item Setup : Move Position; Hide And Show; Re-Arrange By Code Or Description ; Create, Edit, Remove ; Multi-Price ; Member Price
-------------------------------------------------------------------------------------------------------------------------------------------------
Category, Item Setup : Move Position; Hide And Show; Re-Arrange By Code Or Description ; Create, Edit, Remove ; Multi-Price ; Member Price
-------------------------------------------------------------------------------------------------------------------------------------------------
1.
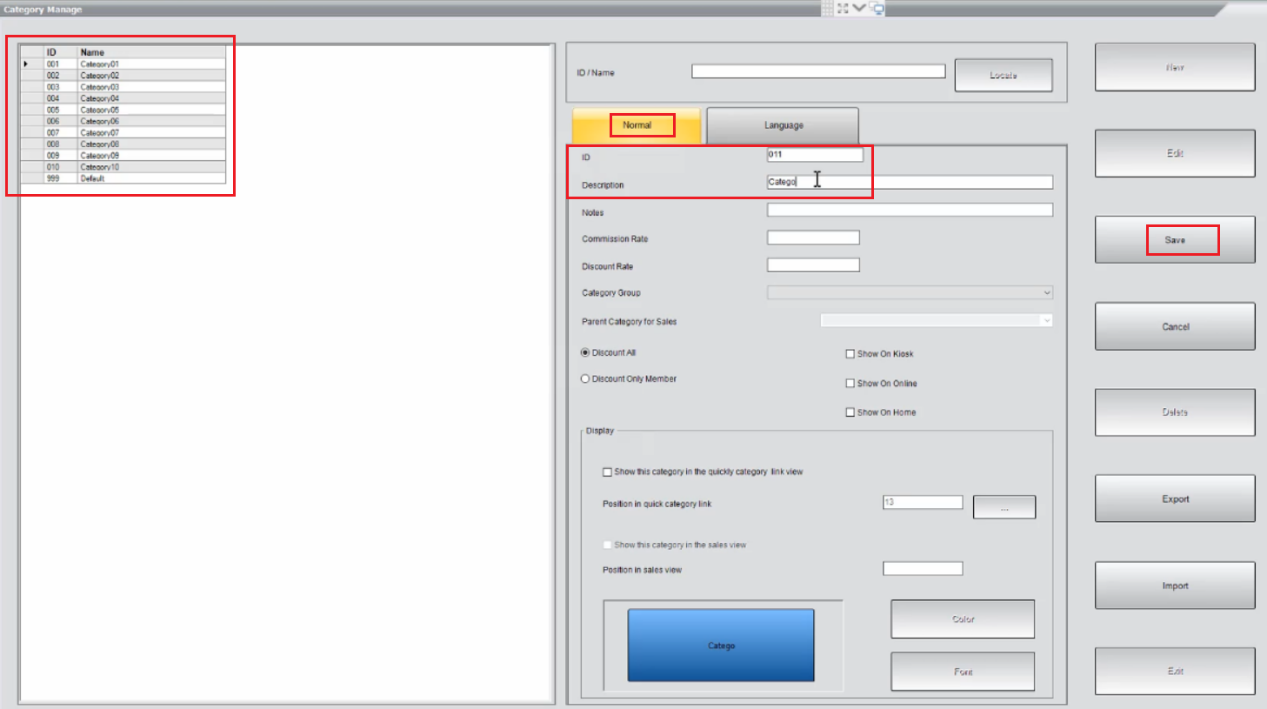
- Create, Delete, Edit "Category, Item".
- In "Button Layout", hide and show "Category, Item".
- In "Button Layout", move "Category, Item" position.
- In "Button Layout", Click "Re-Arrange", Click "Re-Arrange All PLU". Click "Re-Arrange by code" or "Re-Arrange by Description"
- "PLU" stands for "Price Look Up".
-----------
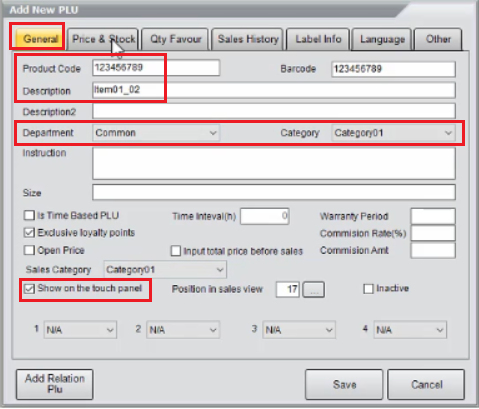
- By default, "ItemDepartment" is "Common"
- "ItemDepartment - RawFresh" means the "Price" is depending on the "Weight" from the "Scales".
-----------
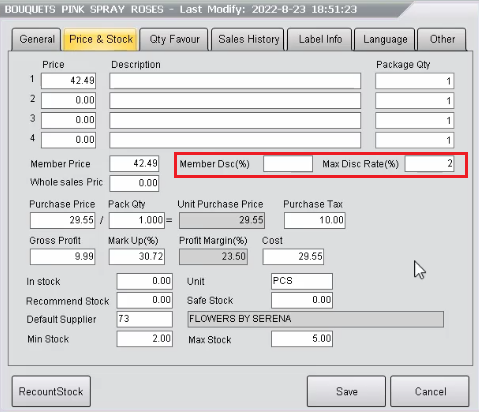
- In "Item Setup", set up "MultiPrice" for "Price1" to "Price4".
- In "Item Setup", set up "MemberPrice" and "MemberDiscount".
-----------
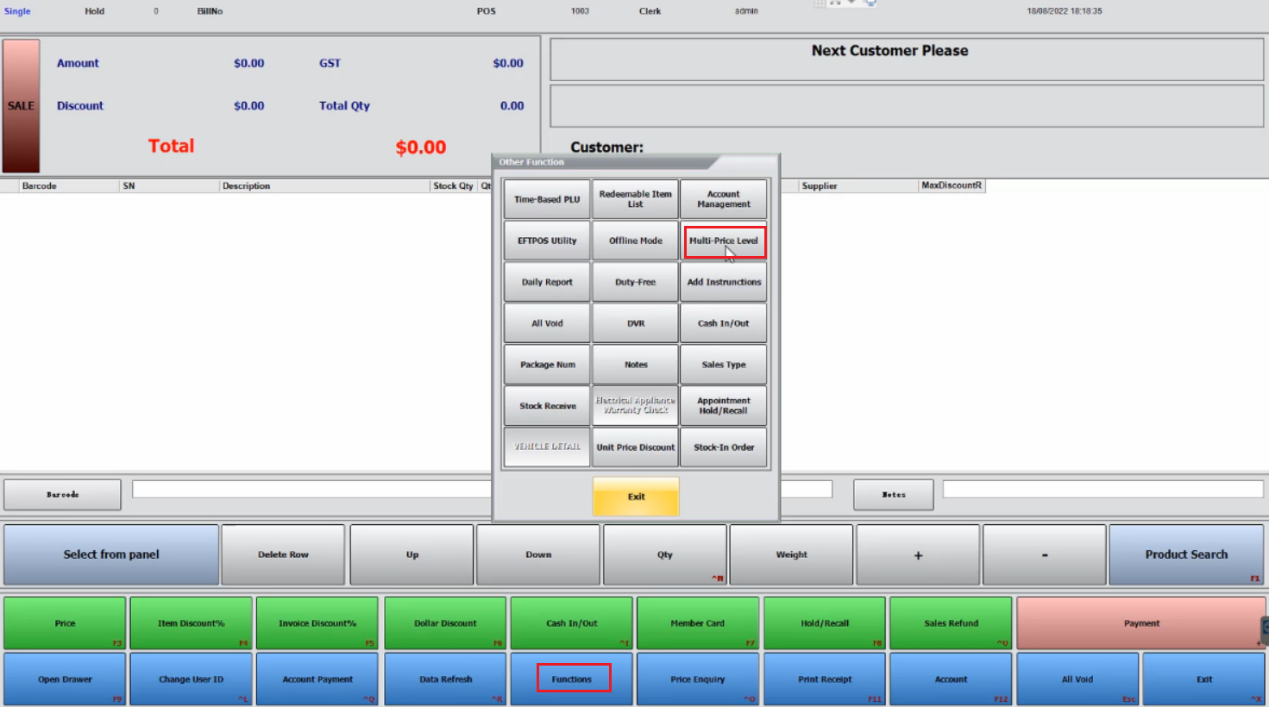
- In "Pos", click "Functions". Click "Multi-Price Level". Click "Manually Select". It means you can select "Price1" to "Price4" in "PopOutWindow" after selecting a "Item" in "Pos".
- If you already use other "MemberSystem" such as "Rewardle", then you can select the "MemberPrice" manually. In "Pos", click "Functions". Click "Multi-Price Level". Click "MemberPrice".
------------------------------------------------------------------------------------------------------------------------------------


-------------------------------------------------------------------------------------------------------------------------------------------------
4. Customer CashOut, Daily Sales Report
-------------------------------------------------------------------------------------------------------------------------------------------------
Customer CashOut, Daily Sales Report
-------------------------------------------------------------------------------------------------------------------------------------------------
1.
- I assume the "Customer" want to pay extra by "Eftpos" in order to get some "Cash Out".
- Display "Cash Out" in "DailySalesReport"
------------------------------------------------------------------------------------------------------------------------------------


-------------------------------------------------------------------------------------------------------------------------------------------------
5. PaymentMethod - Linkly, Windcave
-------------------------------------------------------------------------------------------------------------------------------------------------
PaymentMethod - Linkly, Windcave
-------------------------------------------------------------------------------------------------------------------------------------------------
1.
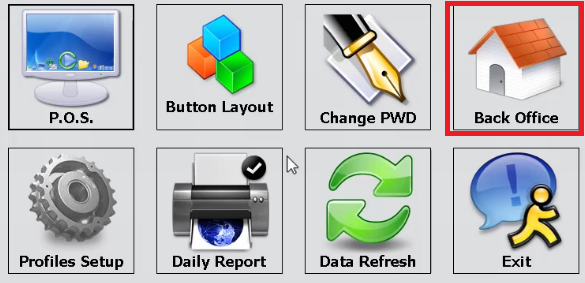
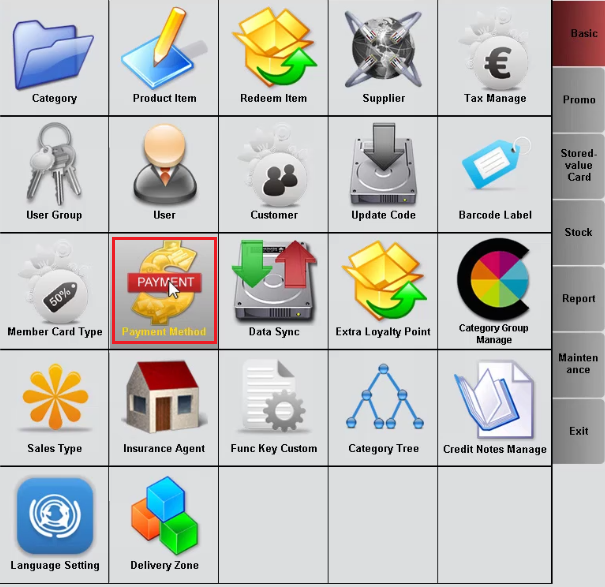
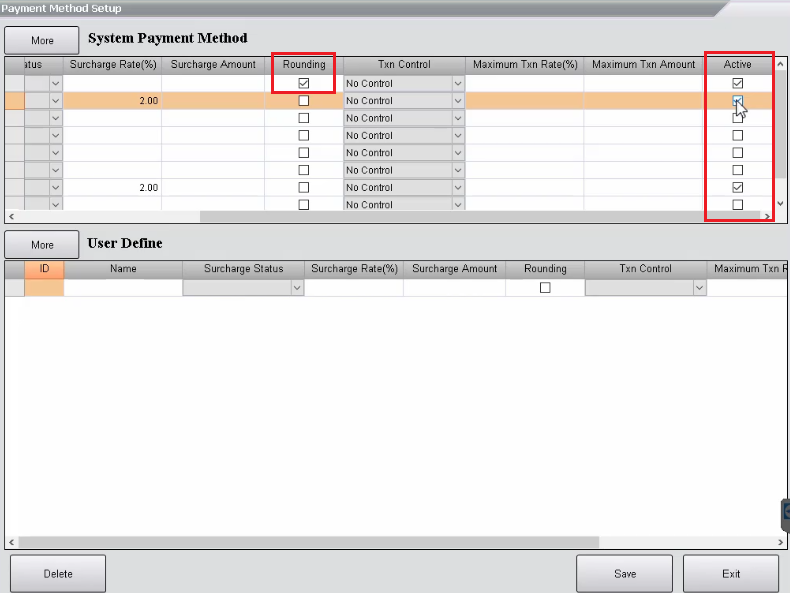
- Click "Back Office". Click "Payment Method". Activate, Dis-Activate, Edit "Payment Method".
-----------
- By default, "Payment Method - Cash" is activated, please ensure you enable "Rounding" for "Payment Method - Cash"
- Activate "Payment Method - Eftpos" means the "Armpos" can connect to "Linkly Eftpos"(https://www.linkly.com.au/)
- Activate "Payment Method - DPS" means the "Armpos" can connect to "Windcave Eftpos"(https://www.windcave.com/)
------------------------------------------------------------------------------------------------------------------------------------


-------------------------------------------------------------------------------------------------------------------------------------------------
6. Online Member, Local Member ; Member Card Type ; Customer ; Member Discount, Max Discount Rate
-------------------------------------------------------------------------------------------------------------------------------------------------
Online Member, Local Member ; Member Card Type ; Customer ; Member Discount, Max Discount Rate
-------------------------------------------------------------------------------------------------------------------------------------------------
1.
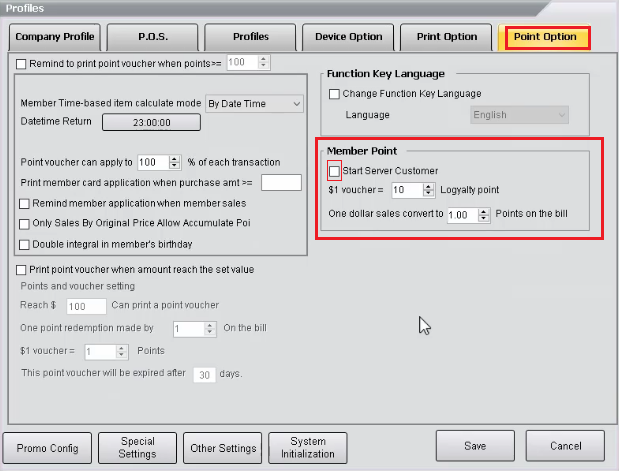
- Click "Profile Setup". Click "Point Option" tab. Ensure you disable "Start Server Customer".
- "Enable - Start Server Customer" means using "OnlineMember".
- "Dsiable - Start Server Customer" means using "LocalMember".
-----------
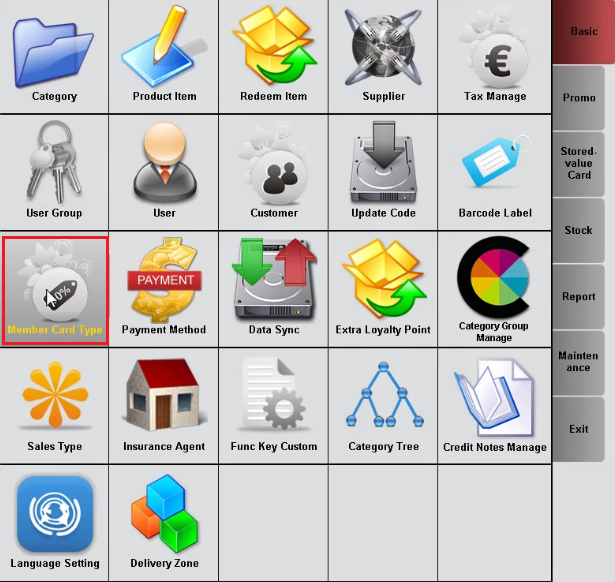
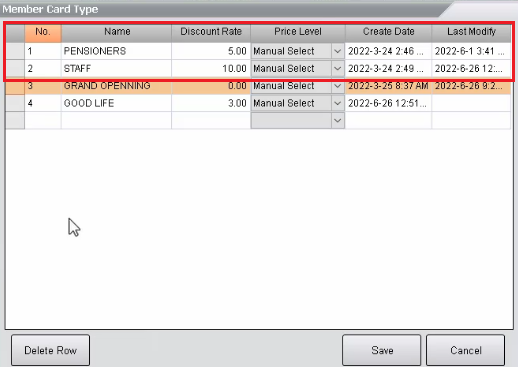
- Click "Back Office". Click "Member Card Type". Here you can set up your "Member Card Type" which means the "MembershipType".
-----------
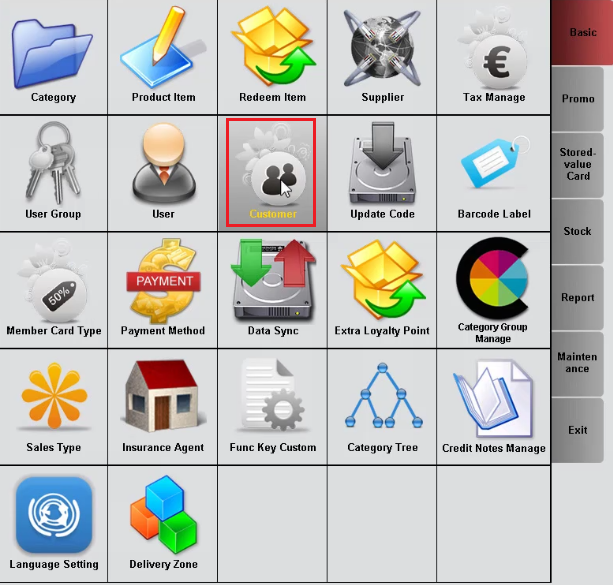
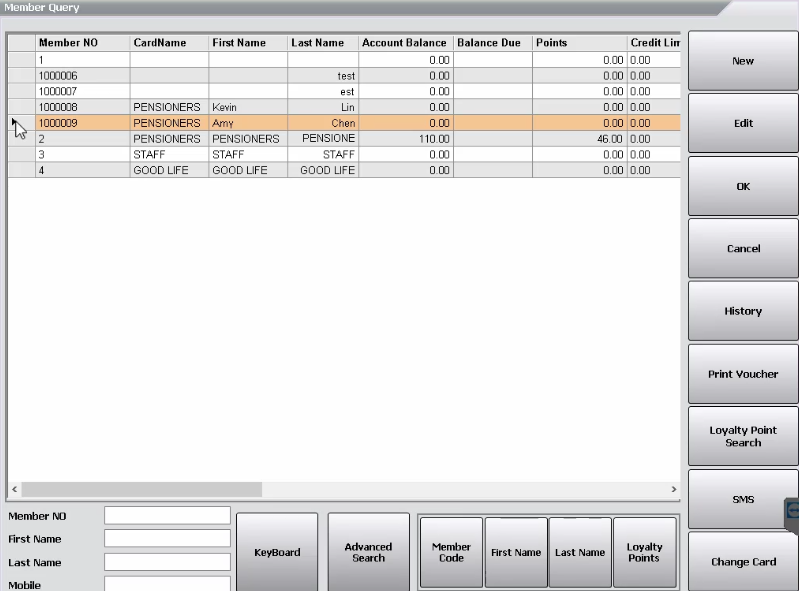
- Click "Back Office". Click "Customer". Here you can set up your "Customer".
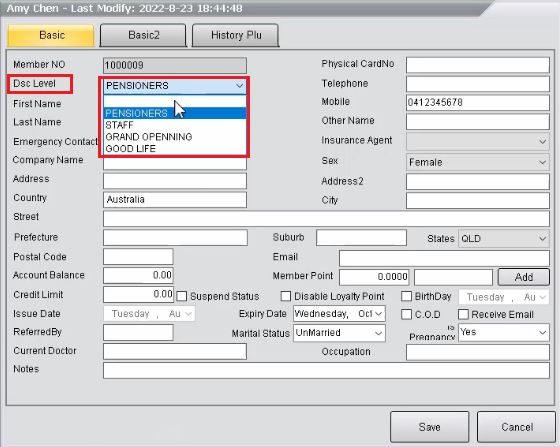
- When you "Add Customer", you must enter the "Member No", "Dsc Level", "First Name", "Last Name", and "Mobile".
- "Dsc Level" stands for "Discount Level" which means your "Member Card Type" which means the "MembershipType".
-----------
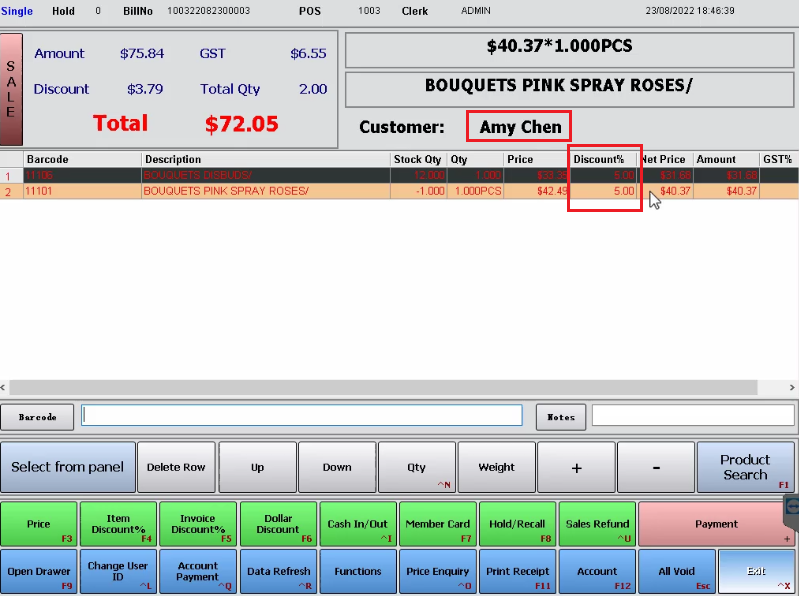
- We did't select any "Member", so it is "OriginalPrice".
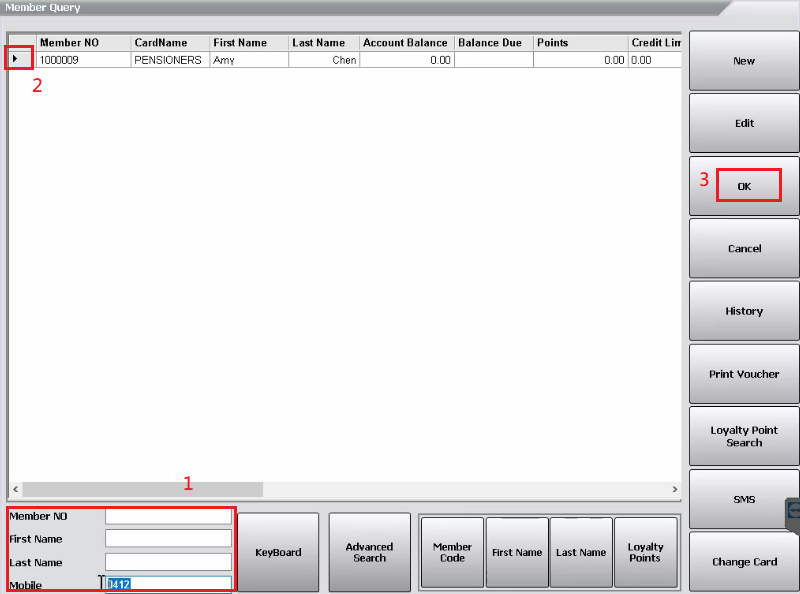
- Click "Pos". Click "Account". We can search "Member" by "MemberNo", "FirstName", "LastName", "Mobile".
- Select a "Member" in order to get "MemberPrice".
-----------
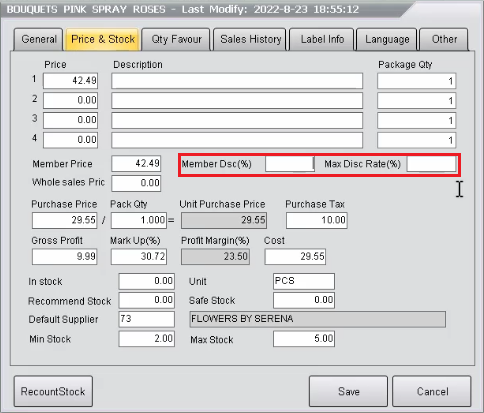
- "MemberDsc" stands for "Member Discount".
- When "Member Discount" is "0.00". It means this "Item" is "Not Discount-able".
- When "Member Discount" is "empty" and "Max Discount Rate" is "2". It means the "Discount" of this "Item" is "up to 2%".
- When "Member Discount" is "0.00" and "Max Discount Rate" is "2". It still means this "Item" is "Not Discount-able".
- Try not to set up any "Member Discount" and "Max Discount Rate" for each "Item" in order to be easier to manage the price in the future.
- If you really have to set up "Member Discount" and "Max Discount Rate" for the "Item", I strongly suggest move all "Not Discount-able Items" and "Restrict Discount Items" into the "Restrict Discount Category".
------------------------------------------------------------------------------------------------------------------------------------
- Click "Profile Setup". Click "Point Option" tab. Ensure you disable "Start Server Customer".
- "Enable - Start Server Customer" means using "OnlineMember".
- "Dsiable - Start Server Customer" means using "LocalMember".
----------------------------

----------------------------------------------
- Click "Back Office". Click "Member Card Type". Here you can set up your "Member Card Type" which means the "MembershipType".
----------------------------

----------------------------------------------
- Click "Back Office". Click "Customer". Here you can set up your "Customer".
- When you "Add Customer", you must enter the "Member No", "Dsc Level", "First Name", "Last Name", and "Mobile".
- "Dsc Level" stands for "Discount Level" which means your "Member Card Type" which means the "MembershipType".
----------------------------

----------------------------------------------
- We did't select any "Member", so it is "OriginalPrice".
- Click "Pos". Click "Account". We can search "Member" by "MemberNo", "FirstName", "LastName", "Mobile".
- Select a "Member" in order to get "MemberPrice".
----------------------------

----------------------------------------------
- "MemberDsc" stands for "Member Discount".
- When "Member Discount" is "0.00". It means this "Item" is "Not Discount-able".
- When "Member Discount" is "empty" and "Max Discount Rate" is "2". It means the "Discount" of this "Item" is "up to 2%".
- When "Member Discount" is "0.00" and "Max Discount Rate" is "2". It still means this "Item" is "Not Discount-able".
- Try not to set up any "Member Discount" and "Max Discount Rate" for each "Item" in order to be easier to manage the price in the future.
- If you really have to set up "Member Discount" and "Max Discount Rate" for the "Item", I strongly suggest move all "Not Discount-able Items" and "Restrict Discount Items" into the "Restrict Discount Category".
----------------------------
- When "Member Discount" is "0.00". It means this "Item" is "Not Discount-able".
- When "Member Discount" is "0.00" and "Max Discount Rate" is "2". It still means this "Item" is "Not Discount-able".

----------------------------
- When "Member Discount" is "empty" and "Max Discount Rate" is "2". It means the "Discount" of this "Item" is "up to 2%".
- When "Member Discount" is "0.00" and "Max Discount Rate" is "2". It still means this "Item" is "Not Discount-able".
----------------------------
- Try not to set up any "Member Discount" and "Max Discount Rate" for each "Item" in order to be easier to manage the price in the future.
- If you really have to set up "Member Discount" and "Max Discount Rate" for the "Item", I strongly suggest move all "Not Discount-able Items" and "Restrict Discount Items" into the "Restrict Discount Category".
-------------------------------------------------------------------------------------------------------------------------------------------------


Comments
Post a Comment