T010_PrinterSetup_KitchenDisplayScreen_KdsSetup
【ArmPos Hospitality Tutorial】 課程編號: 92f3f51d-78fb-4f87-b770-3839a40e98d2 ----------- 此講義目錄 : https://aclasarmpos.blogspot.com/p/armpos-internal-tutorial.html 此講義YouTube PlayList : ArmPos Hospitality Tutorial(All) https://youtube.com/playlist?list=PLGa5Tzn6r8qHGqXwzy0_i4JAi21sl37u_ ArmPos Hospitality Tutorial(Internal) https://youtube.com/playlist?list=PLGa5Tzn6r8qHhvRh9-tuS3xpQgwMcz9Kp ArmPos Hospitality Tutorial(Customer) https://youtube.com/playlist?list=PLGa5Tzn6r8qFIcfl2r0Jd2lpnYw_5_ve5 SampleFile : https://drive.google.com/drive/folders/1FQKoWkFSMrNrEMN4Gdv6ECMygtHsgg54?usp=sharing ----------- 講義部落格 : https://aclasarmpos.blogspot.com/ Youtube PlayList : https://www.youtube.com/channel/UCyvy6XeA1tS73JpJtjlaRTQ/playlists ================================ ---------------------------- Internal Training : None Customer Training : None This Tutorial has been updated, please refer to Tutorial 15 to 18 ---------------------------- T010_PrinterSetup_KitchenDisplayScreen_KdsSetup T010_01_SampleFile (1.) T010_02_Demonstrate_TableSale (2.1.) T010_03_Demonstrate_QuickService (2.2.) T010_04_Summary_Joblist_Checklist_Receipt_Invoice_PrintMessage_AutoCut_AutoSplit_Beep_PrinterMessage (3.) T010_05_Hardware_ConnectToPrinter (4.) T010_06_Armpos_PrinterSetup (5.) T010_07_PosMachine_AssignPrinterFor_Checklist_Receipt_Invoice (6.) T010_08_PosMachine_AssignPrinterFor_Joblist (7.) T010_09_KdsSetting_Kds (8.1.) T010_10_KdsSetting_PosMachine (8.2.)
================================ 1. SampleFile ----------- 2. Demonstrate 2.1. Demonstrate - TableSale 2.2. Demonstrate - QuickService ----------- 3. Summary - Joblist, Checklist, Receipt, Invoice, PrintMessage - AutoCut, Auto Split, Beep, PrinterMessage 4. Connect to Printer(Hardware) 5. Printer Setup(Armpos) 6. "PosMachine-PrinterSetting" - Parameters - Assign Printer for "Checklist,Receipt,Invoice" ----------- 7. Assign Printer for "Joblist" 7.1. "PosMachine-PrinterSetting" 7.1.1. "PosMachine-PrinterSetting" - MenuSetup ----------- 8. "KdsSetting"(KitchenDisplayScreen) 8.1. "Kds-KdsSetting" 8.2. "PosMachine-KdsSetting" 8.2.1. "PosMachine-KdsSetting" - Parameters 8.2.2. "PosMachine-KdsSetting" - MenuSetup ================================
================================
1. SampleFile
-------------------------------------------------------------------------------------------------------------------------------------------------
SampleFile
-------------------------------------------------------------------------------------------------------------------------------------------------
1.
Copy all xml files from "04_01_20220403_CoffeeBubbleTeaBugger_InArmpos_Xml_Printer_Kds" folder,
and replace to the following files.
----------------------------------------------
C:\Program Files (x86)\CYEcrPC\CYEcr.xml
C:\Program Files (x86)\CYEcrPC\PrinterConfig.xml
-----------
C:\Program Files (x86)\CYEcrPC\Data\CYEcrBackUp.xml
C:\Program Files (x86)\CYEcrPC\Data\GridColumns.xml
C:\Program Files (x86)\CYEcrPC\Data\SecondDisplayGridColumns.xml
C:\Program Files (x86)\CYEcrPC\Data\SMTPS.XML
C:\Program Files (x86)\CYEcrPC\Data\text.txt
------------------------------------------------------------------------------------------------------------------------------------
2.
Restore "SampleDatFile".
In my case, I would restore "03_02_20220403_CoffeeBubbleTeaBugger.dat".
-----------
Copy the file to
C:\Program Files (x86)\CYEcrPC\DBBackup\
-----------
Run
C:\Program Files (x86)\CYEcrPC\DBMaintenance.exe
Enter "UserName, Password"
-----------

----------------------------------------------
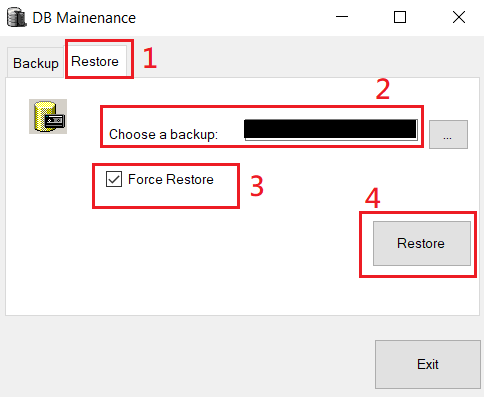
Select "Restore" Tab,
In "Choose a backup:", enter the path of your "dat file".
C:\Program Files (x86)\CYEcrPC\DBBackup\[FileName].dat
-----------
Tick "Force Restore", Click "Restore"
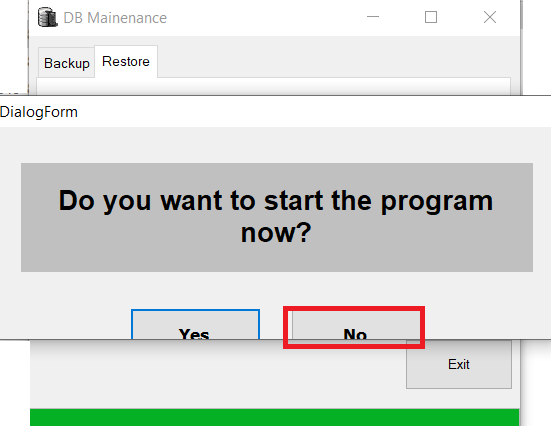
-----------
Do you want to start the program now?
No
-----------
------------------------------------------------------------------------------------------------------------------------------------
3.
If you want to see the result and demonstrate the "Kds"(KitchenDisplayScreen) and "Printer"
you could restore from "04_01_20220403_CoffeeBubbleTeaBugger_InArmpos.dat"
------------------------------------------------------------------------------------------------------------------------------------
4.
"Kds-KdsSetting"
----------------------------------------------
The following files in "04_01_20220403_CoffeeBubbleTeaBugger_InKds_Xml"
is the "KdsSetting" in "KitchenDisplayScreeScreen"(KDS) for this tutorial sample.
In this tutorial, we would not introduce the "KdsSetting" in "KitchenDisplayScreeScreen"(KDS),
because our engineers would help you set up the "KdsSetting" in "KitchenDisplayScreeScreen"(KDS).
But you still need to learn "KdsSetting" in your "PosMachine".
----------------------------------------------
C:\Program Files (x86)\CYEcrPC\CYEcr.xml
C:\Program Files (x86)\CYEcrPC\PrinterConfig.xml
-----------
C:\Program Files (x86)\CYEcrPC\Data\CYEcrBackUp.xml
C:\Program Files (x86)\CYEcrPC\Data\GridColumns.xml
C:\Program Files (x86)\CYEcrPC\Data\SecondDisplayGridColumns.xml
C:\Program Files (x86)\CYEcrPC\Data\SMTPS.XML
C:\Program Files (x86)\CYEcrPC\Data\text.txt
-------------------------------------------------------------------------------------------------------------------------------------------------
2. Demonstrate
2.1. Demonstrate - TableSale
-------------------------------------------------------------------------------------------------------------------------------------------------
Demonstrate - TableSale
-------------------------------------------------------------------------------------------------------------------------------------------------
1.
If you want to see the result and demonstrate the "Kds"(KitchenDisplayScreen) and "Printer"
you could restore from "04_01_20220403_CoffeeBubbleTeaBugger_InArmpos.dat"
------------------------------------------------------------------------------------------------------------------------------------
2.
TableSale - Make order
----------------------------
-------------------------------------------------------------------------------------------------------------------------
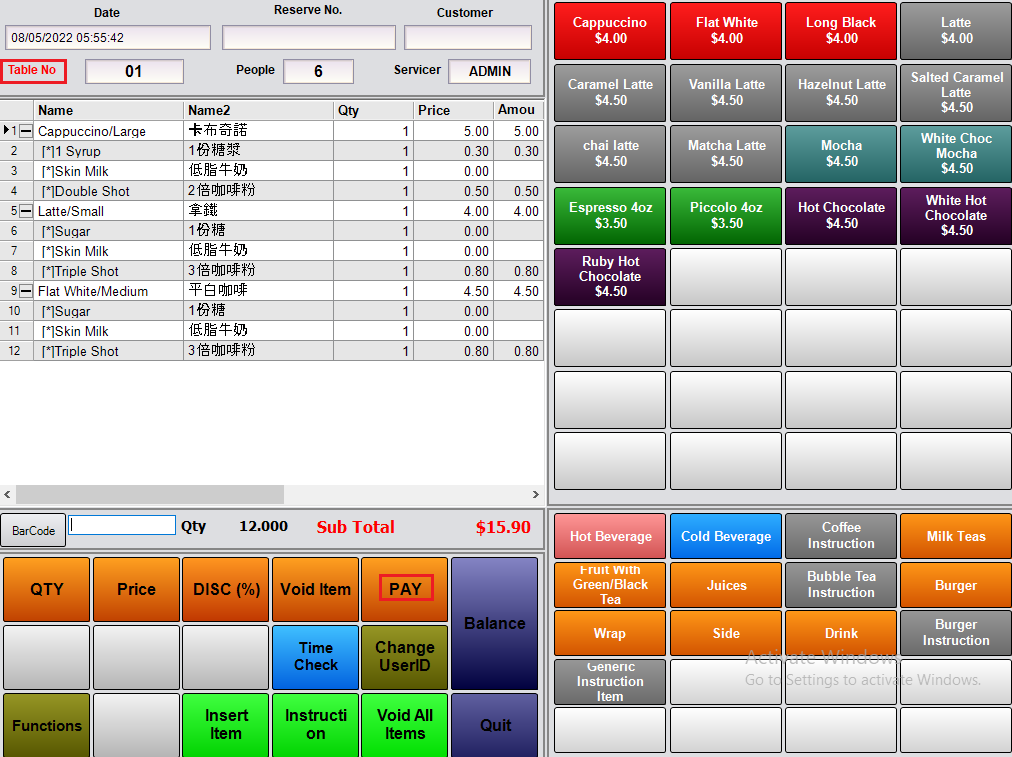
2.1.
"Table01" order
----------------------------------------------
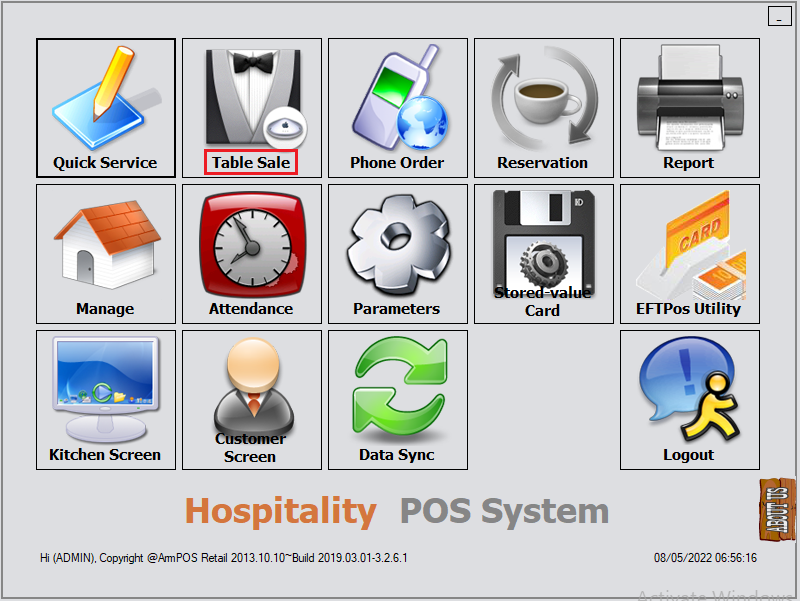
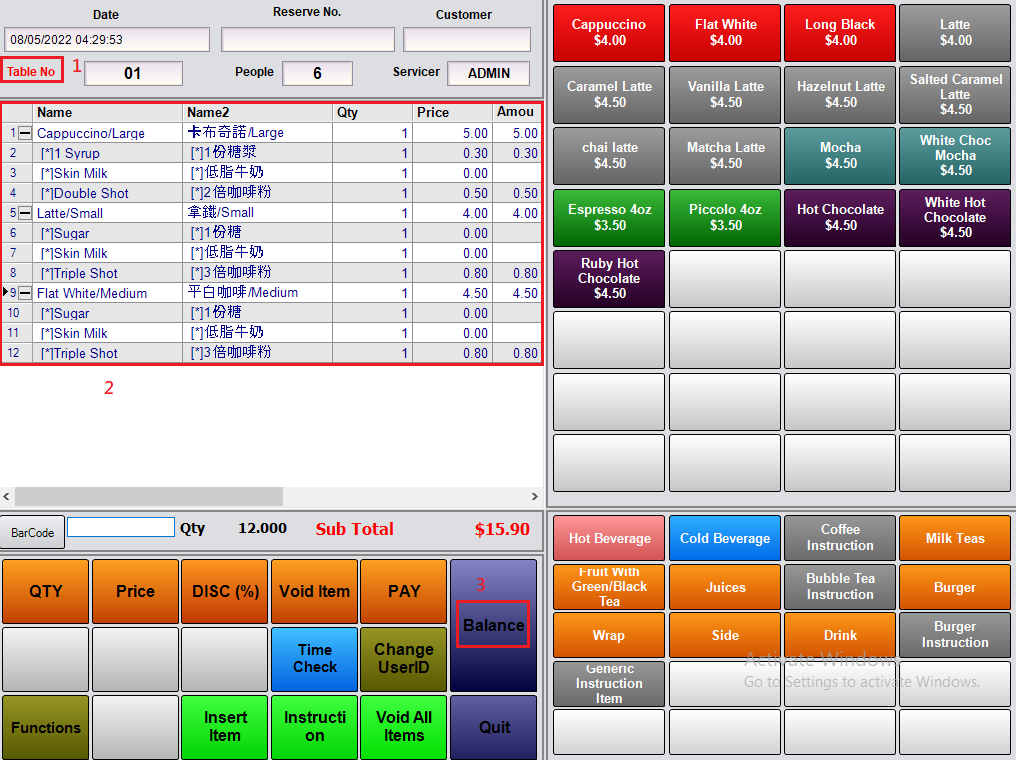
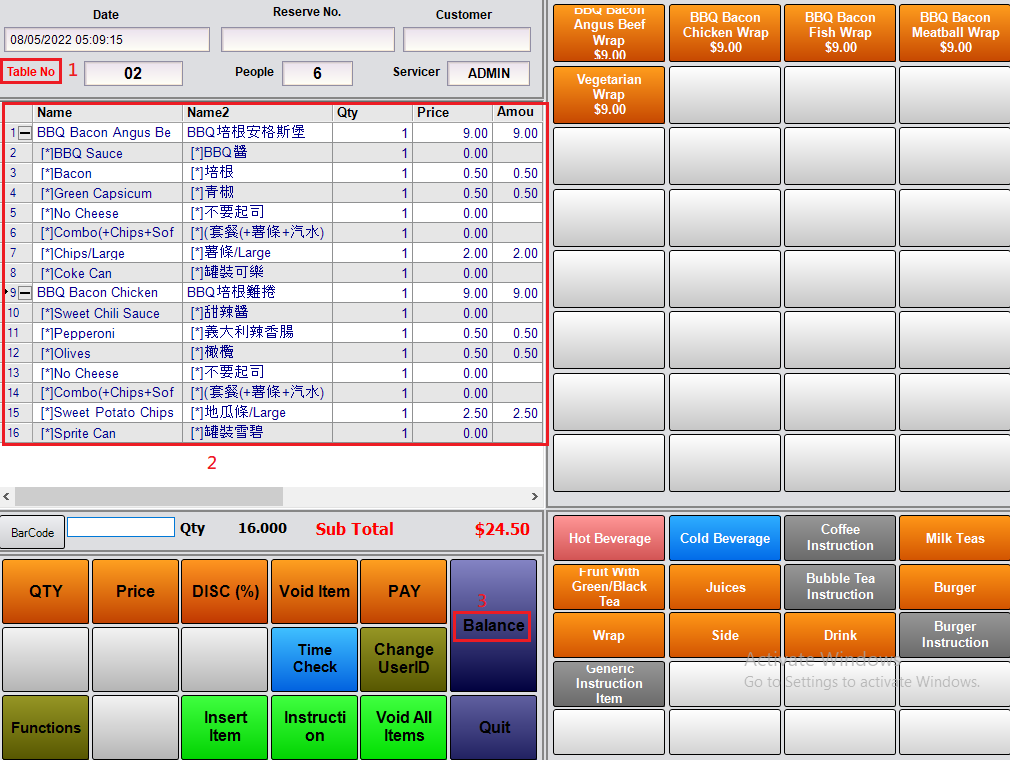
In "PosMachine"
Select "Table01"
Make a order
Click "Balance"
----------------------------
----------------------------------------------
After the customer made a order,
then the "KitchenPrinter" should print out the "Joblist"
which could tell the "chef" what to cook.
-----------
"Manage-MenuSetup-Item-Printer" is the printer that print out the "Joblist".
E.g. Kitchen
----------------------------
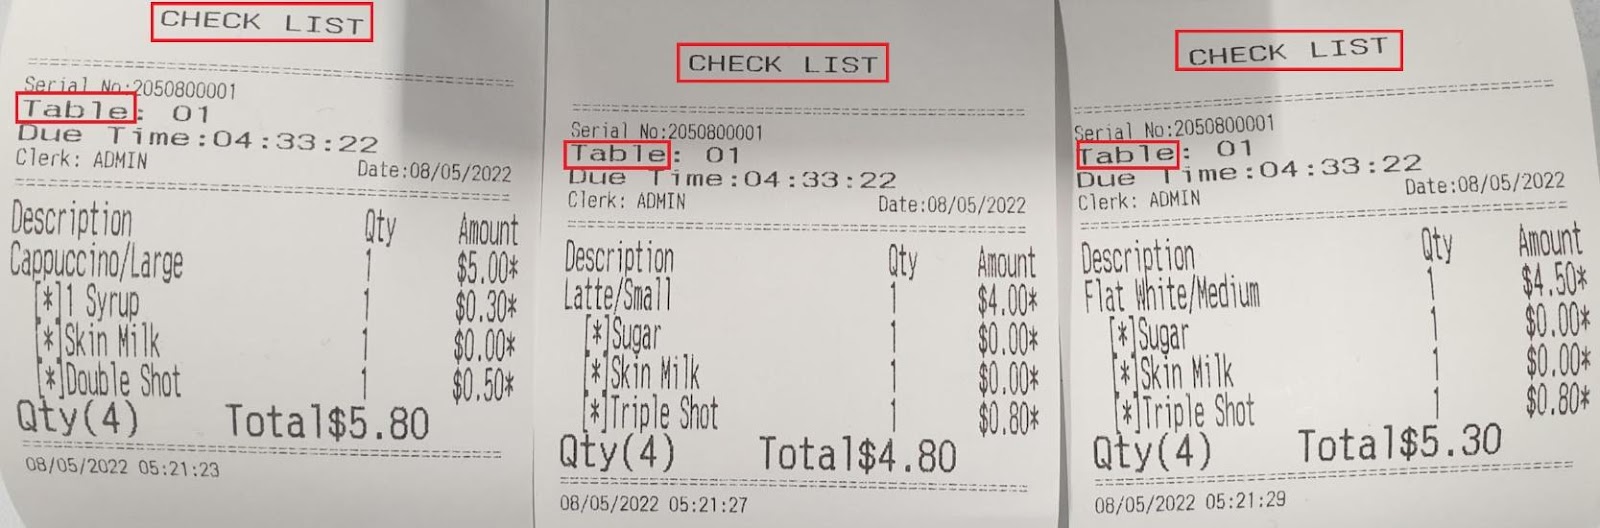
After the customer made a order,
then the "KitchenWindowPrinter" should also print out the "Checklist" for all "Dishes"
which tell the "waitress" or "waiter" what they were going to deliver to customers.
-----------
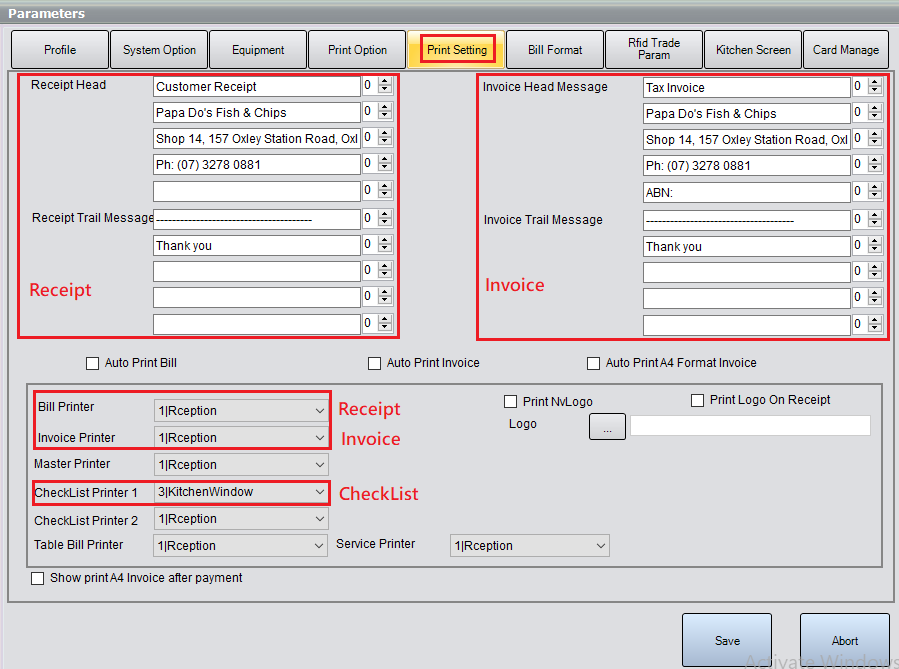
"Parameters-PrintSetting-CheckListPrinter1" is the printer that print out the "CheckList".
E.g. KitchenWindow
----------------------------

----------------------------------------------
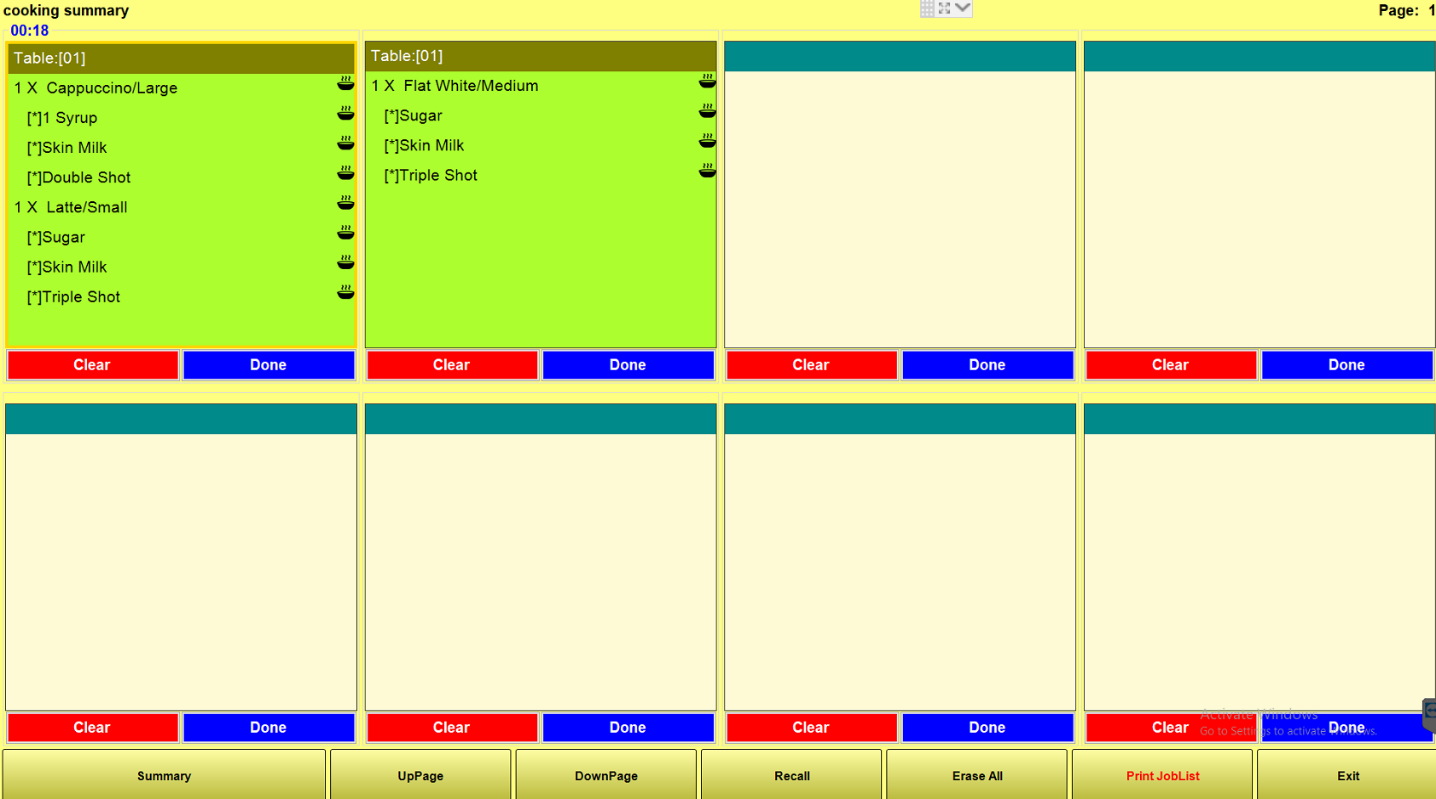
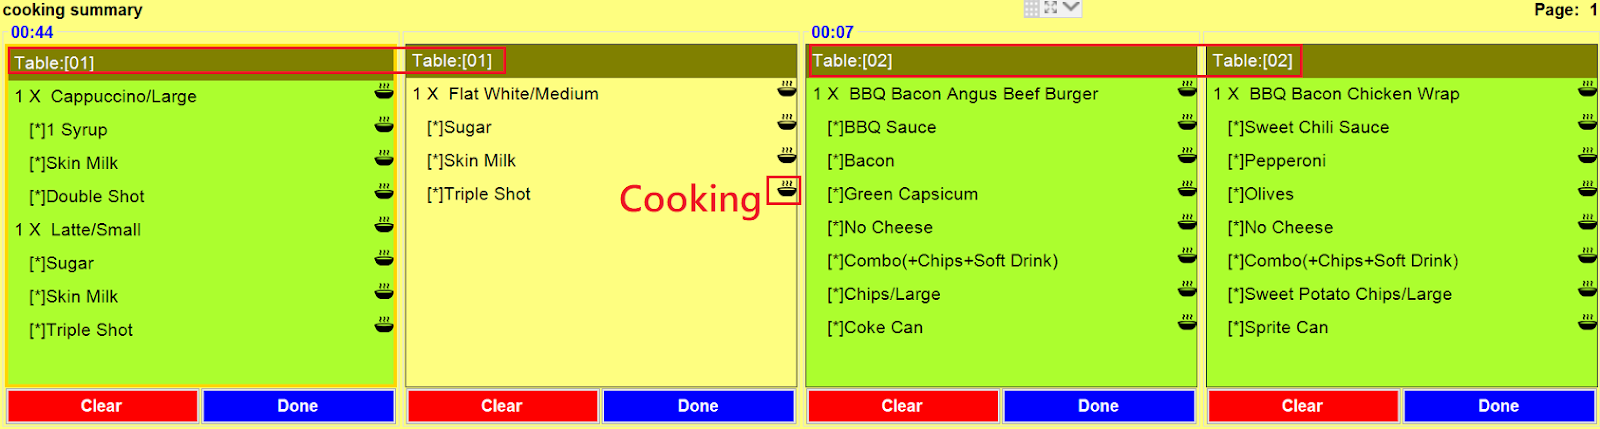
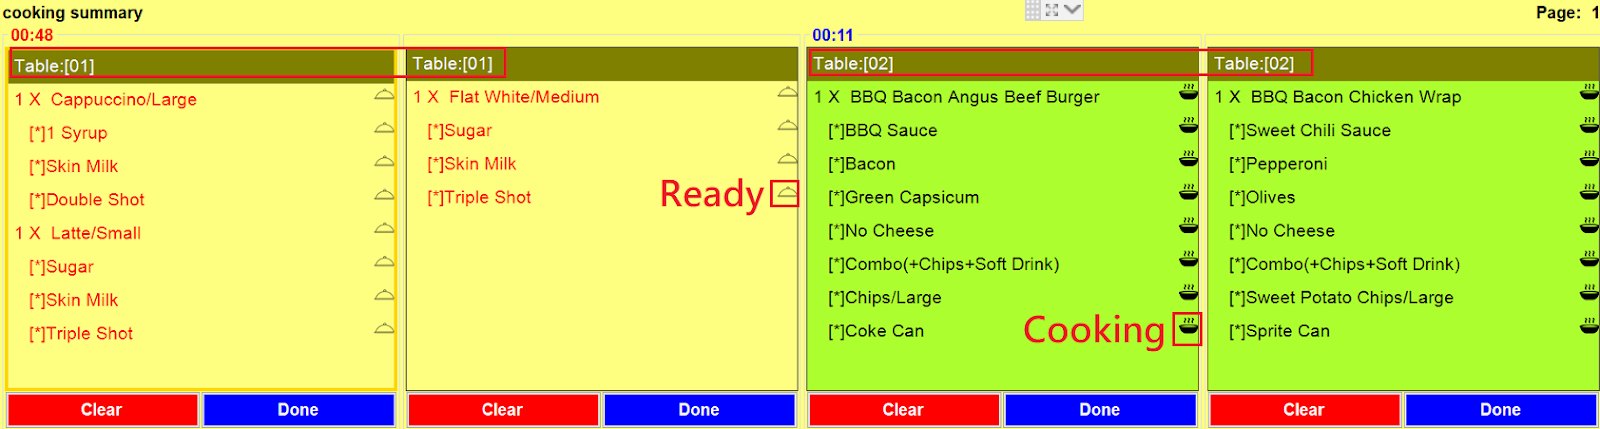
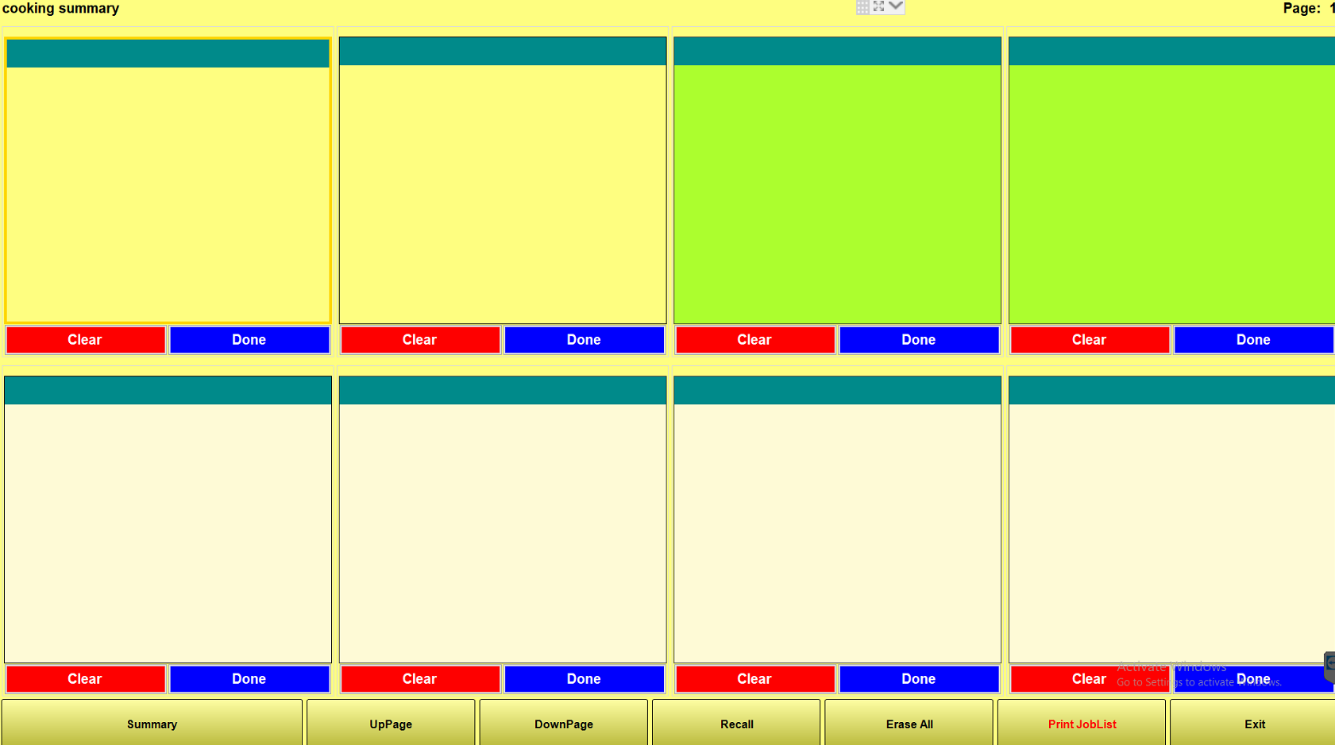
In "Kds"(KitchenDisplayScreen)
It would display the "Joblist" on "Kds".
----------------------------
-------------------------------------------------------------------------------------------------------------------------
2.2.
"Table02" order
----------------------------------------------
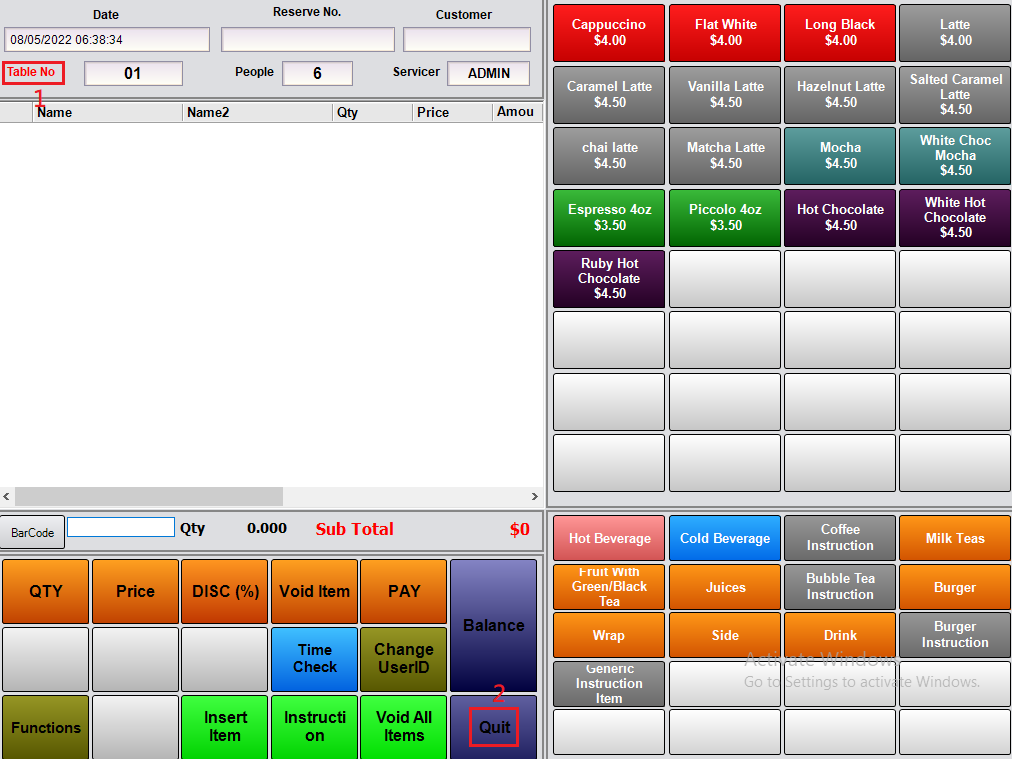
In "PosMachine"
Select "Table02"
Make a order
Click "Balance"
----------------------------
----------------------------------------------
After the customer made a order,
then the "KitchenPrinter" should print out the "Joblist"
which could tell the "chef" what to cook.
-----------
"Manage-MenuSetup-Item-Printer" is the printer that print out the "Joblist".
E.g. Kitchen
----------------------------
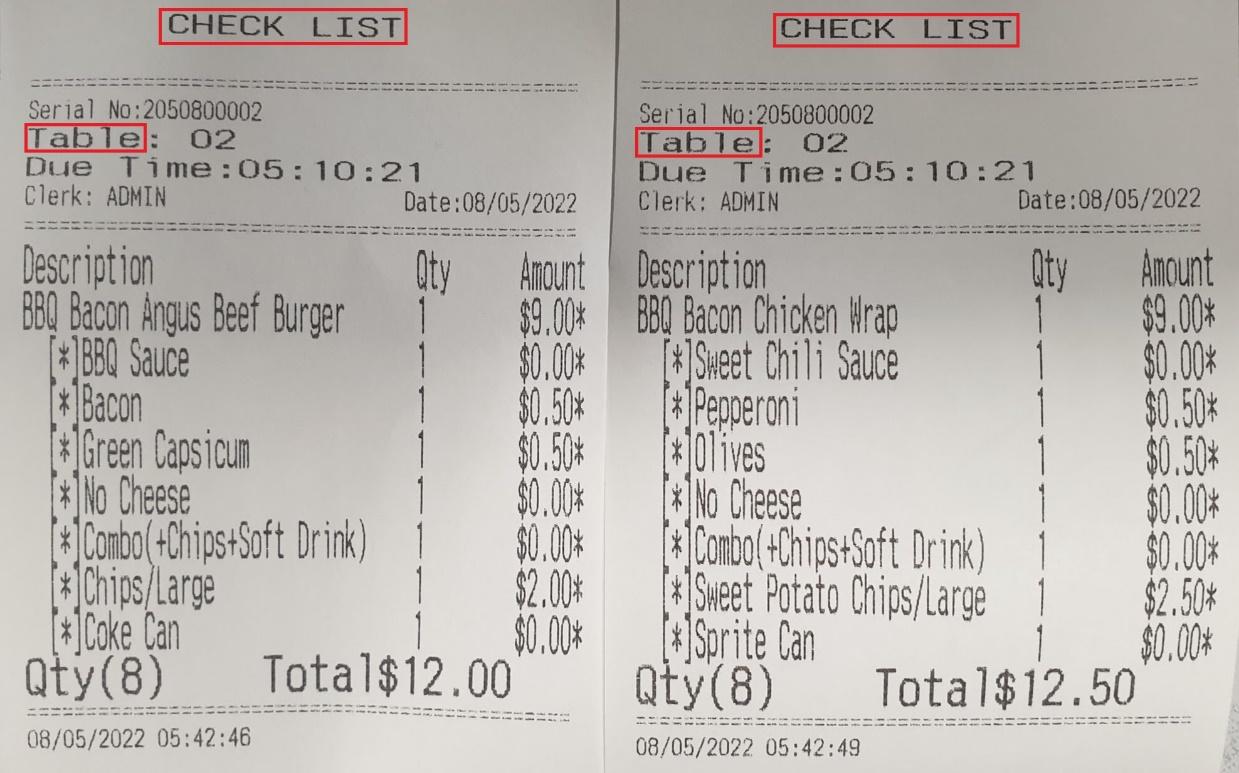
After the customer made a order,
then the "KitchenWindowPrinter" should also print out the "Checklist" for all "Dishes"
which tell the "waitress" or "waiter" what they were going to deliver to customers.
-----------
"Parameters-PrintSetting-CheckListPrinter1" is the printer that print out the "CheckList".
E.g. KitchenWindow
----------------------------

----------------------------------------------
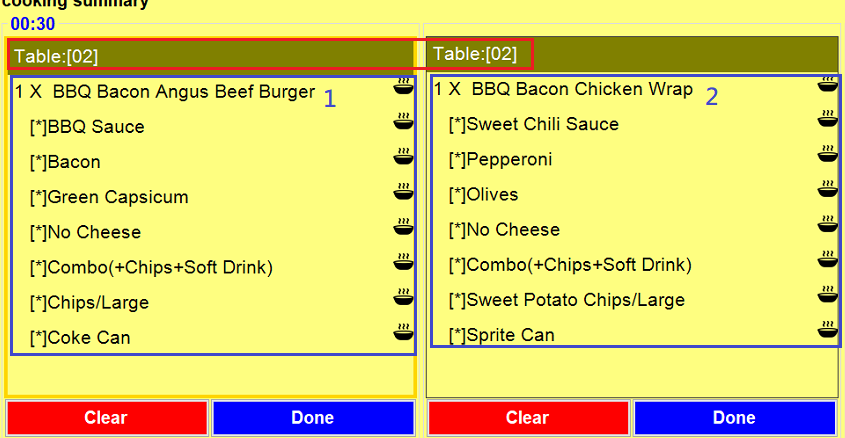
In "Kds"(KitchenDisplayScreen)
It would display the "Joblist" on "Kds".
----------------------------

------------------------------------------------------------------------------------------------------------------------------------
3.
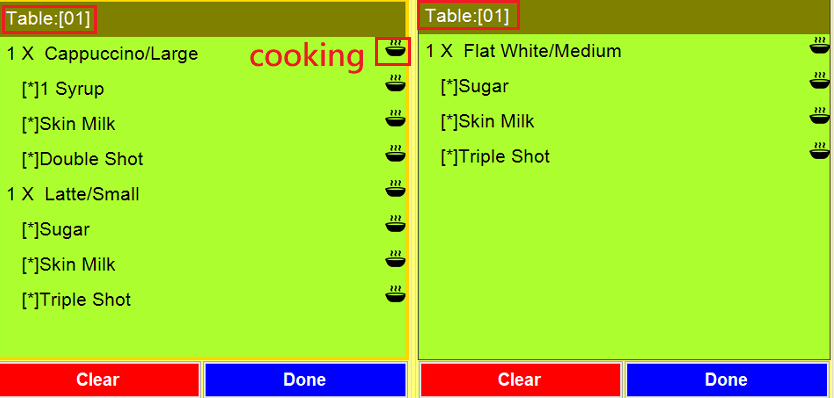
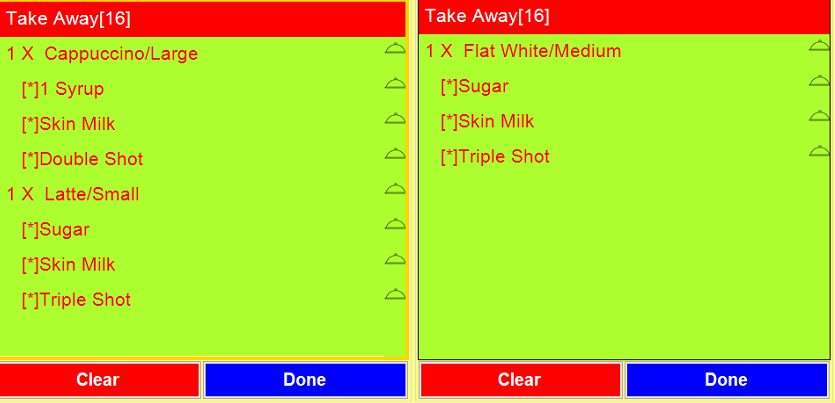
After the "chef" made a "dish" for the "CustomerOrder",
the "chef" should strike-through that individual "dish" from the "Joblist" on the "Kds"(KitchenDisplayScreen).
then the "KitchenWindowPrinter" should print out the "Checklist" for that individual "dish"
which remind the "waitress" or "waiter" that individual "dish" was ready to deliver.
-----------
"Parameters-PrintSetting-CheckListPrinter1" is the printer that print out the "CheckList".
E.g. KitchenWindow
-------------------------------------------------------------------------------------------------------------------------
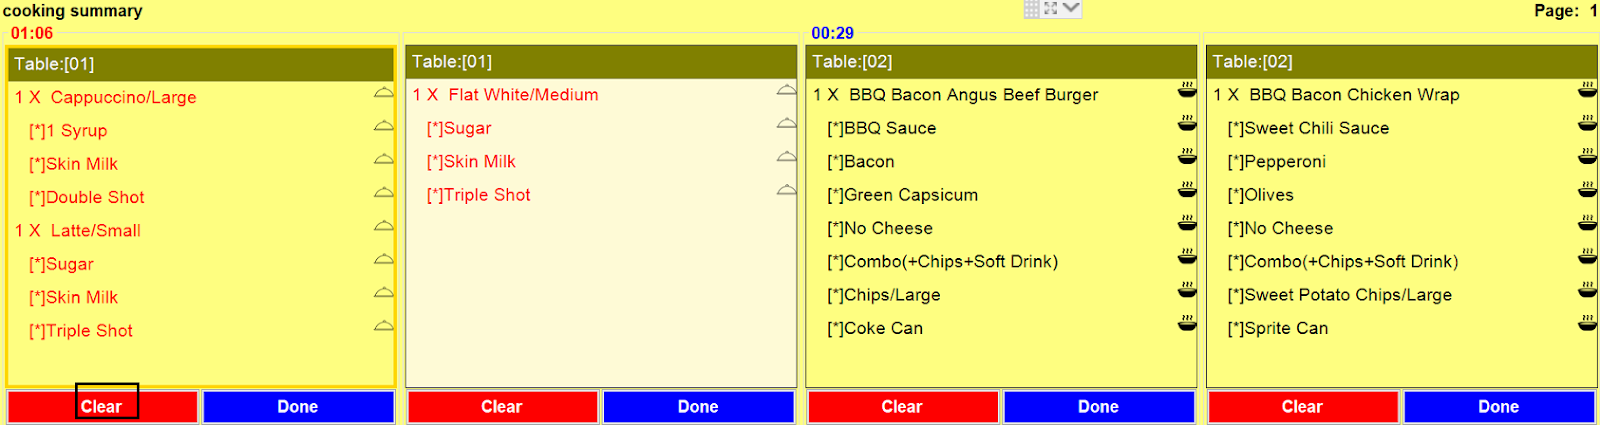
3.1.
In "Kds"(KitchenDisplayScreen)
The "chef" strike-through all "MainItem" in "Table01"
----------------------------

----------------------------------------------
The "KitchenWindowPrinter" should print out the "Checklist" for that individual "dish"
which remind the "waitress" or "waiter" that individual "dish" was ready to deliver.
-----------
"Parameters-PrintSetting-CheckListPrinter1" is the printer that print out the "CheckList".
E.g. KitchenWindow
----------------------------
----------------------------------------------
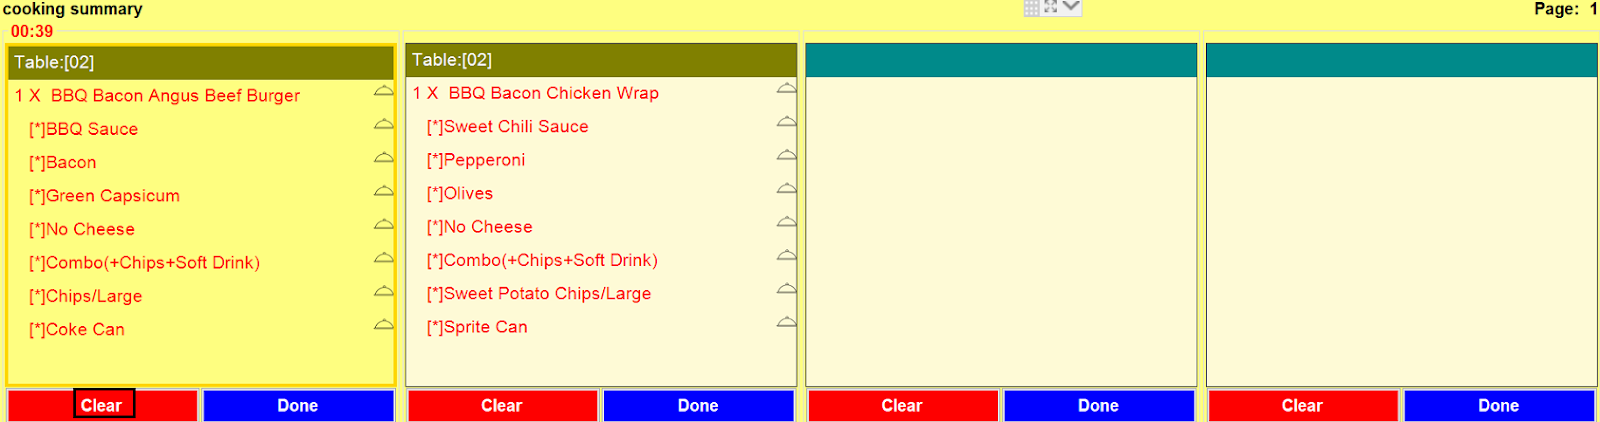
In "Kds"(KitchenDisplayScreen)
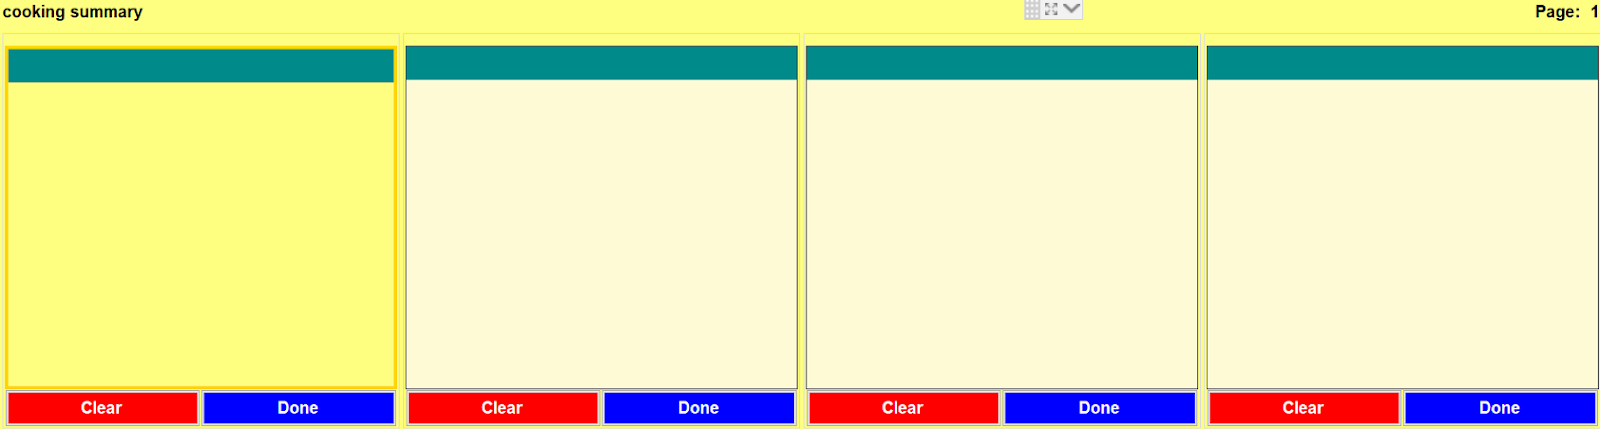
If all "MainItem" in "Table01" are in "Ready" status,
then the "chef" should click "clear" for "Table01"
----------------------------
-------------------------------------------------------------------------------------------------------------------------
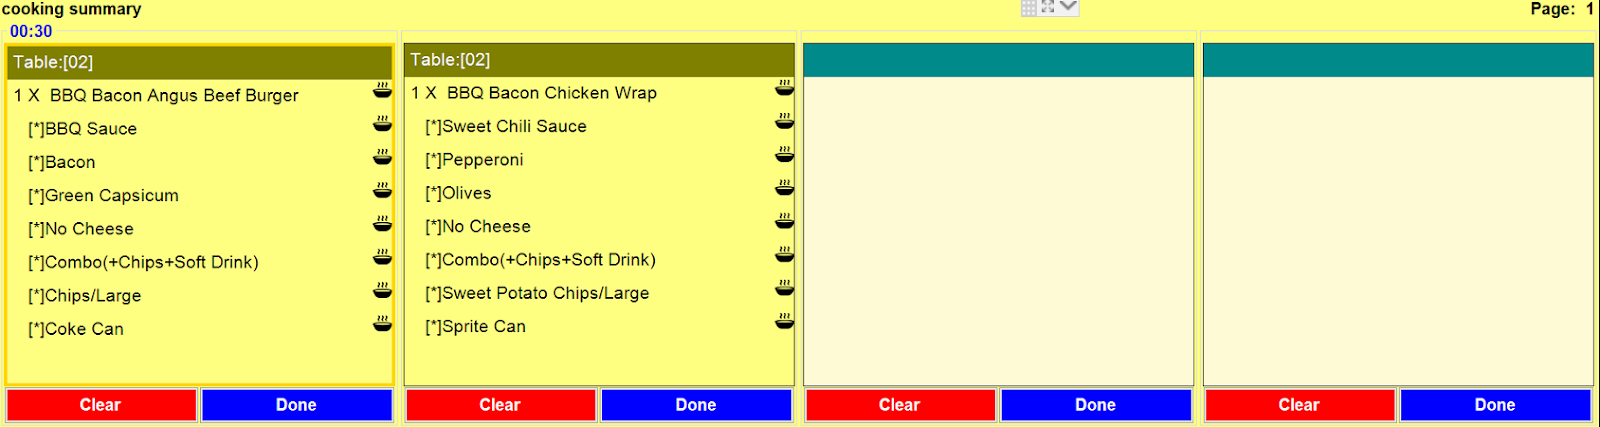
3.2.
In "Kds"(KitchenDisplayScreen)
The "chef" strike-through all "MainItem" in "Table02"
----------------------------

----------------------------------------------
The "KitchenWindowPrinter" should print out the "Checklist" for that individual "dish"
which remind the "waitress" or "waiter" that individual "dish" was ready to deliver.
-----------
"Parameters-PrintSetting-CheckListPrinter1" is the printer that print out the "CheckList".
E.g. KitchenWindow
----------------------------
----------------------------------------------
In "Kds"(KitchenDisplayScreen)
If all "MainItem" in "Table02" are in "Ready" status,
then the "chef" should click "clear" for "Table02"
----------------------------
------------------------------------------------------------------------------------------------------------------------------------
4.
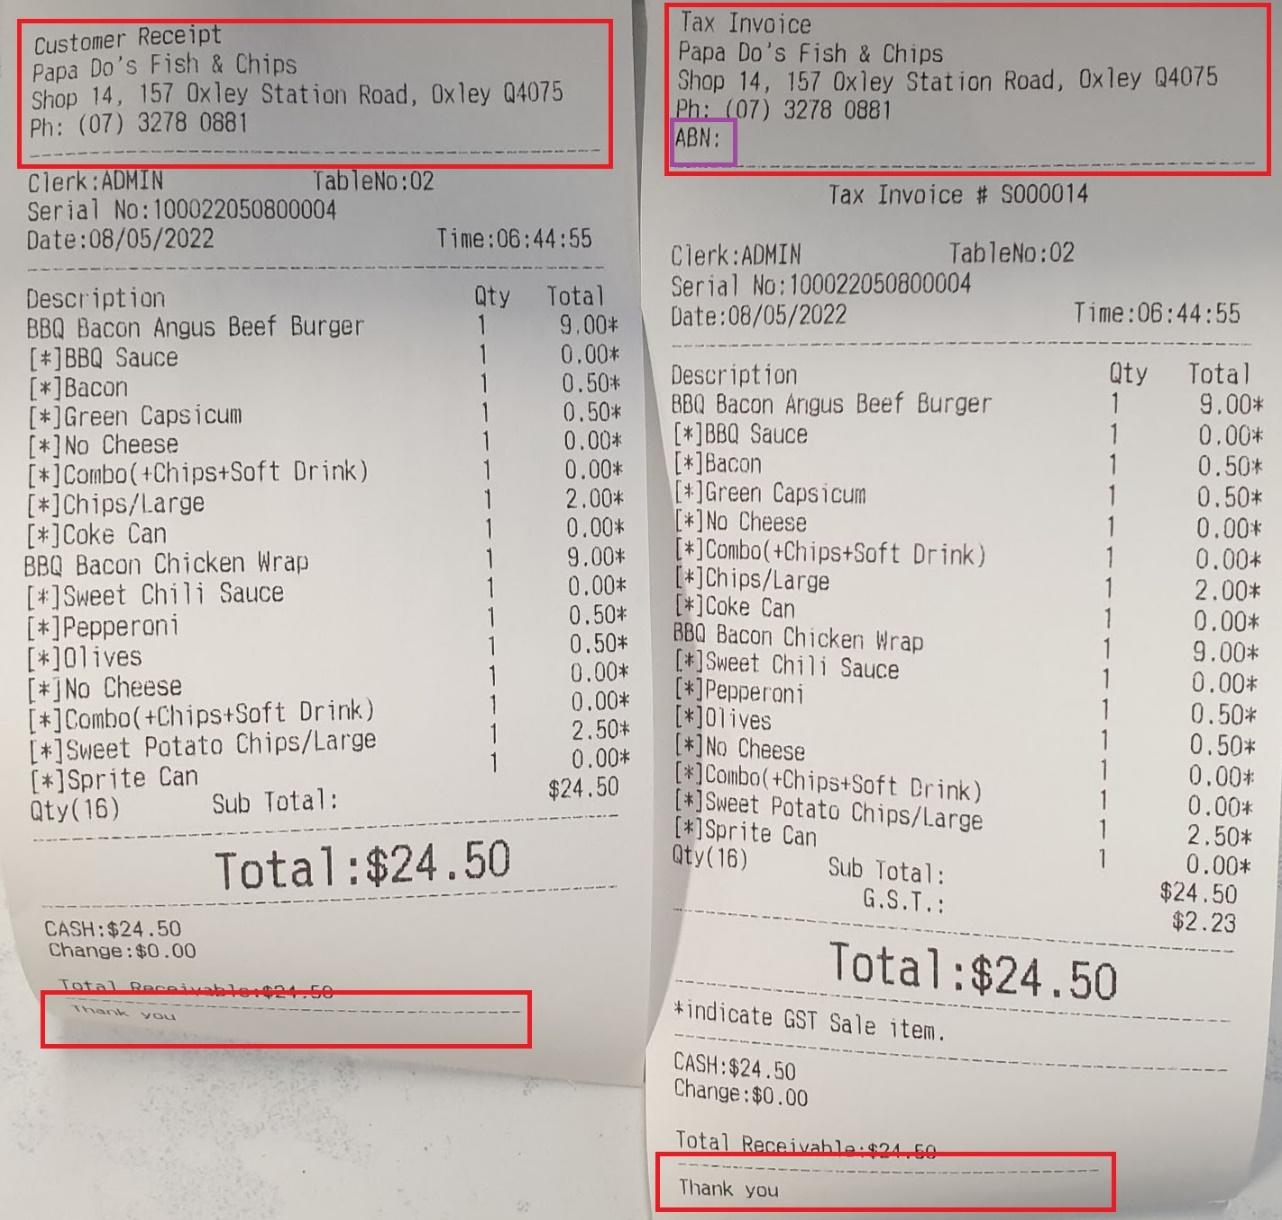
After the customer paid the "CustomerOrder",
the "RceptionPrinter" should print out the "Receipt' for the customer.
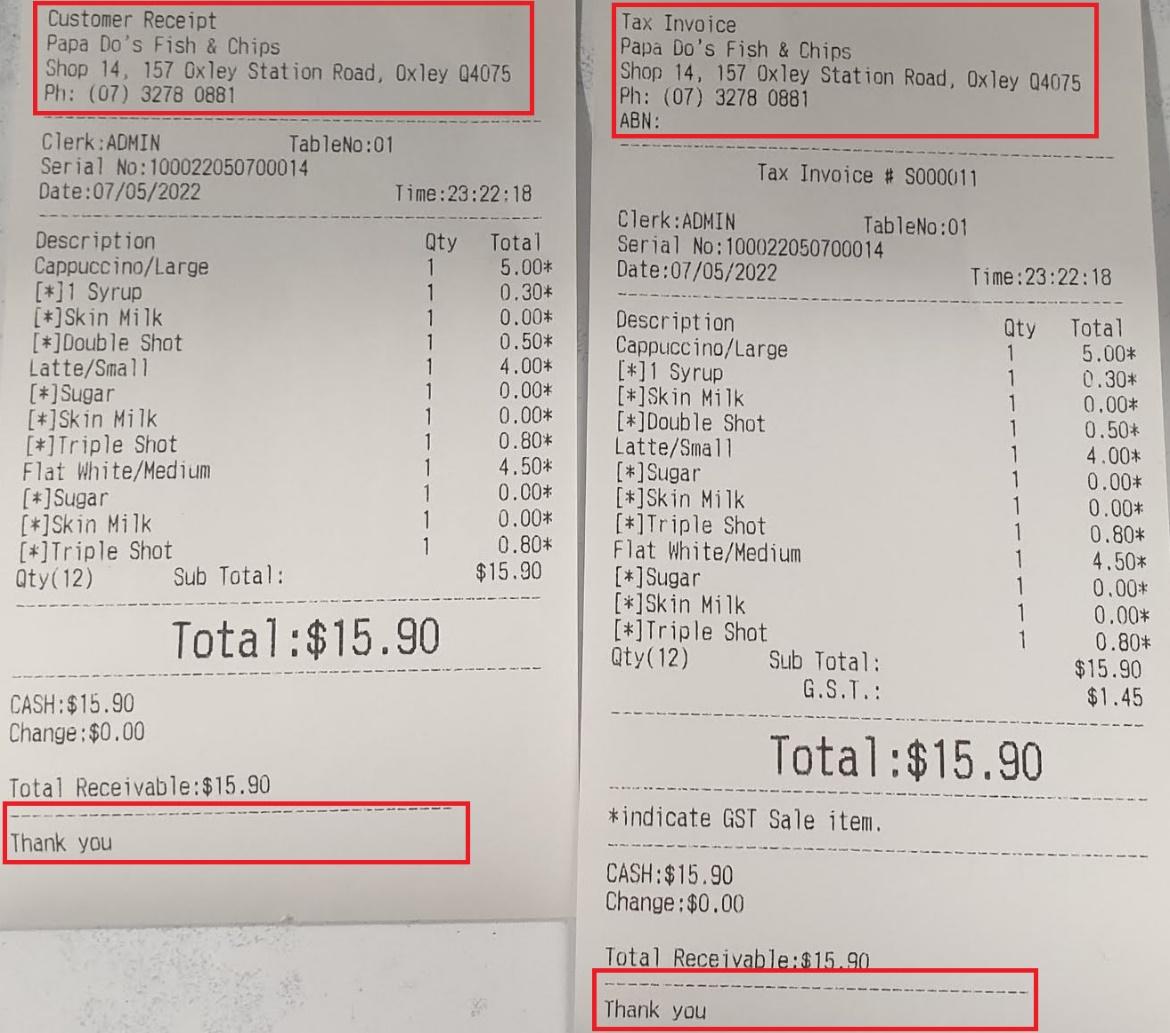
The "Invoice" is the "Receipt" with "ABN"(Australia Business Number).
Some customers need the "Invoice" for the "TaxPurpose".
-----------
"Parameters-PrintSetting-BillPrinter" is the printer that print out the "Receipt".
E.g. Reception
-----------
"Parameters-PrintSetting-InvoicePrinter" is the printer that print out the "Invoice".
The "Invoice" is the "Receipt" with "ABN"(Australia Business Number).
E.g. Reception
-------------------------------------------------------------------------------------------------------------------------
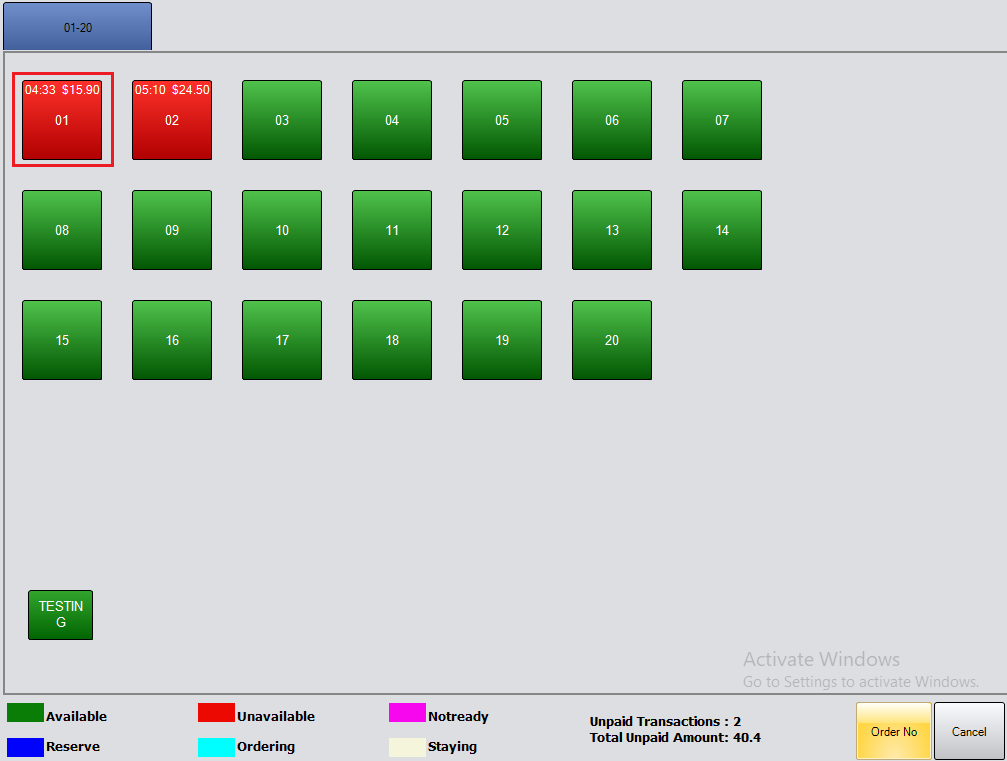
4.1.
Pay "Table01"
----------------------------------------------
Select "Table01"
"RedTable" means this table had not paid yet
----------------------------
----------------------------------------------
Click "Pay"
----------------------------
----------------------------------------------
Click "Cash"
Click "CompletePayment"
----------------------------

----------------------------------------------
Click "PrintReceipt"
Click "PrintInvoice"
Click "Exit"
----------------------------
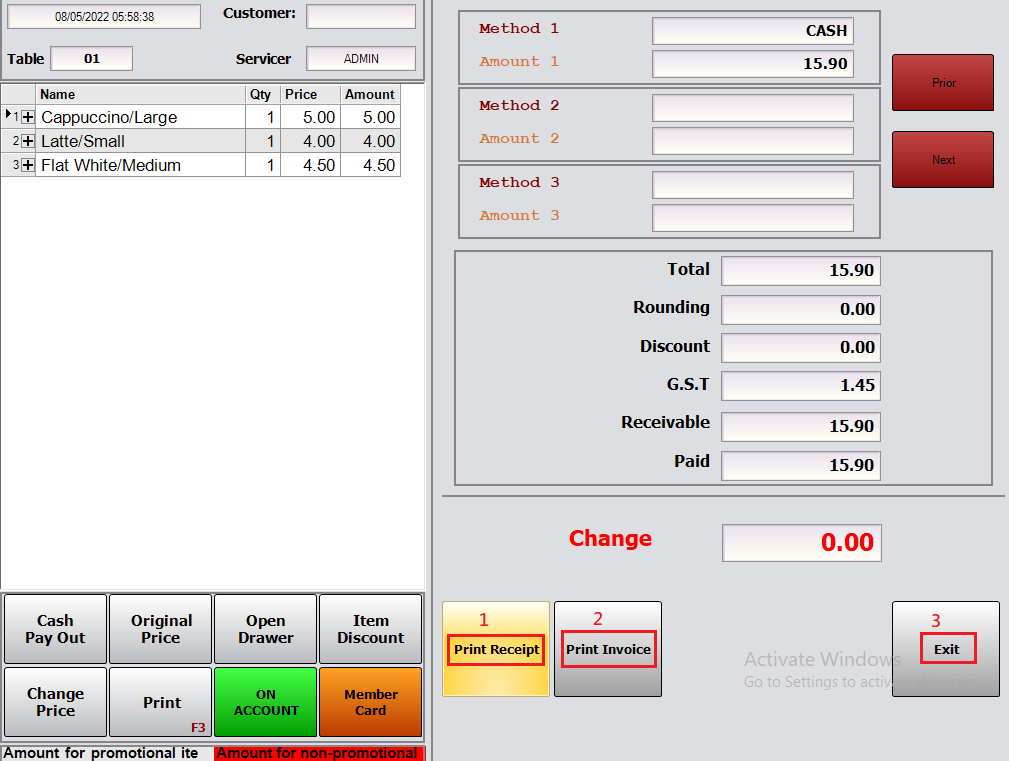
----------------------------------------------
"Parameters-PrintSetting-BillPrinter" is the printer that print out the "Receipt".
E.g. Reception
-----------
"Parameters-PrintSetting-InvoicePrinter" is the printer that print out the "Invoice".
The "Invoice" is the "Receipt" with "ABN"(Australia Business Number).
E.g. Reception
----------------------------

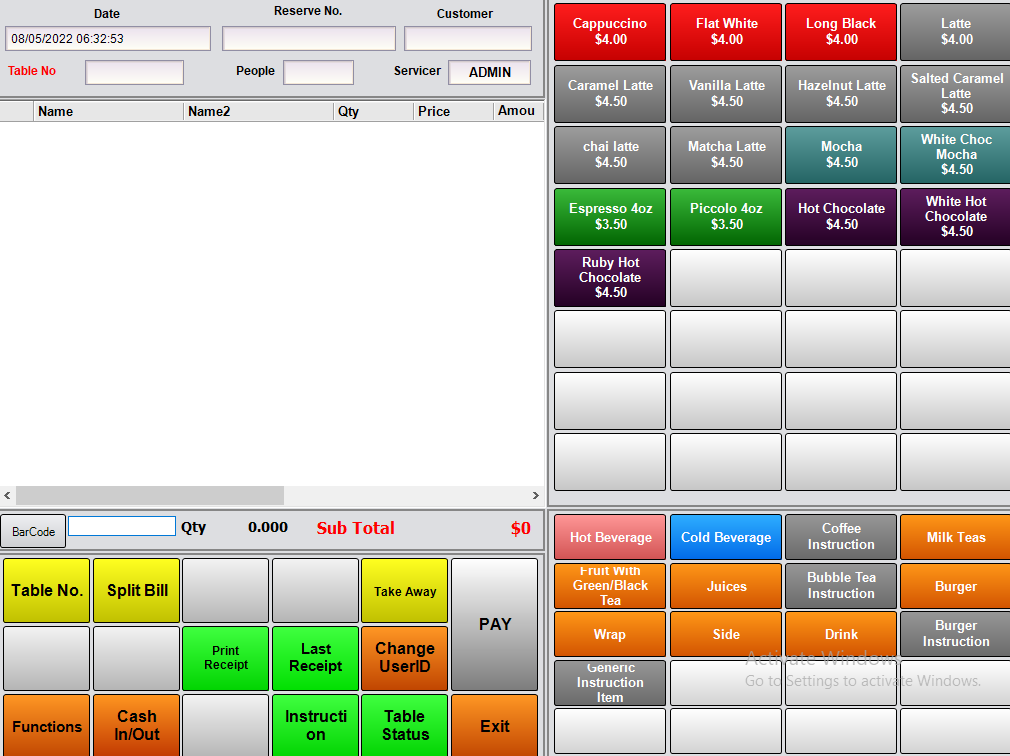
----------------------------------------------
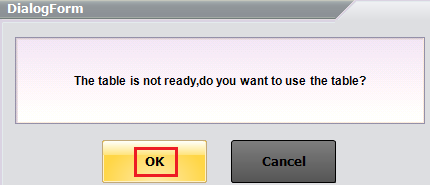
"PurpleTable" means this table had paid,
but the table had not cleaned up yet.
-----------
After the table had cleaned up,
Select "Table01"
--> OK
--> Quit
Then the table would be available again.
----------------------------


-------------------------------------------------------------------------------------------------------------------------
4.2.
Pay "Table02"
----------------------------------------------
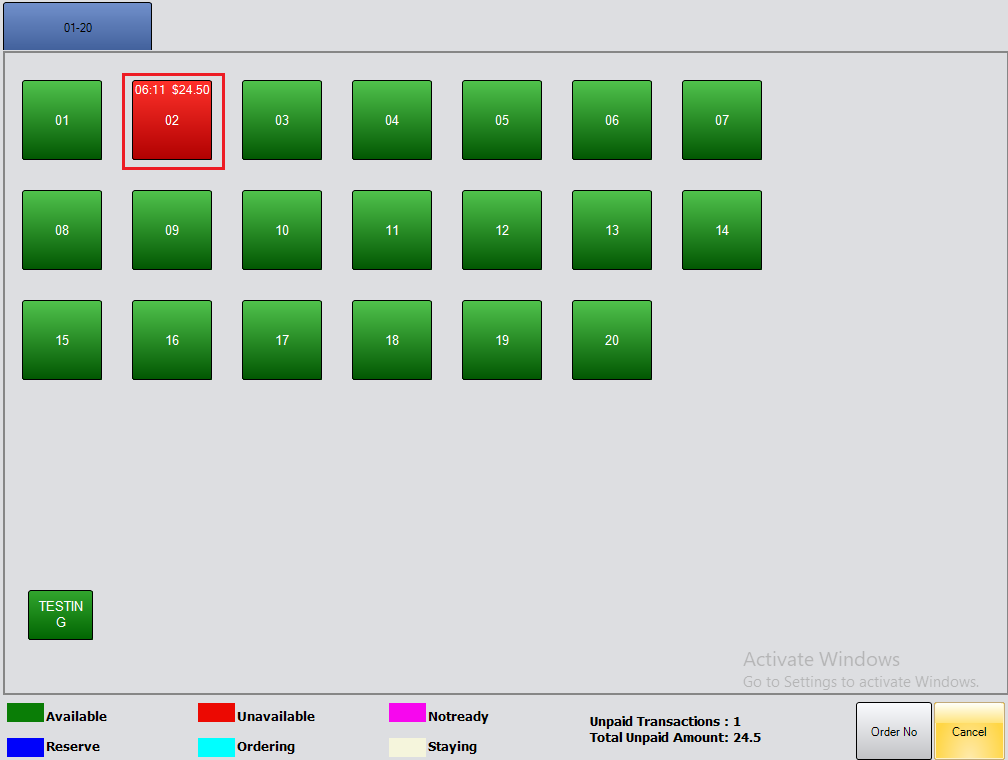
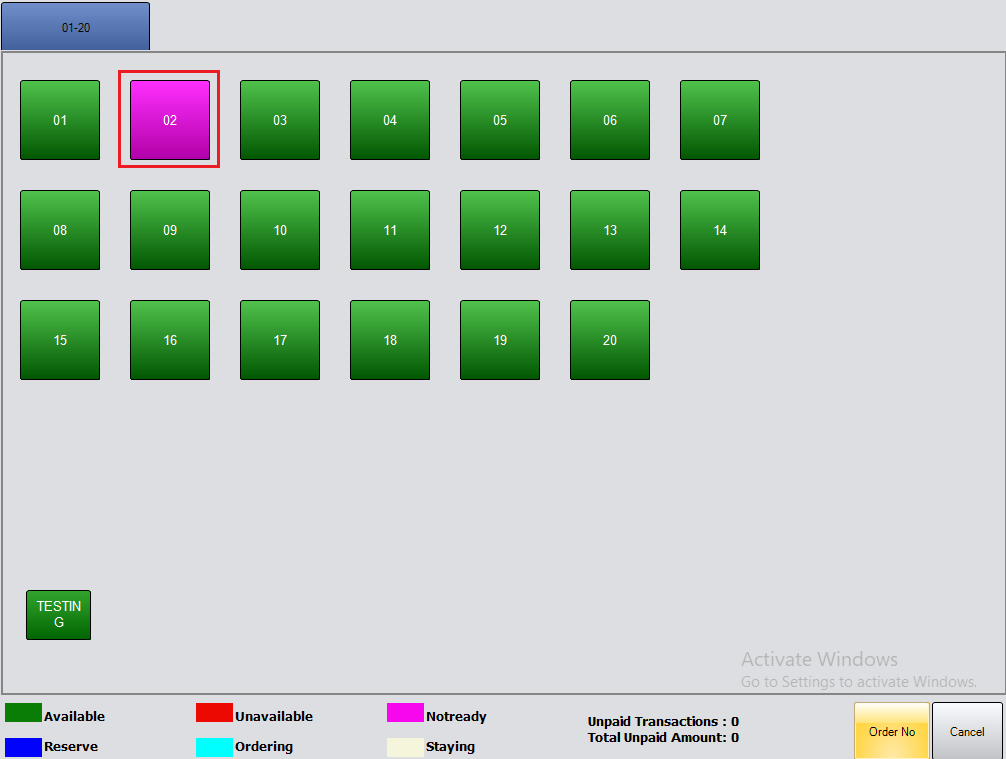
Select "Table02"
"RedTable" means this table had not paid yet
----------------------------
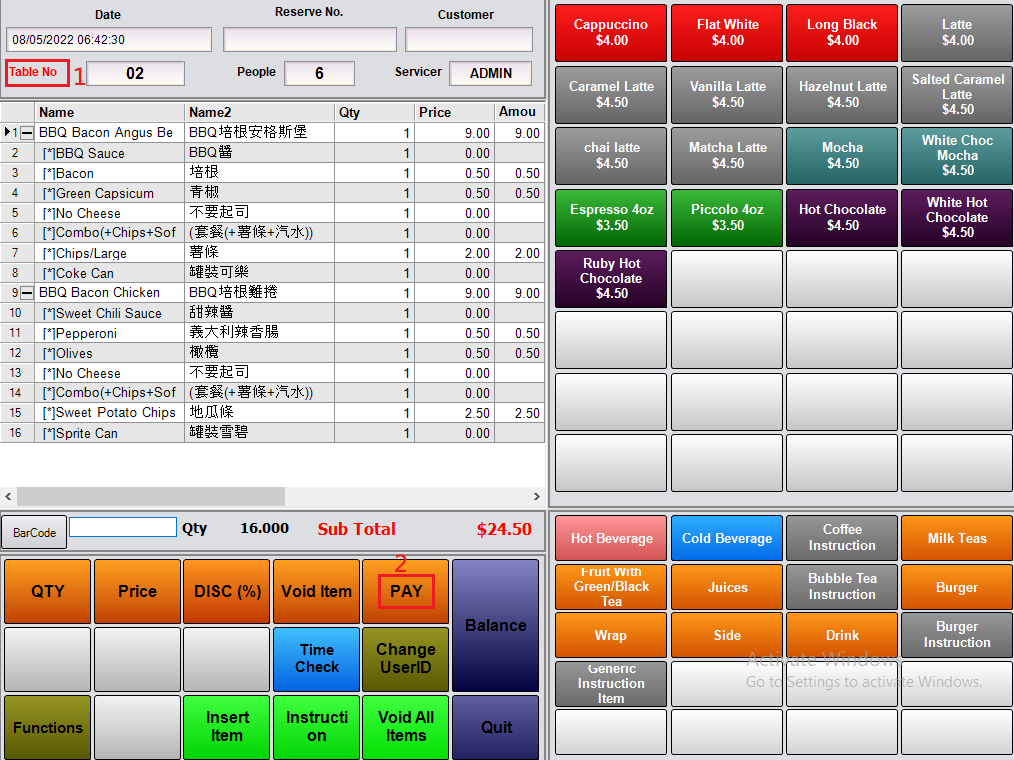
----------------------------------------------
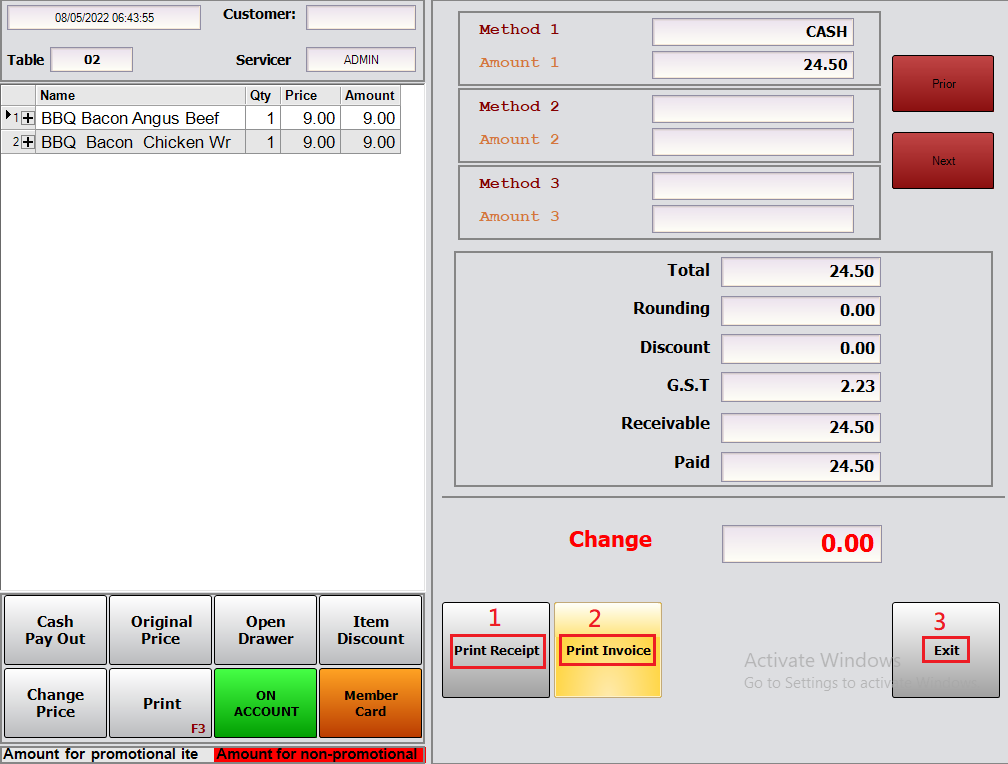
Click "Pay"
----------------------------
----------------------------------------------
Click "Cash"
Click "CompletePayment"
----------------------------

----------------------------------------------
Click "PrintReceipt"
Click "PrintInvoice"
Click "Exit"
----------------------------
----------------------------------------------
"Parameters-PrintSetting-BillPrinter" is the printer that print out the "Receipt".
E.g. Reception
-----------
"Parameters-PrintSetting-InvoicePrinter" is the printer that print out the "Invoice".
The "Invoice" is the "Receipt" with "ABN"(Australia Business Number).
E.g. Reception
----------------------------
----------------------------------------------
"PurpleTable" means this table had paid,
but the table had not cleaned up yet.
-----------
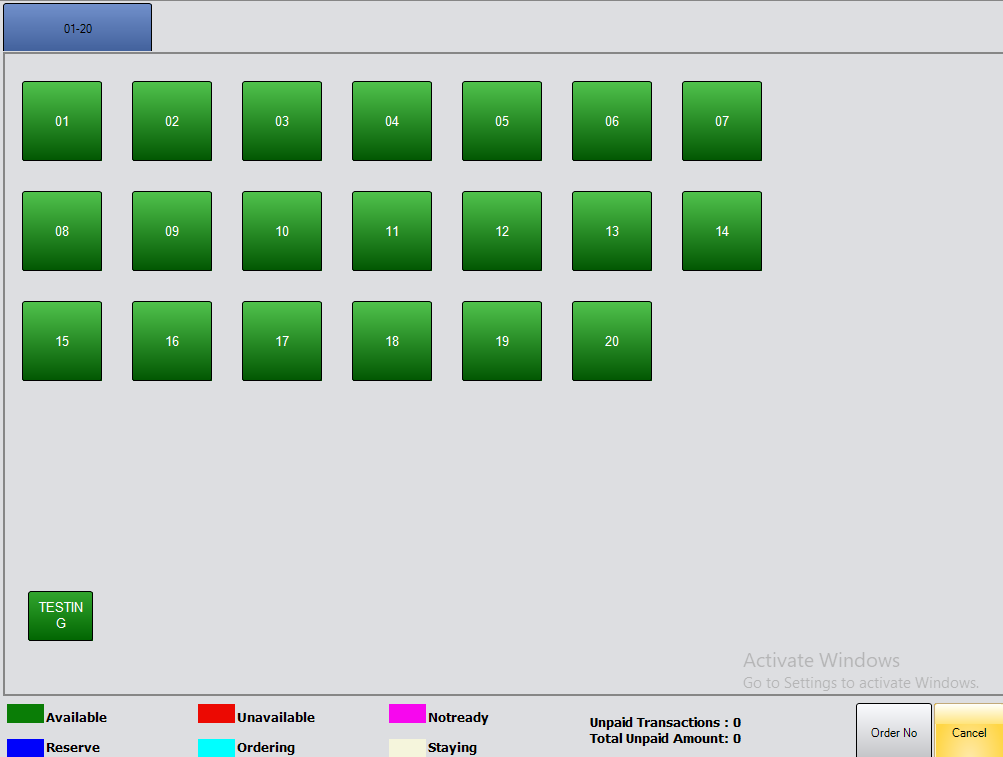
After the table had cleaned up,
Select "Table02"
--> OK
--> Quit
Then the table would be available again.
----------------------------

-------------------------------------------------------------------------------------------------------------------------------------------------
2.2. Demonstrate - QuickService
-------------------------------------------------------------------------------------------------------------------------------------------------
Demonstrate - QuickService
-------------------------------------------------------------------------------------------------------------------------------------------------
1.
If you want to see the result and demonstrate the "Kds"(KitchenDisplayScreen) and "Printer"
you could restore from "04_01_20220403_CoffeeBubbleTeaBugger_InArmpos.dat"
------------------------------------------------------------------------------------------------------------------------------------
2.
QuickService - Make order
----------------------------
-------------------------------------------------------------------------------------------------------------------------
2.1.
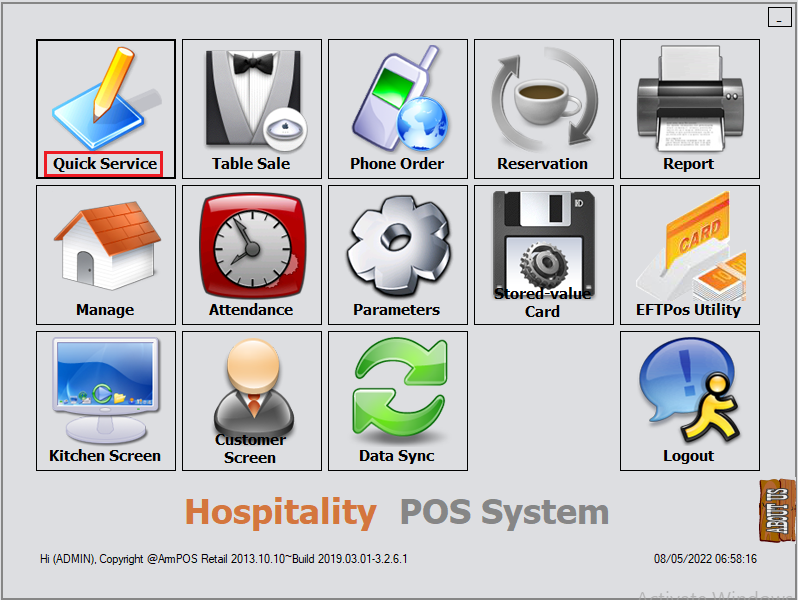
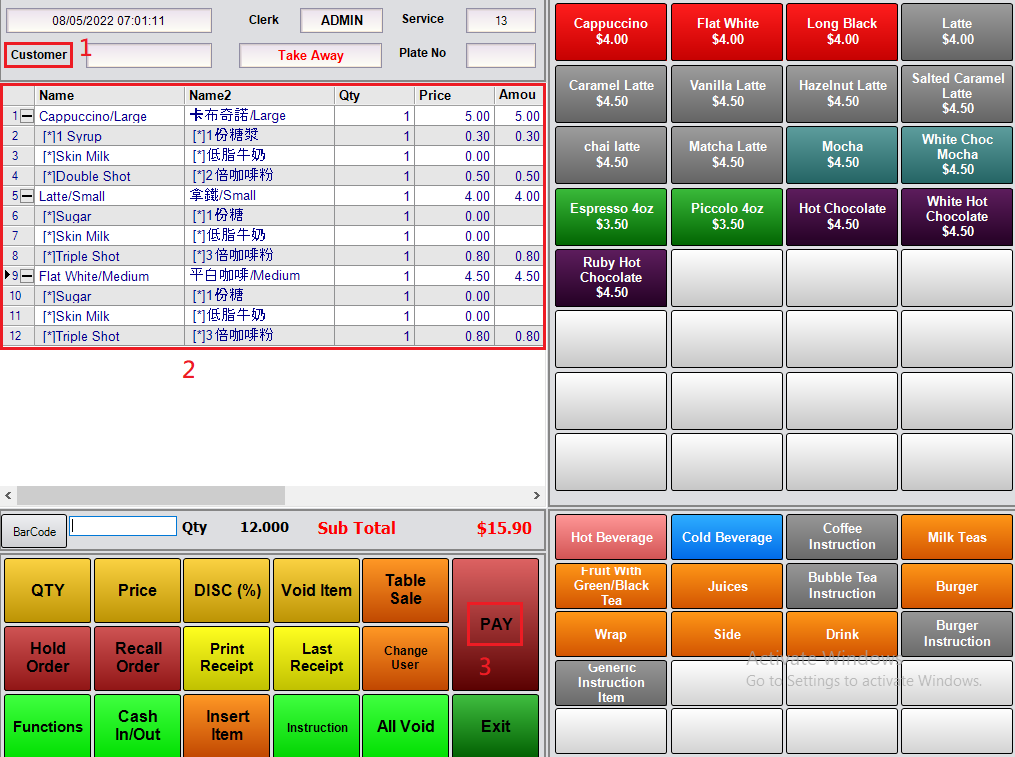
In "PosMachine"
Make a order
Click "Pay"
----------------------------
----------------------------------------------
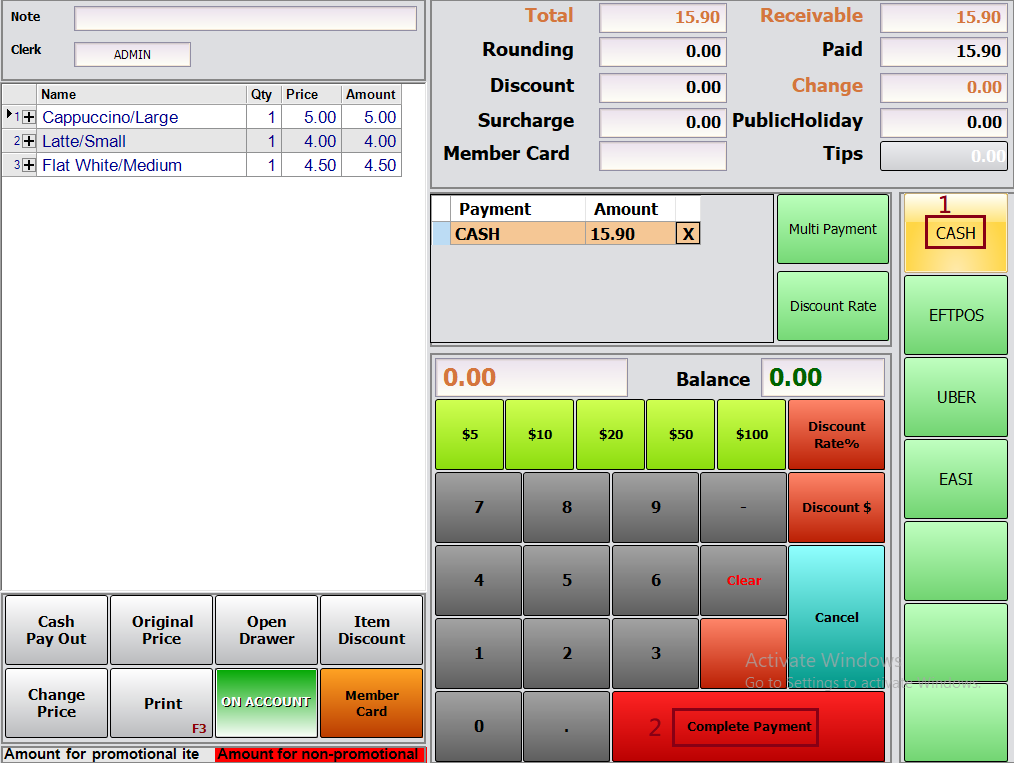
Click "Cash"
Click "CompletePayment"
----------------------------
----------------------------------------------
In "QuickService",
After the customer had "completed payment",
then the "KitchenPrinter" should print out the "Joblist"
which could tell the "chef" what to cook.
-----------
"Manage-MenuSetup-Item-Printer" is the printer that print out the "Joblist".
E.g. Kitchen
----------------------------
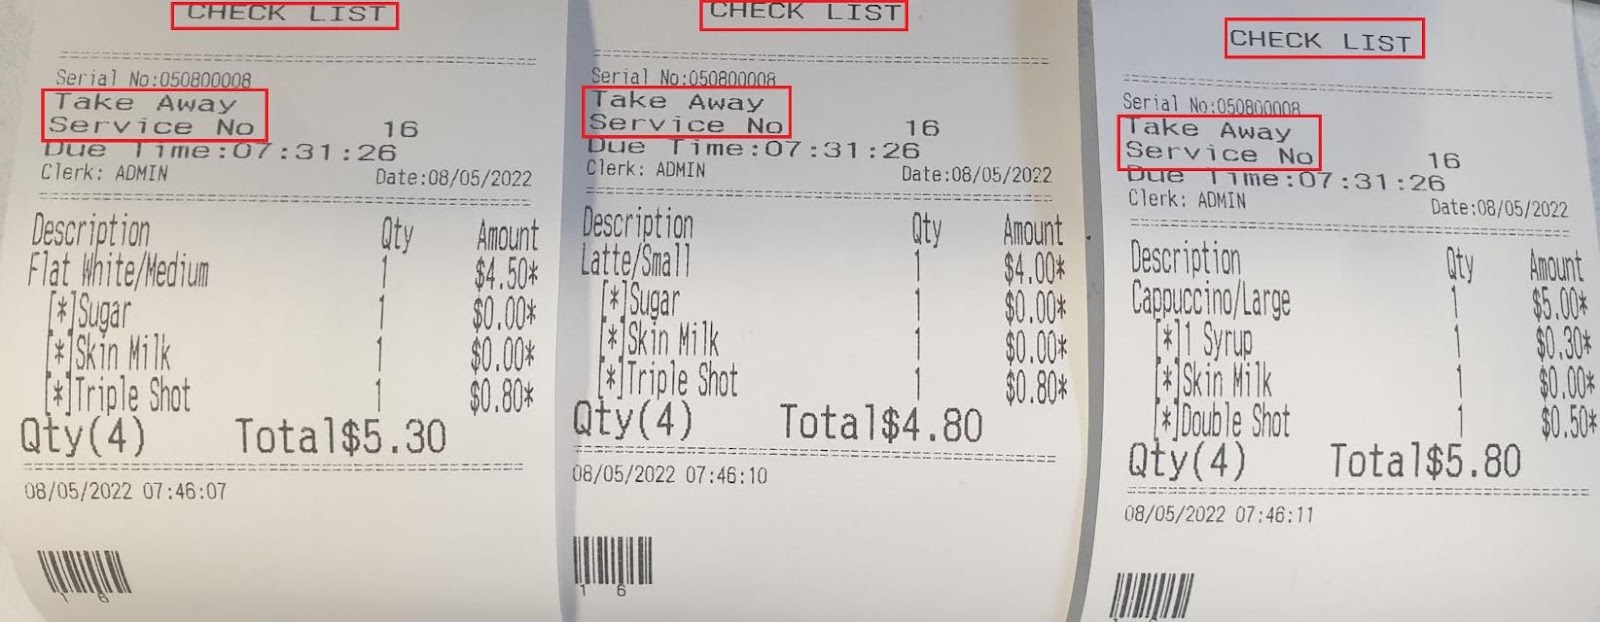
In "QuickService",
After the customer had "completed payment",
then the "KitchenWindowPrinter" should also print out the "Checklist" for all "Dishes"
which tell the "waitress" or "waiter" what they were going to deliver to customers.
-----------
"Parameters-PrintSetting-CheckListPrinter1" is the printer that print out the "CheckList".
E.g. KitchenWindow
----------------------------

----------------------------------------------
Click "PrintReceipt"
Click "PrintInvoice"
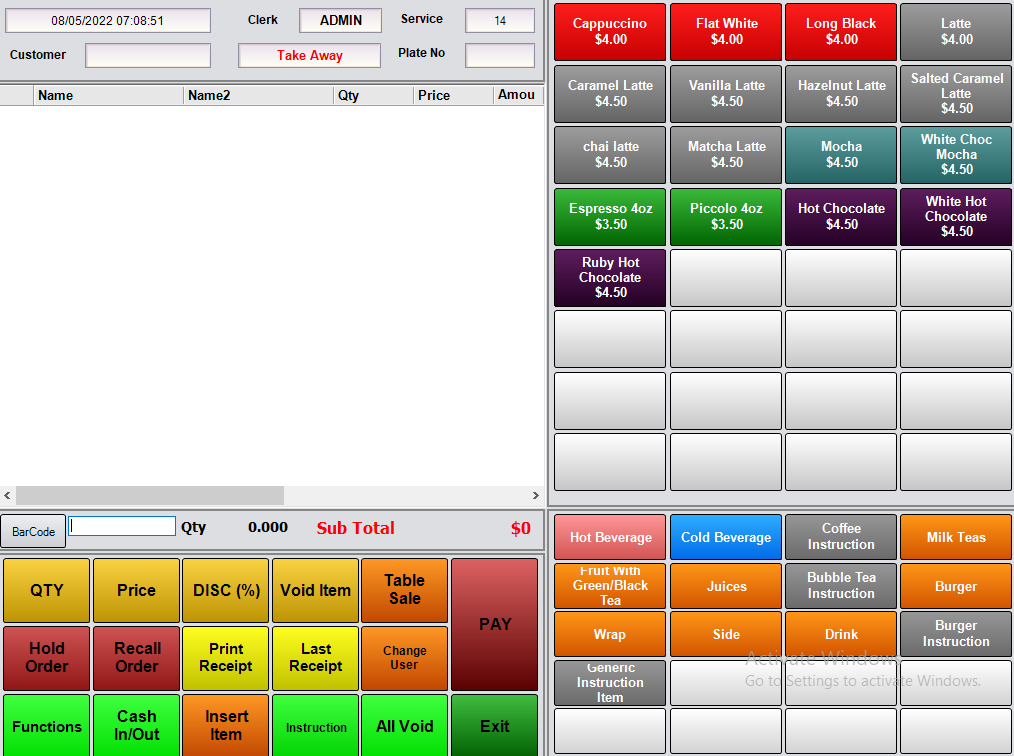
Click "PrintServiceNo"
Click "Exit"
----------------------------

----------------------------------------------
"Parameters-PrintSetting-BillPrinter" is the printer that print out the "Receipt".
E.g. Reception
-----------
"Parameters-PrintSetting-InvoicePrinter" is the printer that print out the "Invoice".
The "Invoice" is the "Receipt" with "ABN"(Australia Business Number).
E.g. Reception
-----------
"ServiceNumber" is a small piece of paper for the customer to collect their "dishes" later.
E.g. Reception
----------------------------

----------------------------------------------
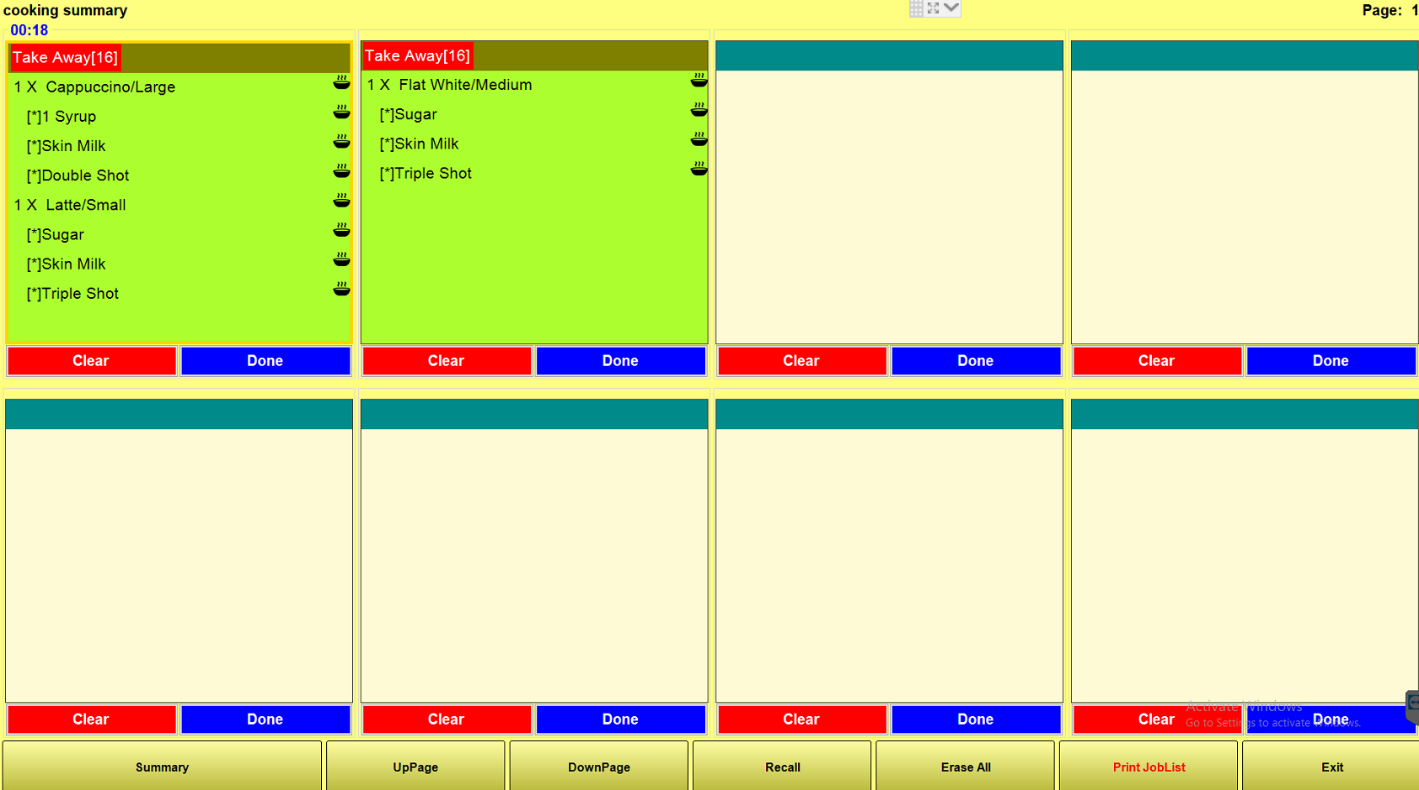
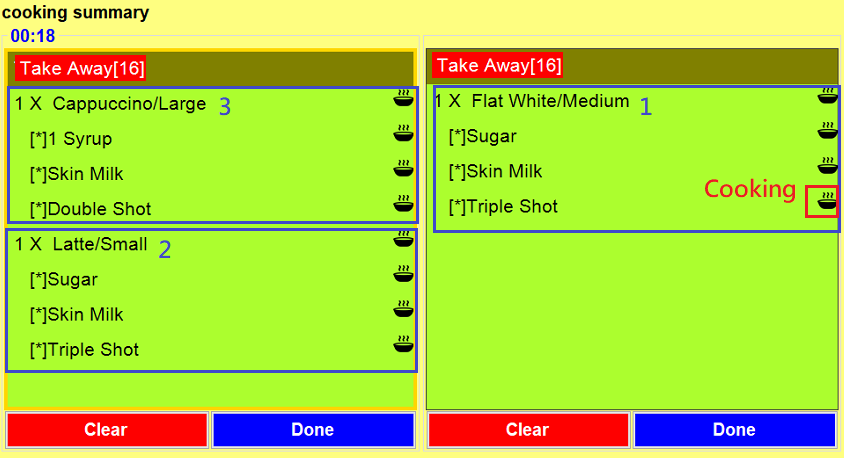
In "Kds"(KitchenDisplayScreen)
It would display the "Joblist" on "Kds".
----------------------------
---------------------------------------------
The "KitchenWindowPrinter" should print out the "Checklist" for that individual "dish"
which remind the "waitress" or "waiter" that individual "dish" was ready to deliver.
-----------
"Parameters-PrintSetting-CheckListPrinter1" is the printer that print out the "CheckList".
E.g. KitchenWindow
-----------
The "BubbleTeaShop" should print out the "Checklist" as a "Label",
so you could paste the "Label" on top of the "Cup".
----------------------------
----------------------------------------------
In "Kds"(KitchenDisplayScreen)
If the all "MainItem" in "Table01" is in "Ready" status,
then the "chef" should click "clear" for "Table01"
----------------------------

-------------------------------------------------------------------------------------------------------------------------------------------------
3. Summary - Joblist, Checklist, Receipt, Invoice, PrintMessage - AutoCut, Auto Split, Beep, PrinterMessage
-------------------------------------------------------------------------------------------------------------------------------------------------
Summary - Joblist, Checklist, Receipt, Invoice, PrintMessage - AutoCut, Auto Split, Beep, PrinterMessage
-------------------------------------------------------------------------------------------------------------------------------------------------
0.
PrinterSummary
----------------------------------------------
"Parameters-PrintSetting-BillPrinter" - Receipt
"Parameters-PrintSetting-InvoicePrinter" - Invoice
(Red)"MenuSetup-Item-Printer" - JobList
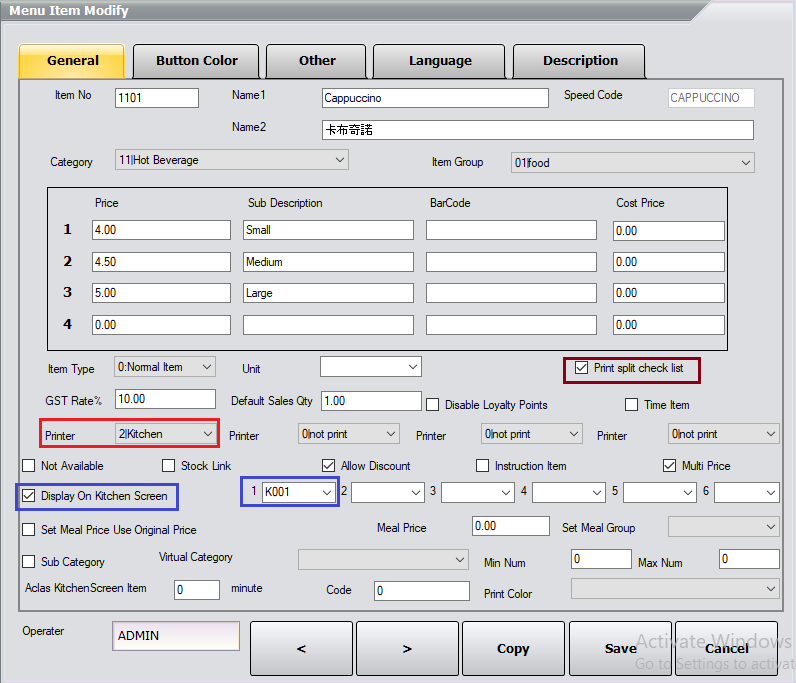
(Brown)"MenuSetup-Item-PrinterSplitCheckList" - Enble
"Parameters-PrintSetting-CheckListPrinter1" - CheckList
----------------------------------------------
"Parameters-PrintSetting-BillPrinter" is the printer that print out the "Receipt".
E.g. Reception
-----------
"Parameters-PrintSetting-InvoicePrinter" is the printer that print out the "Invoice".
The "Invoice" is the "Receipt" with "ABN"(Australia Business Number).
E.g. Reception
-----------
"Manage-MenuSetup-Item-Printer" is the printer that print out the "Joblist".
E.g. Kitchen
-----------
"Parameters-PrintSetting-CheckListPrinter1" is the printer that print out the "CheckList".
E.g. KitchenWindow
----------------------------------------------

------------------------------------------------------------------------------------------------------------------------------------
1.
One "Restaurant" should have many "printers"
The "Printer" of the "Armpos Hospitality" have a few things to print.
-------------------------------------------------------------------------------------------------------------------------
1.1.
"RceptionPrinter" - "Receipt, Invoice, PrintMessage"
----------------------------------------------
After the customer paid the "CustomerOrder",
the "RceptionPrinter" should print out the "Receipt' for the customer.
The "Invoice" is the "Receipt" with "ABN"(Australia Business Number).
Some customers need the "Invoice" for the "TaxPurpose".
-----------
"Parameters-PrintSetting-BillPrinter" is the printer that print out the "Receipt".
E.g. Reception
-----------
"Parameters-PrintSetting-InvoicePrinter" is the printer that print out the "Invoice".
The "Invoice" is the "Receipt" with "ABN"(Australia Business Number).
E.g. Reception
-----------
"LeftHandSide" is what you will see in "Receipt"
"RightHandSide" is what you will see in "Invoice"
----------------------------------------------
Manage
-->
Basic Tab
Parameters
-->
Print Setting
"Parameters-PrintSetting-BillPrinter" - Receipt
"Parameters-PrintSetting-InvoicePrinter" - Invoice
----------------------------
-------------------------------------------------------------------------------------------------------------------------
1.2.
"KitchenPrinter" - "Joblist, PrintMessage"
----------------------------------------------
After the customer made a order,
then the "KitchenPrinter" should print out the "Joblist"
which could tell the "chef" what to cook.
-----------
After the "chef" made "dishes" for the "CustomerOrder",
the "chef" should strike-through that "dishes" from the "Joblist".
-----------
"Manage-MenuSetup-Item-Printer" is the printer that print out the "Joblist".
E.g. Kitchen
----------------------------------------------
Manage
-->
Basic Tab
Menu Setup
-->
Select your "Item"
Click "Edit"
-->
(Red)"MenuSetup-Item-Printer" - JobList
----------------------------
-------------------------------------------------------------------------------------------------------------------------
1.3.
"KitchenWindowPrinter" - "Checklist, PrintMessage"
----------------------------------------------
After the customer made a order,
then the "KitchenPrinter" should print out the "Joblist"
which could tell the "chef" what to cook.
-----------
After the customer made a order,
then the "KitchenWindowPrinter" should also print out the "Checklist" for all "Dishes"
which tell the "waitress" or "waiter" what they were going to deliver to customers.
-----------
After the "chef" made a "dish" for the "CustomerOrder",
the "chef" should strike-through that individual "dish" from the "Joblist" on the "Kds"(KitchenDisplayScreen).
then the "KitchenWindowPrinter" should print out the "Checklist" for that individual "dish"
which remind the "waitress" or "waiter" that individual "dish" was ready to deliver.
-----------
"Parameters-PrintSetting-CheckListPrinter1" is the printer that print out the "CheckList".
E.g. KitchenWindow
----------------------------------------------
Manage
-->
Basic Tab
Parameters
-->
Print Setting
"CheckListPrinter1"
-----------
After the customer made a order,
then the "KitchenWindowPrinter" should also print out the "Checklist" for all "Dishes"
which tell the "waitress" or "waiter" what they were going to deliver to customers.
-----------
"Parameters-PrintSetting-CheckListPrinter1" - CheckList
----------------------------
----------------------------------------------
After the "chef" made a "dish" for the "CustomerOrder",
the "chef" should strike-through that individual "dish" from the "Joblist" on the "Kds"(KitchenDisplayScreen).
then the "KitchenWindowPrinter" should print out the "Checklist" for that individual "dish"
which remind the "waitress" or "waiter" that individual "dish" was ready to deliver.
-----------
In "Kds-KdsSetting"
Your "Kds" need to connect to the "Printer" of the "KitchenWindow"
However, I will not demonstrate the "Kds-KdsSetting".
-----------
In "PosMachine-KdsSetting"
Your "PosMachine" need to connect to the "Printer" of the "KitchenWindow".
However, you need to enable "PrintSplitCheckList" for each "Item"
-----------
(Red)"MenuSetup-Item-Printer" - JobList
(Brown)"MenuSetup-Item-PrinterSplitCheckList" - Enble
----------------------------
-------------------------------------------------------------------------------------------------------------------------
1.4.
"BarPrinter" - "Joblist, Checklist, Receipt, Invoice, PrintMessage"
----------------------------------------------
In this tutorial, we will not demonstrate the "BarPrinter",
but we will introduce the "BarPrinter" only a little bit.
-----------
Situation1
The independent "Bar".
In most "Bars", "Bar" only has one "BarPrinter"
which should print out "Joblist, Checklist, Receipt, Invoice, PrintMessage".
-----------
Situation2
Some "Restaurants" has a "Bar".
In this case, we might still use "Situation1" for the independent "BarPosMachine".
Otherwise, the "BarPrinter" should only print the "Joblist"
------------------------------------------------------------------------------------------------------------------------------------
2.
"PrintMessage" is a very special functions for every "Printer".
----------------------------------------------
In this tutorial, we would not demonstrate the "PrintMessage" function,
but I would still like to introduce this function.
-----------
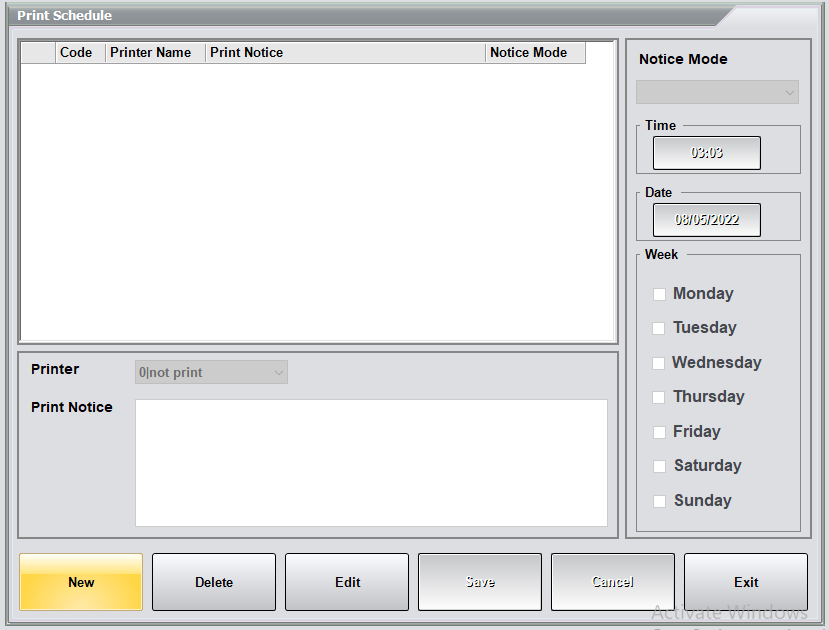
"PrintMessage" is the function of "Printer" that remind our staff what to do at certain point of time.
E.g.
The trading hour between "Monday" to "Friday" is "10am" to "9pm".
The trading hour between "Saturday" to "Sunday" is "10am" to "12am"(midnight).
Every day between "3pm" to "5pm" is the "HappyHour" that provide discount special.
The "Restaurant" use "TableLayout1" during Monday to Friday,
and use "TableLayout2" during the weekend.
-----------
In this case, "RceptionPrinter" should print out the "PrintMessage" when "closing" on "Friday"
that remind the staffs to re-locate the tables as "TableLayout2" for the "Weekend" business.
in this case, it was "9pm" on "Friday".
-----------
Every day when "close", all "Printers" should print out the "PrintMessage"
to remind the staffs what to do for "closing" the "Restaurant"
In this case, it was "9pm" between "Monday" to "Friday"
In this case, it was "12am"(midnight) during the "Weekend".
-----------
Every day when "Open", all "Printers" should print out the "PrintMessage"
to remind the staffs what to do for "opening" the "Restaurant"
In this case, it was "10am" every day.
-----------
When the "beginning" of "HappyHour",
"RceptionPrinter" should print out the "PrintMessage"
that remind the "waitress" or "waiter" to tell customers that
we are currently during "HappyHour" in order to encourage more orders.
----
"KitchenPrinter" should print out the "PrintMessage"
to remind the "Chef" that the "dishes" is during " HappyHour",
because the "dishes" during " HappyHour" should be cheaper and smaller size of food.
-----------
When the "end" of "HappyHour",
"RceptionPrinter" should print out the "PrintMessage"
that remind the "waitress" or "waiter" to tell customers.
For example,
Sorry, the "HappyHour" is finished today.
Do you want to order something else?
----
"KitchenPrinter" should print out the "PrintMessage"
to remind the "Chef" that the "dishes" should come back to normal size.
----------------------------------------------
Manage
-->
Basic Tab
Printer Setup
Enable "PrintMessage"
-----------


----------------------------------------------
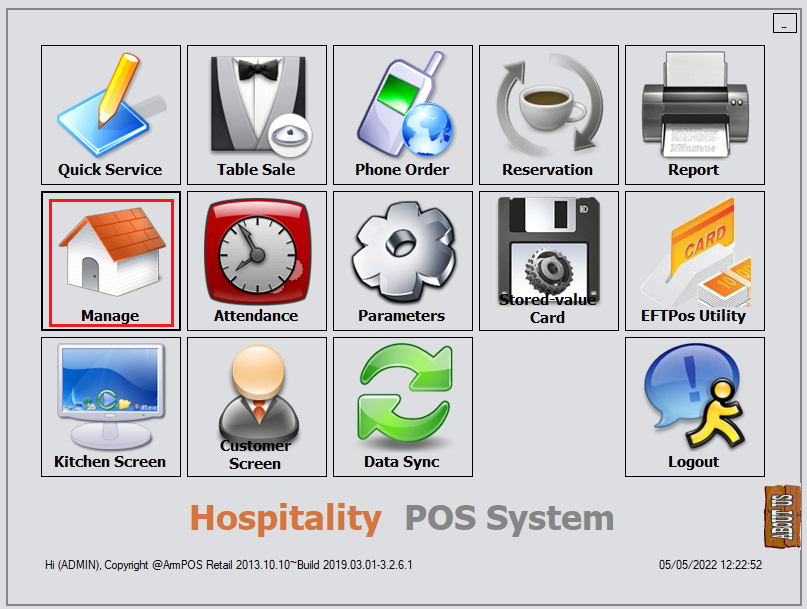
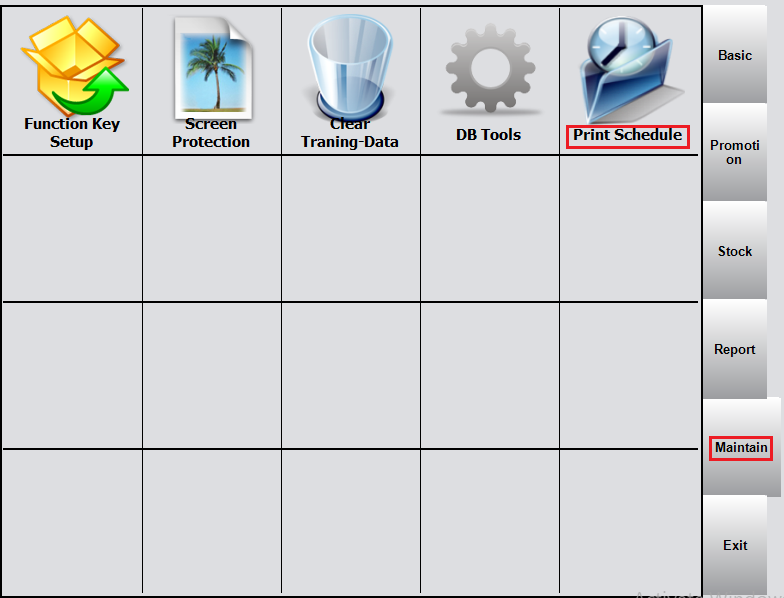
Manage
-->
Maintain Tab
Print Schedule
-----------

------------------------------------------------------------------------------------------------------------------------------------
3.
PrinterOptions - AutoCut, Auto Split, Beep
-------------------------------------------------------------------------------------------------------------------------
3.1.
PrinterOptions - AutoCut, Auto Split, Beep
----------------------------------------------
Manage
-->
Basic Tab
Printer Setup
----------------------------------------------
-------------------------------------------------------------------------------------------------------------------------
3.2.
PrinterOptions - AutoCut, Auto Split, Beep
----------------------------------------------
----------------------------------------------
if "AutoCut" is "true",
then "Joblist, Checklist, Receipt, Invoice, PrintMessage" will be "AutomaticPaperCutting".
-----------
if "AutoSplit" is "true",
then each "Joblist" will only contain one "Dish".
-----------
if "PrintMessage" is "true",
then the "Printer" will activate "PrintMessage" function that remind our staff what to do at certain point of time.
-----------
if "Beep" is "True"
then the "Printer" will activate the "Beep" sound while printing.
-------------------------------------------------------------------------------------------------------------------------------------------------
4. Connect to Printer(Hardware)
-------------------------------------------------------------------------------------------------------------------------------------------------
Connect to Printer(Hardware)
-------------------------------------------------------------------------------------------------------------------------------------------------
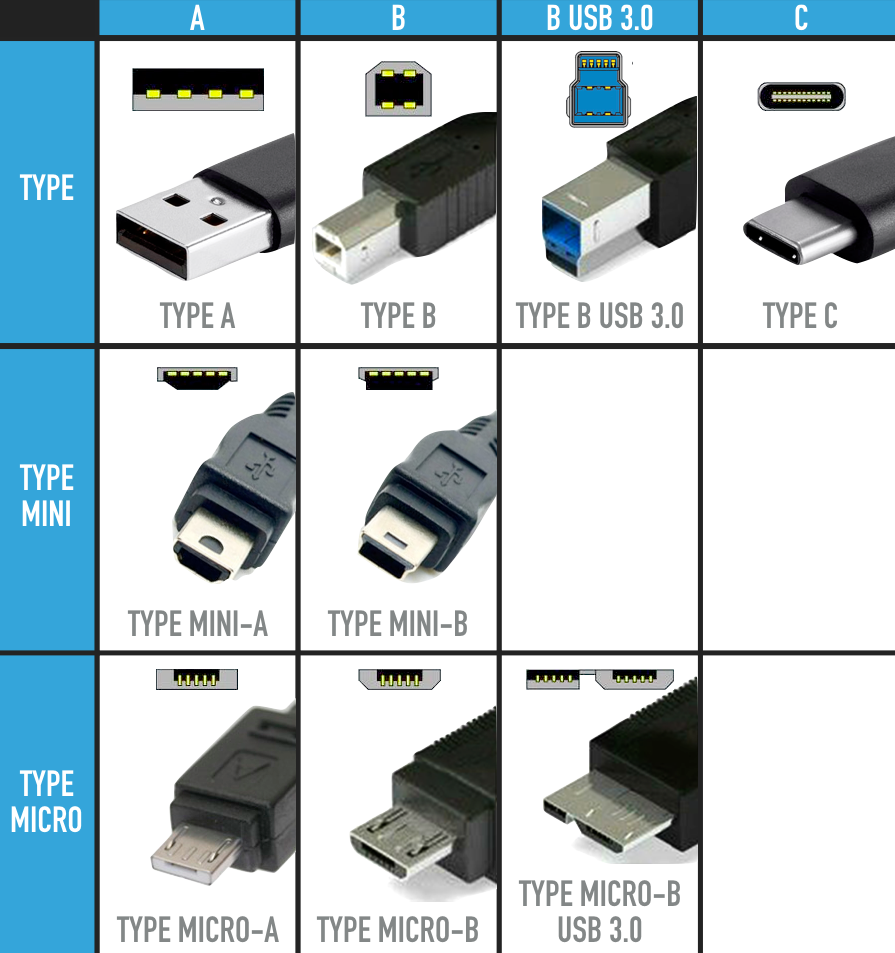
1.
Cable
----------------------------------------------
Reference: https://www.reddit.com/r/coolguides/comments/5zvu1w/i_redrew_the_usb_types_guide/
UsbType.png
----------------------------------------------
Reference: https://behind-the-scenes.net/using-serial-ports-for-communication/
SerialPort.jpg

----------------------------------------------
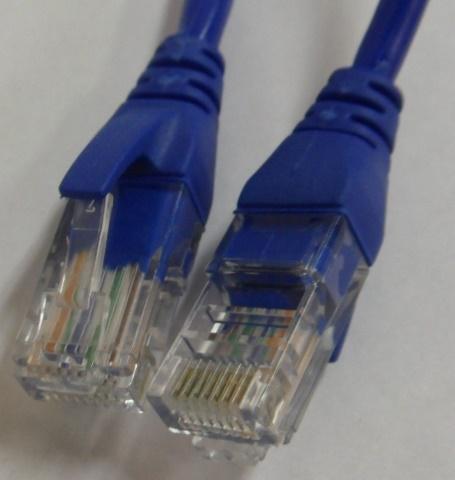
Reference: https://www.linortek.com/store/rj45-internet-cable/
Rj45InternetCable.jpg
------------------------------------------------------------------------------------------------------------------------------------
2.
Connect the Printer
There are 3 ways to connect the "Printer"
-------------------------------------------------------------------------------------------------------------------------
2.1.
1stWay - Connect by "UsbTypeBMale-UsbTypeAMale" cable.
"UsbTypeBMale" should connect to "Printer".
"UsbTypeAMale" should connect to "PosMachine".
-----------
In this case, you need to install the "driver" to the "PosMachine".
If you use
2ndWay - Connect by "SerialPortMale-SerialPortFemale" cable.
3rdWay - Connect by "Rj45InternetCable".
Then you don't need to install "driver".
Therefore, we don't recommend to use
1stWay - Connect by "UsbTypeBMale-UsbTypeAMale" cable.
-----------
Each "Printer" has different "Driver",
so I will not demonstrate how to install the "Drive" in this tutorial.
----------------------------------------------

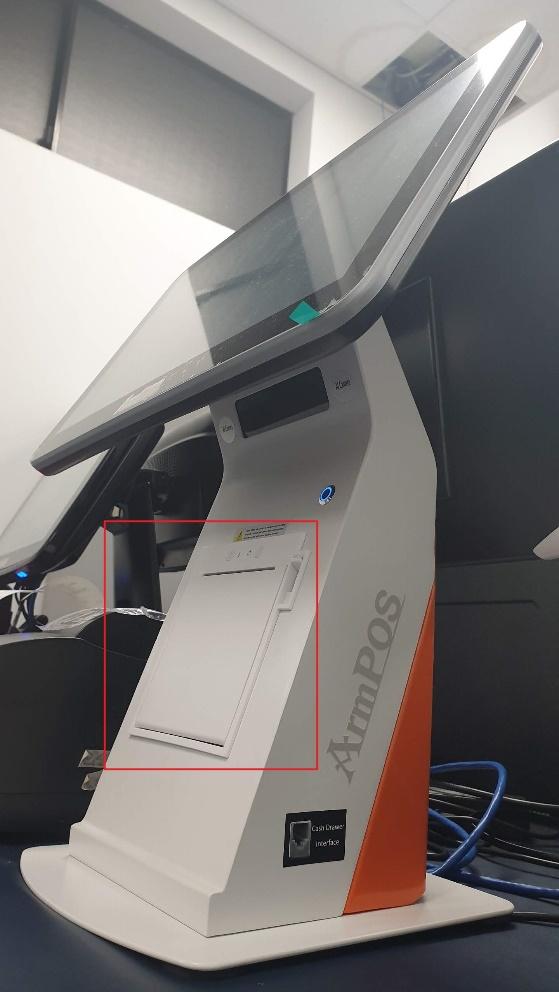
----------------------------------------------
Some of our "PosMachine" has included the "BuiltInPrinter".
In this case, you need to install the "Driver" to use the "BuiltInPrinter".
Each "Printer" has different "Driver",
so I will not demonstrate how to install the "Drive" in this tutorial.
-------------------------------------------------------------------------------------------------------------------------
2.2.
2ndWay - Connect by "SerialPortMale-SerialPortFemale" cable.
"SerialPortMale" should connect to "Printer".
"SerialPortFemale" should connect to "PosMachine".
In my case, "SerialPortFemale" was connected to "PosMachine-COM2".
----------------------------------------------

-------------------------------------------------------------------------------------------------------------------------
2.3.
3rdWay - Connect by "Rj45InternetCable".
"PosMachine" should connect to the "Switch" via "Rj45InternetCable".
"Printer" should connect to the "Switch" via "Rj45InternetCable".
Please note that you don't need "InternetConnection",
all you need is to connect all "Devices" to "Switch".
-----------
We highly recommend you connect all "Devices" through "Switch",
so "3rdWay - Connect by "Rj45InternetCable"" is the best way to connect the "Printer".
----------------------------------------------

------------------------------------------------------------------------------------------------------------------------------------
3.
SelfTestingPage
----------------------------------------------
We highly recommend you connect all "Devices" through "Switch",
so "3rdWay - Connect by "Rj45InternetCable"" is the best way to connect the "Printer".
-----------
Please turn off the "Printer",
and then hold the "Feed" button and turn on the "Printer".
It will print out the "SelfTestingPage".
In the "SelfTestingPage".
Please notice that the "BaudRate" of this "Printer" is "19200".
-----------
If you use the
3rdWay - Connect by "Rj45InternetCable".
Then it will tell you the "IpAddress".
In this case, the "IpAddress" is "192.168.0.206".
----------------------------------------------


----------------------------------------------

-------------------------------------------------------------------------------------------------------------------------------------------------
5. Printer Setup(Armpos)
-------------------------------------------------------------------------------------------------------------------------------------------------
Printer Setup(Armpos)
-------------------------------------------------------------------------------------------------------------------------------------------------
1.
Printer Setup(Armpos)
-------------------------------------------------------------------------------------------------------------------------
1.1.
C:\Program Files (x86)\CYEcrPC\PrinterConfig.xml
----------------------------------------------
<?xml version="1.0" standalone="yes"?>
<NewDataSet>
<xs:schema id="NewDataSet" xmlns="" xmlns:xs="http://www.w3.org/2001/XMLSchema" xmlns:msdata="urn:schemas-microsoft-com:xml-msdata">
<xs:element name="NewDataSet" msdata:IsDataSet="true" msdata:MainDataTable="CYPRN" msdata:UseCurrentLocale="true">
<xs:complexType>
<xs:choice minOccurs="0" maxOccurs="unbounded">
<xs:element name="CYPRN">
<xs:complexType>
<xs:sequence>
<xs:element name="PRN_NO" type="xs:short" minOccurs="0" />
<xs:element name="PRN_NAME" type="xs:string" minOccurs="0" />
<xs:element name="PRN_TYPE" type="xs:string" minOccurs="0" />
<xs:element name="PRN_IP" type="xs:string" minOccurs="0" />
<xs:element name="PRN_BAUDRATE" type="xs:int" minOccurs="0" />
<xs:element name="PRN_CUT" type="xs:boolean" minOccurs="0" />
<xs:element name="PRN_SPLIT" type="xs:boolean" minOccurs="0" />
<xs:element name="PRN_ID" type="xs:string" minOccurs="0" />
<xs:element name="USER_NAME" type="xs:string" minOccurs="0" />
<xs:element name="PRN_BEEP" type="xs:boolean" minOccurs="0" />
<xs:element name="PRN_MESSAGE" type="xs:boolean" minOccurs="0" />
</xs:sequence>
</xs:complexType>
</xs:element>
</xs:choice>
</xs:complexType>
</xs:element>
</xs:schema>
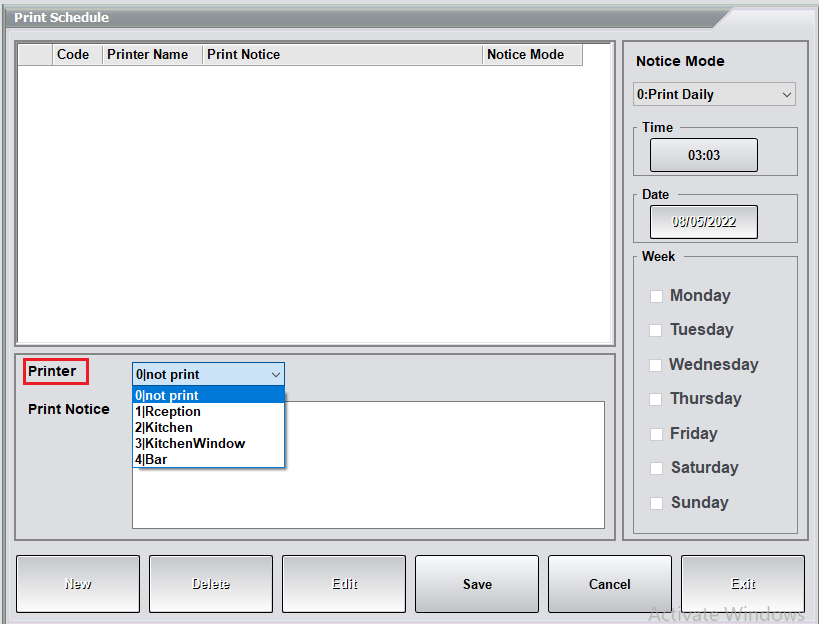
<CYPRN>
<PRN_NO>0</PRN_NO>
<PRN_NAME>not print</PRN_NAME>
<PRN_TYPE />
<PRN_IP>none</PRN_IP>
<PRN_BAUDRATE>0</PRN_BAUDRATE>
<PRN_CUT>false</PRN_CUT>
<PRN_SPLIT>false</PRN_SPLIT>
<PRN_ID>0</PRN_ID>
<USER_NAME />
<PRN_BEEP>false</PRN_BEEP>
<PRN_MESSAGE>false</PRN_MESSAGE>
</CYPRN>
<CYPRN>
<PRN_NO>1</PRN_NO>
<PRN_NAME>Rception</PRN_NAME>
<PRN_TYPE>GP-80250</PRN_TYPE>
<PRN_IP>192.168.0.206</PRN_IP>
<PRN_BAUDRATE>0</PRN_BAUDRATE>
<PRN_CUT>true</PRN_CUT>
<PRN_SPLIT>false</PRN_SPLIT>
<PRN_ID>0</PRN_ID>
<USER_NAME>ADMIN</USER_NAME>
<PRN_BEEP>false</PRN_BEEP>
<PRN_MESSAGE>true</PRN_MESSAGE>
</CYPRN>
<CYPRN>
<PRN_NO>2</PRN_NO>
<PRN_NAME>Kitchen</PRN_NAME>
<PRN_TYPE>GP-80250</PRN_TYPE>
<PRN_IP>192.168.0.206</PRN_IP>
<PRN_BAUDRATE>0</PRN_BAUDRATE>
<PRN_CUT>true</PRN_CUT>
<PRN_SPLIT>false</PRN_SPLIT>
<PRN_ID>0</PRN_ID>
<USER_NAME>ADMIN</USER_NAME>
<PRN_BEEP>false</PRN_BEEP>
<PRN_MESSAGE>true</PRN_MESSAGE>
</CYPRN>
<CYPRN>
<PRN_NO>3</PRN_NO>
<PRN_NAME>KitchenWindow</PRN_NAME>
<PRN_TYPE>GP-80250</PRN_TYPE>
<PRN_IP>192.168.0.206</PRN_IP>
<PRN_BAUDRATE>0</PRN_BAUDRATE>
<PRN_CUT>true</PRN_CUT>
<PRN_SPLIT>false</PRN_SPLIT>
<PRN_ID>0</PRN_ID>
<USER_NAME>ADMIN</USER_NAME>
<PRN_BEEP>false</PRN_BEEP>
<PRN_MESSAGE>true</PRN_MESSAGE>
</CYPRN>
<CYPRN>
<PRN_NO>4</PRN_NO>
<PRN_NAME>Bar</PRN_NAME>
<PRN_TYPE>GP-80250</PRN_TYPE>
<PRN_IP>192.168.0.206</PRN_IP>
<PRN_BAUDRATE>0</PRN_BAUDRATE>
<PRN_CUT>true</PRN_CUT>
<PRN_SPLIT>false</PRN_SPLIT>
<PRN_ID>0</PRN_ID>
<USER_NAME>ADMIN</USER_NAME>
<PRN_BEEP>false</PRN_BEEP>
<PRN_MESSAGE>true</PRN_MESSAGE>
</CYPRN>
</NewDataSet>
-------------------------------------------------------------------------------------------------------------------------
1.2.
PrinterOptions - AutoCut, Auto Split, Beep
----------------------------------------------
Manage
-->
Basic Tab
Printer Setup
Enable "PrintMessage"
-----------
------------------------------------------------------------------------------------------------------------------------------------
2.
Connect the Printer
There are 3 ways to connect the "Printer"
-------------------------------------------------------------------------------------------------------------------------
2.1.
1stWay - Connect by "UsbTypeBMale-UsbTypeAMale" cable.
"UsbTypeBMale" should connect to "Printer".
"UsbTypeAMale" should connect to "PosMachine".
-----------
In this case, you need to install the "driver" to the "PosMachine".
If you use
2ndWay - Connect by "SerialPortMale-SerialPortFemale" cable.
3rdWay - Connect by "Rj45InternetCable".
Then you don't need to install "driver".
Therefore, we don't recommend to use
1stWay - Connect by "UsbTypeBMale-UsbTypeAMale" cable.
-----------
Each "Printer" has different "Driver",
so I will not demonstrate how to install the "Drive" in this tutorial.
----------------------------------------------
----------------------------------------------
Some of our "PosMachine" has included the "BuiltInPrinter".
In this case, you need to install the "Driver" to use the "BuiltInPrinter".
Each "Printer" has different "Driver",
so I will not demonstrate how to install the "Drive" in this tutorial.
----------------------------------------------
In this case,
I assume you have already installed the "Driver"for one of our "BuiltInPrinter"
Please add the following "printers"
----------------------------
1stPrinter
"printer code" was automatically generated.
Printer name :
no print
Printer Type :
Printer interface :
none
BaudRate :
0
Auto Cut : False
Auto Split : False
Beep : False
Print Message : False
"Operator" was automatically filled.
----------------------------
2ndPrinter
"printer code" was automatically generated.
----
Printer name :
POS80v2.0
----
Printer Type :
Driver Print
If the "Printer" was connect by "Driver"
In this case, please select "POS80v2.0" as "Printer name" for your "ArmposHospitality".
In this case, please select "Driver Print" as "Printer Type" for your "ArmposHospitality".
----
Printer interface :
USB
Please note after you selected "POS80v2.0" as "Printer name" for your "ArmposHospitality".
and after you selected "Driver Print" as "Printer Type" for your "ArmposHospitality".
Then the "Printer interface" would be automatically set to "USB".
----
BaudRate :
0
----
Auto Cut : False
If the "Printer" was connect by "Driver",
then "ArmposHospitality" could not set up "AutoCut" and "Beep".
You have to use "DriverSetting" to set up "AutoCut" and "Beep".
----
Auto Split : False
Beep : False
Print Message : True
"Operator" was automatically filled.
----
Please note that the "BuiltInPrinter" does not allow you to set "AutoCut" and "Beep".
We always use the "BuiltInPrinter" as the "RceptionPrinter".
----------------------------


-------------------------------------------------------------------------------------------------------------------------
2.2.
2ndWay - Connect by "SerialPortMale-SerialPortFemale" cable.
"SerialPortMale" should connect to "Printer".
"SerialPortFemale" should connect to "PosMachine".
In my case, "SerialPortFemale" was connected to "PosMachine-COM2".
----------------------------------------------
----------------------------------------------
SelfTestingPage
-----------
We highly recommend you connect all "Devices" through "Switch",
so "3rdWay - Connect by "Rj45InternetCable"" is the best way to connect the "Printer".
-----------
Please turn off the "Printer",
and then hold the "Feed" button and turn on the "Printer".
It will print out the "SelfTestingPage".
In the "SelfTestingPage".
Please notice that the "BaudRate" of this "Printer" is "19200".
-----------
If you use the
3rdWay - Connect by "Rj45InternetCable".
Then it will tell you the "IpAddress".
In this case, the "IpAddress" is "192.168.0.206".
----------------------------------------------
----------------------------------------------
Please add the following "printers"
----------------------------
1stPrinter
"printer code" was automatically generated.
Printer name :
no print
Printer Type :
Printer interface :
none
BaudRate :
0
Auto Cut : False
Auto Split : False
Beep : False
Print Message : False
"Operator" was automatically filled.
----------------------------
2ndPrinter
"printer code" was automatically generated.
----
Printer name :
Rception
----
Printer Type :
GP-80250
Please note that the "GP-80250" is the "PrinterType" of the default printer of the"ArmposHospitality".
----
Printer interface :
Com2
Please note, in my case, the "SerialPortFemale" was connected to "PosMachine-COM2".
----
BaudRate :
19200
Please note, if you used the "SerialPortMale" to connect to the "Printer",
then you should also provide the "BaudRate".
Please turn off the "Printer",
and then hold the "Feed" button and turn on the "Printer".
It will print out the "SelfTestingPage".
In the "SelfTestingPage".
Please notice that the "BaudRate" of this "Printer" is "19200".
----
Auto Cut : True
Auto Split : False
Beep : False
Print Message : True
"Operator" was automatically filled.
----------------------------
3rdPrinter
"printer code" was automatically generated.
----
Printer name :
Kitchen
----
Printer Type :
GP-80250
Please note that the "GP-80250" is the "PrinterType" of the default printer of the"ArmposHospitality".
----
Printer interface :
Com2
Please note, in my case, the "SerialPortFemale" was connected to "PosMachine-COM2".
----
BaudRate :
19200
Please note, if you used the "SerialPortMale" to connect to the "Printer",
then you should also provide the "BaudRate".
Please turn off the "Printer",
and then hold the "Feed" button and turn on the "Printer".
It will print out the "SelfTestingPage".
In the "SelfTestingPage".
Please notice that the "BaudRate" of this "Printer" is "19200".
----
Auto Cut : True
Auto Split : False
Beep : False
Print Message : True
"Operator" was automatically filled.
----------------------------
4thPrinter
"printer code" was automatically generated.
----
Printer name :
KitchenWindow
----
Printer Type :
GP-80250
Please note that the "GP-80250" is the "PrinterType" of the default printer of the"ArmposHospitality".
----
Printer interface :
Com2
Please note, in my case, the "SerialPortFemale" was connected to "PosMachine-COM2".
----
BaudRate :
19200
Please note, if you used the "SerialPortMale" to connect to the "Printer",
then you should also provide the "BaudRate".
Please turn off the "Printer",
and then hold the "Feed" button and turn on the "Printer".
It will print out the "SelfTestingPage".
In the "SelfTestingPage".
Please notice that the "BaudRate" of this "Printer" is "19200".
----
Auto Cut : True
Auto Split : False
Beep : False
Print Message : True
"Operator" was automatically filled.
----------------------------
5thPrinter
"printer code" was automatically generated.
----
Printer name :
BarPrinter
----
Printer Type :
GP-80250
Please note that the "GP-80250" is the "PrinterType" of the default printer of the"ArmposHospitality".
----
Printer interface :
Com2
Please note, in my case, the "SerialPortFemale" was connected to "PosMachine-COM2".
----
BaudRate :
19200
Please note, if you used the "SerialPortMale" to connect to the "Printer",
then you should also provide the "BaudRate".
Please turn off the "Printer",
and then hold the "Feed" button and turn on the "Printer".
It will print out the "SelfTestingPage".
In the "SelfTestingPage".
Please notice that the "BaudRate" of this "Printer" is "19200".
----
Auto Cut : True
Auto Split : False
Beep : False
Print Message : True
"Operator" was automatically filled.
----------------------------


-------------------------------------------------------------------------------------------------------------------------
2.3.
3rdWay - Connect by "Rj45InternetCable".
"PosMachine" should connect to the "Switch" via "Rj45InternetCable".
"Printer" should connect to the "Switch" via "Rj45InternetCable".
Please note that you don't need "InternetConnection",
all you need is to connect all "Devices" to "Switch".
-----------
We highly recommend you connect all "Devices" through "Switch",
so "3rdWay - Connect by "Rj45InternetCable"" is the best way to connect the "Printer".
----------------------------------------------
----------------------------------------------
SelfTestingPage
-----------
We highly recommend you connect all "Devices" through "Switch",
so "3rdWay - Connect by "Rj45InternetCable"" is the best way to connect the "Printer".
-----------
Please turn off the "Printer",
and then hold the "Feed" button and turn on the "Printer".
It will print out the "SelfTestingPage".
In the "SelfTestingPage".
Please notice that the "BaudRate" of this "Printer" is "19200".
-----------
If you use the
3rdWay - Connect by "Rj45InternetCable".
Then it will tell you the "IpAddress".
In this case, the "IpAddress" is "192.168.0.206".
----------------------------------------------
----------------------------------------------
Please add the following "printers"
----------------------------
1stPrinter
"printer code" was automatically generated.
Printer name :
no print
Printer Type :
Printer interface :
none
BaudRate :
0
Auto Cut : False
Auto Split : False
Beep : False
Print Message : False
"Operator" was automatically filled.
----------------------------
2ndPrinter
"printer code" was automatically generated.
Printer name :
Rception
Printer Type :
GP-80250
Please note that the "GP-80250" is the "PrinterType" of the default printer of the"ArmposHospitality".
Printer interface :
192.168.0.206
BaudRate :
0
Auto Cut : True
Auto Split : False
Beep : False
Print Message : True
"Operator" was automatically filled.
----------------------------
3rdPrinter
"printer code" was automatically generated.
Printer name :
Kitchen
Printer Type :
GP-80250
Please note that the "GP-80250" is the "PrinterType" of the default printer of the"ArmposHospitality".
Printer interface :
192.168.0.206
BaudRate :
0
Auto Cut : True
Auto Split : False
Beep : False
Print Message : True
"Operator" was automatically filled.
----------------------------
4thPrinter
"printer code" was automatically generated.
Printer name :
KitchenWindow
Printer Type :
GP-80250
Please note that the "GP-80250" is the "PrinterType" of the default printer of the"ArmposHospitality".
Printer interface :
192.168.0.206
BaudRate :
0
Auto Cut : True
Auto Split : False
Beep : False
Print Message : True
"Operator" was automatically filled.
----------------------------
5thPrinter
"printer code" was automatically generated.
Printer name :
BarPrinter
Printer Type :
GP-80250
Please note that the "GP-80250" is the "PrinterType" of the default printer of the"ArmposHospitality".
Printer interface :
192.168.0.206
BaudRate :
0
Auto Cut : True
Auto Split : False
Beep : False
Print Message : True
"Operator" was automatically filled.
----------------------------
-------------------------------------------------------------------------------------------------------------------------------------------------
6. "PosMachine-PrinterSetting" - Parameters - Assign Printer for "Checklist,Receipt,Invoice"
-------------------------------------------------------------------------------------------------------------------------------------------------
Assign Printer for "Checklist,Receipt,Invoice"
-------------------------------------------------------------------------------------------------------------------------------------------------
0.
PrinterSummary
-------------------------------------------------------------------------------------------------------------------------
0.1.
The following are xml files from "04_01_20220403_CoffeeBubbleTeaBugger_InArmpos_Xml_Printer_Kds" folder.
It has already contains all settings,
you don't really have to do anything.
----------------------------------------------
C:\Program Files (x86)\CYEcrPC\CYEcr.xml
C:\Program Files (x86)\CYEcrPC\PrinterConfig.xml
-----------
C:\Program Files (x86)\CYEcrPC\Data\CYEcrBackUp.xml
C:\Program Files (x86)\CYEcrPC\Data\GridColumns.xml
C:\Program Files (x86)\CYEcrPC\Data\SecondDisplayGridColumns.xml
C:\Program Files (x86)\CYEcrPC\Data\SMTPS.XML
C:\Program Files (x86)\CYEcrPC\Data\text.txt
-------------------------------------------------------------------------------------------------------------------------
0.2.
PrinterSummary
----------------------------------------------
"Parameters-PrintSetting-BillPrinter" - Receipt
"Parameters-PrintSetting-InvoicePrinter" - Invoice
(Red)"MenuSetup-Item-Printer" - JobList
(Brown)"MenuSetup-Item-PrinterSplitCheckList" - Enble
"Parameters-PrintSetting-CheckListPrinter1" - CheckList
----------------------------------------------
"Parameters-PrintSetting-BillPrinter" is the printer that print out the "Receipt".
E.g. Reception
-----------
"Parameters-PrintSetting-InvoicePrinter" is the printer that print out the "Invoice".
The "Invoice" is the "Receipt" with "ABN"(Australia Business Number).
E.g. Reception
-----------
"Manage-MenuSetup-Item-Printer" is the printer that print out the "Joblist".
E.g. Kitchen
-----------
"Parameters-PrintSetting-CheckListPrinter1" is the printer that print out the "CheckList".
E.g. KitchenWindow
----------------------------------------------
------------------------------------------------------------------------------------------------------------------------------------
1.
One "Restaurant" should have many "printers"
The "Printer" of the "Armpos Hospitality" have a few things to print.
-------------------------------------------------------------------------------------------------------------------------
1.1.
"RceptionPrinter" - "Receipt, Invoice, PrintMessage"
----------------------------------------------
After the customer paid the "CustomerOrder",
the "RceptionPrinter" should print out the "Receipt' for the customer.
The "Invoice" is the "Receipt" with "ABN"(Australia Business Number).
Some customers need the "Invoice" for the "TaxPurpose".
-----------
"Parameters-PrintSetting-BillPrinter" is the printer that print out the "Receipt".
E.g. Reception
-----------
"Parameters-PrintSetting-InvoicePrinter" is the printer that print out the "Invoice".
The "Invoice" is the "Receipt" with "ABN"(Australia Business Number).
E.g. Reception
-----------
"LeftHandSide" is what you will see in "Receipt"
"RightHandSide" is what you will see in "Invoice"
----------------------------------------------
Manage
-->
Basic Tab
Parameters
-->
Print Setting
"Parameters-PrintSetting-BillPrinter" - Receipt
"Parameters-PrintSetting-InvoicePrinter" - Invoice
----------------------------
-------------------------------------------------------------------------------------------------------------------------
1.2.
"KitchenPrinter" - "Joblist, PrintMessage"
----------------------------------------------
After the customer made a order,
then the "KitchenPrinter" should print out the "Joblist"
which could tell the "chef" what to cook.
-----------
After the "chef" made "dishes" for the "CustomerOrder",
the "chef" should strike-through that "dishes" from the "Joblist".
-----------
"Manage-MenuSetup-Item-Printer" is the printer that print out the "Joblist".
E.g. Kitchen
----------------------------------------------
Manage
-->
Basic Tab
Menu Setup
-->
Select your "Item"
Click "Edit"
-->
(Red)"MenuSetup-Item-Printer" - JobList
----------------------------
-------------------------------------------------------------------------------------------------------------------------
1.3.
"KitchenWindowPrinter" - "Checklist, PrintMessage"
----------------------------------------------
After the customer made a order,
then the "KitchenPrinter" should print out the "Joblist"
which could tell the "chef" what to cook.
-----------
After the customer made a order,
then the "KitchenWindowPrinter" should also print out the "Checklist" for all "Dishes"
which tell the "waitress" or "waiter" what they were going to deliver to customers.
-----------
After the "chef" made a "dish" for the "CustomerOrder",
the "chef" should strike-through that individual "dish" from the "Joblist" on the "Kds"(KitchenDisplayScreen).
then the "KitchenWindowPrinter" should print out the "Checklist" for that individual "dish"
which remind the "waitress" or "waiter" that individual "dish" was ready to deliver.
-----------
"Parameters-PrintSetting-CheckListPrinter1" is the printer that print out the "CheckList".
E.g. KitchenWindow
----------------------------------------------
Manage
-->
Basic Tab
Parameters
-->
Print Setting
"CheckListPrinter1"
-----------
After the customer made a order,
then the "KitchenWindowPrinter" should also print out the "Checklist" for all "Dishes"
which tell the "waitress" or "waiter" what they were going to deliver to customers.
-----------
"Parameters-PrintSetting-CheckListPrinter1" - CheckList
----------------------------
----------------------------------------------
After the "chef" made a "dish" for the "CustomerOrder",
the "chef" should strike-through that individual "dish" from the "Joblist" on the "Kds"(KitchenDisplayScreen).
then the "KitchenWindowPrinter" should print out the "Checklist" for that individual "dish"
which remind the "waitress" or "waiter" that individual "dish" was ready to deliver.
-----------
In "Kds-KdsSetting"
Your "Kds" need to connect to the "Printer" of the "KitchenWindow"
However, I will not demonstrate the "Kds-KdsSetting".
-----------
In "PosMachine-KdsSetting"
Your "PosMachine" need to connect to the "Printer" of the "KitchenWindow".
However, you need to enable "PrintSplitCheckList" for each "Item"
-----------
(Red)"MenuSetup-Item-Printer" - JobList
(Brown)"MenuSetup-Item-PrinterSplitCheckList" - Enble
----------------------------
-------------------------------------------------------------------------------------------------------------------------
1.4.
"BarPrinter" - "Joblist, Checklist, Receipt, Invoice, PrintMessage"
----------------------------------------------
In this tutorial, we will not demonstrate the "BarPrinter",
but we will introduce the "BarPrinter" only a little bit.
-----------
Situation1
The independent "Bar".
In most "Bars", "Bar" only has one "BarPrinter"
which should print out "Joblist, Checklist, Receipt, Invoice, PrintMessage".
-----------
Situation2
Some "Restaurants" has a "Bar".
In this case, we might still use "Situation1" for the independent "BarPosMachine".
Otherwise, the "BarPrinter" should only print the "Joblist"
------------------------------------------------------------------------------------------------------------------------------------
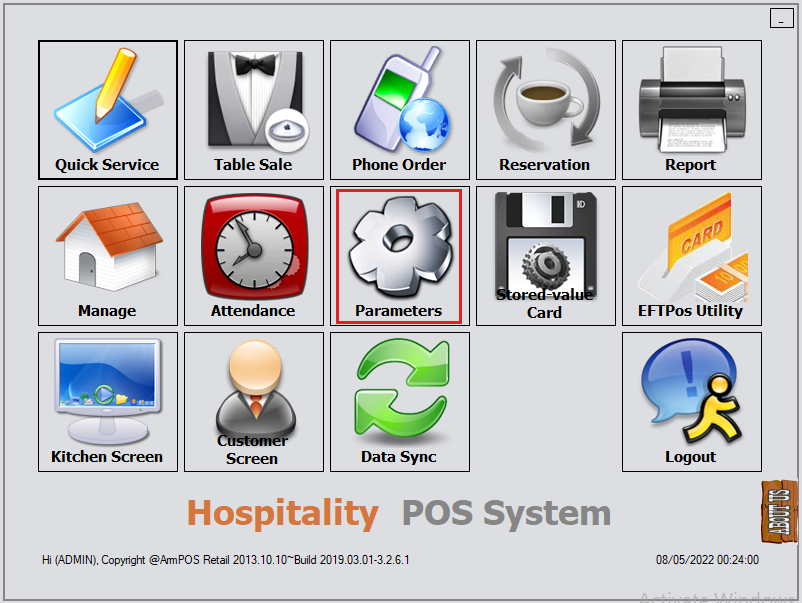
2.
Manage
-->
Basic Tab
Parameters
-->
Profile
----------------------------------------------

------------------------------------------------------------------------------------------------------------------------------------
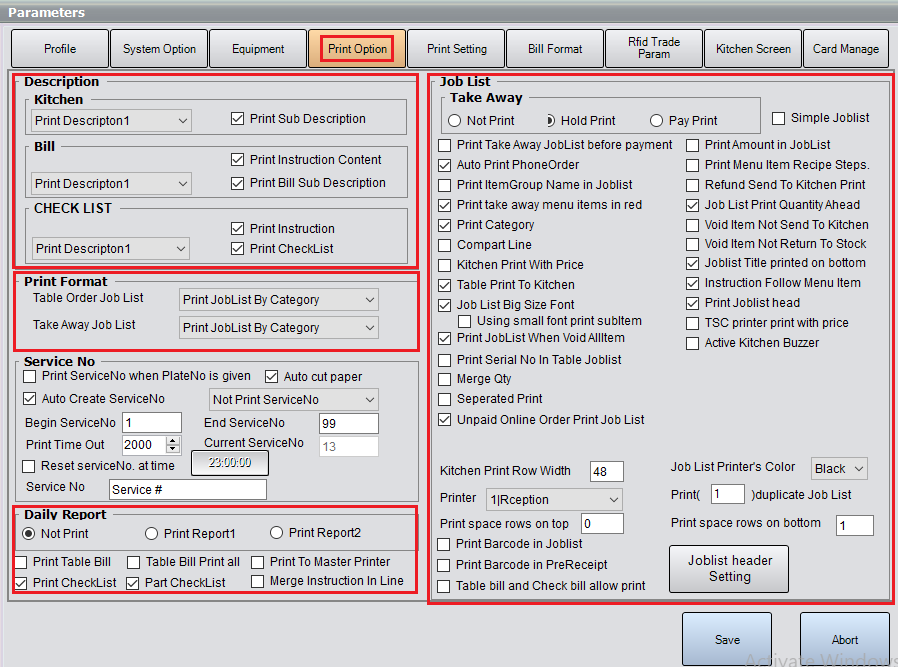
3.
Manage
-->
Basic Tab
Parameters
-->
Print Option
----------------------------------------------
------------------------------------------------------------------------------------------------------------------------------------
4.
Manage
-->
Basic Tab
Parameters
-->
Bill Format
----------------------------------------------

-------------------------------------------------------------------------------------------------------------------------------------------------
7. Assign Printer for "Joblist"
7.1. "PosMachine-PrinterSetting"
7.1.1. "PosMachine-PrinterSetting" - MenuSetup
-------------------------------------------------------------------------------------------------------------------------------------------------
"PosMachine-PrinterSetting" - MenuSetup
-------------------------------------------------------------------------------------------------------------------------------------------------
1.
"PosMachine-PrinterSetting" - MenuSetup - Assign Printer to 1 Item
----------------------------------------------
"KitchenPrinter" - "Joblist, PrintMessage"
----------------------------------------------
After the customer made a order,
then the "KitchenPrinter" should print out the "Joblist"
which could tell the "chef" what to cook.
-----------
After the "chef" made "dishes" for the "CustomerOrder",
the "chef" should strike-through that "dishes" from the "Joblist".
-----------
"Manage-MenuSetup-Item-Printer" is the printer that print out the "Joblist".
E.g. Kitchen
----------------------------------------------
Manage
-->
Basic Tab
Menu Setup
-->
Select your "Item"
Click "Edit"
-->
(Red)"MenuSetup-Item-Printer" - JobList
----------------------------
------------------------------------------------------------------------------------------------------------------------------------
2.
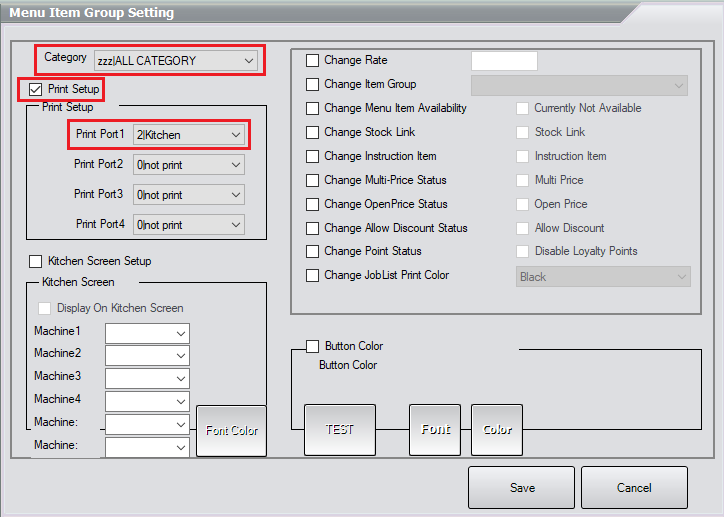
"PosMachine-PrinterSetting" - MenuSetup - Assign Printer to all Items
----------------------------------------------
"KitchenPrinter" - "Joblist, PrintMessage"
----------------------------------------------
After the customer made a order,
then the "KitchenPrinter" should print out the "Joblist"
which could tell the "chef" what to cook.
-----------
After the "chef" made "dishes" for the "CustomerOrder",
the "chef" should strike-through that "dishes" from the "Joblist".
-----------
"Manage-MenuSetup-Item-Printer" is the printer that print out the "Joblist".
E.g. Kitchen
----------------------------------------------
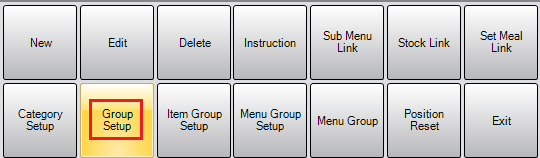
Manage
-->
Basic Tab
Menu Setup
-->
Group Setup
-->
Select "AllCategory"
Enable "PrintSetup"
Select "Kitchen" as "PrintPort1"
----------------------------------------------
-------------------------------------------------------------------------------------------------------------------------------------------------
8. "KdsSetting"(KitchenDisplayScreen)
8.1. "Kds-KdsSetting"
-------------------------------------------------------------------------------------------------------------------------------------------------
"Kds-KdsSetting"
-------------------------------------------------------------------------------------------------------------------------------------------------
1.
"Kds-KdsSetting"
----------------------------------------------
The following files in "04_01_20220403_CoffeeBubbleTeaBugger_InKds_Xml"
is the "KdsSetting" in "KitchenDisplayScreeScreen"(KDS) for this tutorial sample.
In this tutorial, we would not introduce the "KdsSetting" in "KitchenDisplayScreeScreen"(KDS),
because our engineers would help you set up the "KdsSetting" in "KitchenDisplayScreeScreen"(KDS).
But you still need to learn "KdsSetting" in your "PosMachine".
----------------------------------------------
C:\Program Files (x86)\CYEcrPC\CYEcr.xml
C:\Program Files (x86)\CYEcrPC\PrinterConfig.xml
-----------
C:\Program Files (x86)\CYEcrPC\Data\CYEcrBackUp.xml
C:\Program Files (x86)\CYEcrPC\Data\GridColumns.xml
C:\Program Files (x86)\CYEcrPC\Data\SecondDisplayGridColumns.xml
C:\Program Files (x86)\CYEcrPC\Data\SMTPS.XML
C:\Program Files (x86)\CYEcrPC\Data\text.txt
------------------------------------------------------------------------------------------------------------------------------------
2.
In "Kds-KdsSetting"
Manage
-->
Basic Tab
Parameters
-->
Equipment
Remember "MachineId"
----------------------------
Please remember this "MachineId" of the "Kds-KdsSetting"(KitchenDisplayScreen),
We need to key-in this "MachineId" into "PosMachine-KdsSetting"
in order to let the specific "PosMachine" match the specific "Kds".
-----------
In this case, it is "K001" as the "MachineId"
----------------------------------------------

------------------------------------------------------------------------------------------------------------------------------------
3.
In "Kds-KdsSetting"
Manage
-->
Basic Tab
Parameters
-->
Kitchen Screen
----------------------------
-------------------------------------------------------------------------------------------------------------------------------------------------
8.2. "PosMachine-KdsSetting"
8.2.1. "PosMachine-KdsSetting" - Parameters
-------------------------------------------------------------------------------------------------------------------------------------------------
"PosMachine-KdsSetting" - Parameters
-------------------------------------------------------------------------------------------------------------------------------------------------
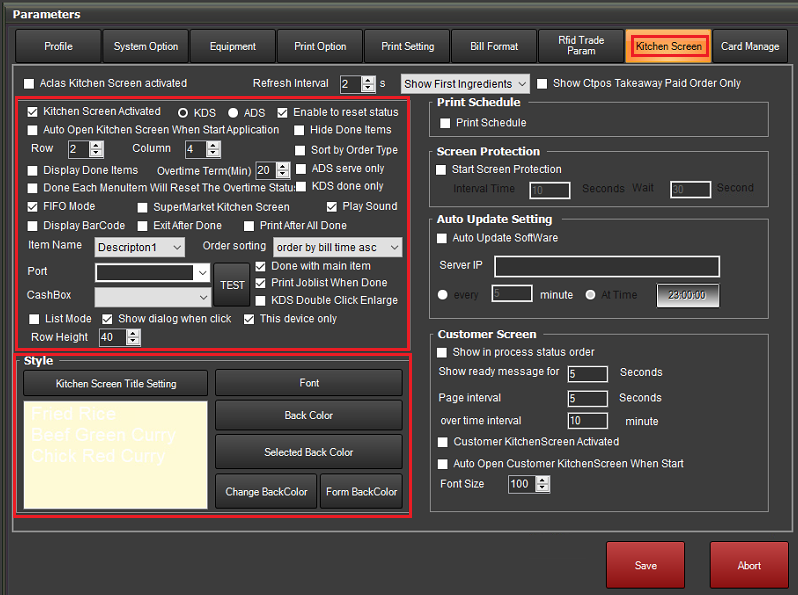
1.
In "PosMachine-KdsSetting"
Manage
-->
Basic Tab
Parameters
-->
Print Option
-->
Kitchen Screen
Enabled "KitchenScreenActivated".
----------------------------------------------

-------------------------------------------------------------------------------------------------------------------------------------------------
8.2.2. "PosMachine-KdsSetting" - MenuSetup
-------------------------------------------------------------------------------------------------------------------------------------------------
"PosMachine-KdsSetting" - MenuSetup
-------------------------------------------------------------------------------------------------------------------------------------------------
1.
"PosMachine-KdsSetting" - MenuSetup - Assign "Kds" to Items
We can assign "Kds" to all items or single item.
Please assign "Kds" to all items.
I will still show you how to assign "Kds" to single item.
----------------------------
Revise
In "Kds-KdsSetting"
Manage
-->
Basic Tab
Parameters
-->
Equipment
Remember "MachineId"
-----------
Please remember this "MachineId" of the "Kds-KdsSetting"(KitchenDisplayScreen),
We need to key-in this "MachineId" into "PosMachine-KdsSetting"
in order to let the specific "PosMachine" match the specific "Kds".
-----------
In this case, it is "K001" as the "MachineId"
-------------------------------------------------------------------------------------------------------------------------
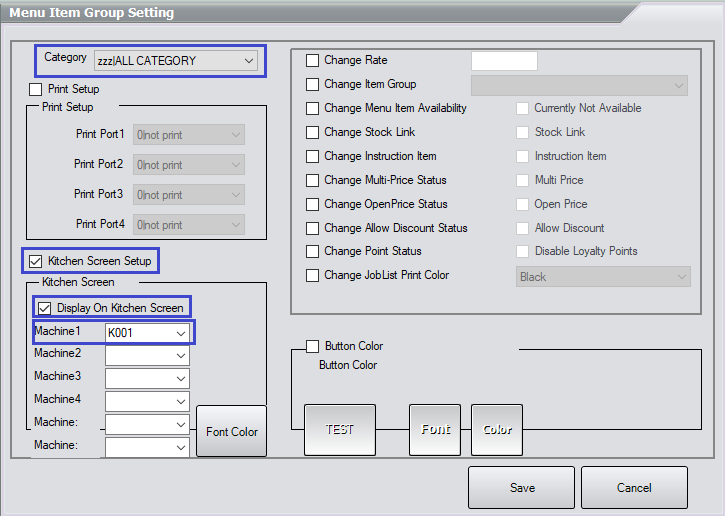
1.1.
"PosMachine-KdsSetting" - MenuSetup - Assign "Kds" to all Items
----------------------------------------------
In "PosMachine-KdsSetting"
Manage
-->
Basic Tab
Menu Setup
-->
Group Setup
-->
Select "AllCategory"
Enable "KitchenScreenSetup"
Enable "DisplayOnKitchenScreen"
Enter "K001" as "Machine1"
----------------------------------------------
-------------------------------------------------------------------------------------------------------------------------
1.2.
"PosMachine-KdsSetting" - MenuSetup - Assign "Kds" to 1 Item
----------------------------------------------
In "PosMachine-KdsSetting"
Manage
-->
Basic Tab
Menu Setup
-->
Select your "Item"
Click "Edit"
-->
(Blue)"MenuSetup-Item-DisplayOnKitchenScreen" - KdsMachineId
(Brown)"MenuSetup-Item-PrinterSplitCheckList" - Enble
----------------------------------------------
"PosMachine-KdsSetting" - MenuSetup - Assign "Kds" to 1 Item
-----------
(Blue)"MenuSetup-Item-DisplayOnKitchenScreen" - KdsMachineId
Enter "K001" as "Machine1"
-----------
"BuilkEnable-PrintSplitCheckList" function of "ArmposHospitality" is still under develop.
Thus, please enable "PrintSplitCheckList" seperately.
----------------------------------------------
Revise
After the "chef" made a "dish" for the "CustomerOrder",
the "chef" should strike-through that individual "dish" from the "Joblist" on the "Kds"(KitchenDisplayScreen).
then the "KitchenWindowPrinter" should print out the "Checklist" for that individual "dish"
which remind the "waitress" or "waiter" that individual "dish" was ready to deliver.
-----------
In "Kds-KdsSetting"
Your "Kds" need to connect to the "Printer" of the "KitchenWindow"
However, I will not demonstrate the "Kds-KdsSetting".
-----------
In "PosMachine-KdsSetting"
Your "PosMachine" need to connect to the "Printer" of the "KitchenWindow".
However, you need to enable "PrintSplitCheckList" for each "Item"
-----------
(Red)"MenuSetup-Item-Printer" - JobList
(Brown)"MenuSetup-Item-PrinterSplitCheckList" - Enble
----------------------------------------------
-------------------------------------------------------------------------------------------------------------------------------------------------


Comments
Post a Comment